East Meets West: Green Tea Cheesecake

green tea cheesecake

Cheesecake is a simple combination of creamy cheese, sugar and eggs. But this common custard (yes, technically it’s not a cake) also has endless varieties. There’s the Creamy: a silky smooth filling that’s baked in a waterbath. Then there’s the New Yorker: a dense, slightly crumbly “cake” with browned edges. There’s also the No-Bake: the cheese sets up in the fridge to resemble mousse. And the Italian: the original cheesecake is made with mealy ricotta.

Up until this year’s Chinese New Year party, there was one last cheesecake I hadn’t tried: the Japanese. Japanese-style cheesecake is almost a misnomer, since it’s part cheesecake, sponge cake, and souffle. My favorite cheesecake is the New York-style, but for those who think traditional cheesecake is dairy overkill, Japanese cheesecake is a good alternative. The tiny air bubbles lighten the cake, but you can still get the cream cheese flavor. As with most Asian desserts, it’s also less sweet than its Western counterpart.

I’ve been craving this novelty ever since trying Fay Da Bakery‘s Japanese cheesecake (and I don’t even like sponge cake!). And green tea’s all the rage at Panya Bakery in the East Village. My friends love their green tea tiramisu and green tea pineapple bun (there’s no pineapple in the bun–the crumbly topping just resembles the fruit). My roommate even suggested that I make green tea filling for my macaroons.

So for my friend Diane’s birthday, I decided to make green tea Japanese-style cheesecake. I adapted a plain Cotton Soft Japanese Cheesecake recipe from Irene at the Diana’s Desserts forum. This is a developing recipe, since Irene posted the recipe with UK measurements. The British bake by weight, rather than us sloppy Americans, who bake by volume. Volume is less exact, because people tend to cram as much flour as they can into a cup. (You’re really supposed to aearate the flour, scoop it into a cup, and level the top off without shaking it.) Improper measuring results in a dense, dry cake.

I steeped four tea bags into the batter and found there was no green tea flavor. So I finely processed the leaves from another bag and added it straight to the batter. The green tea flavor emerged, but it wasn’t as strong as I would have liked. So I estimate that six green tea bags is good.

Also, the original called for corn flour. In the U.S., corn flour is finely processed corn meal (the stuff in corn bread). However, in the U.K., corn flour is corn starch. They’re two completely different things! I used corn flour but got clumps. I think I was supposed to use corn starch.

Green Tea Japanese Cheesecake
Adapted from Irene’s Cotton Soft Japanese Cheesecake recipe

140g (2/3 cup) fine granulated sugar
6 egg whites
6 egg yolks
Hint: Eggs separate easier when they’re cold, but the whites whip better at room temperature.
1/4 tsp cream of tartar or 1/2 tsp white vinegar or 1/2 tsp lemon juice
100 ml (3/8 cup) milk
6 green tea bags
50g (1/2 stick) butter
250g (1 8-oz. package + 1 tbsp) cream cheese
1 tbsp lemon juice
60g (3/7 cup) cake flour
Hint: 1 cup cake flour equals 1 cup minus 2 tablespoons all-purpose flour, plus 2 tablespoons cornstarch.
20g (1/4 cup) corn starch
1/4 tsp salt

Preheat oven to 325 F. Lightly grease and line the bottom and sides of an 8-inch round cake pan with greaseproof baking paper or parchment paper. If using a springform pan, line the outside with foil so the batter doesn’t leak out.

Scald the milk in a saucepan, preferably to 180 F. Do not let the milk boil, or it will make the tea bitter. Pour the milk in a cup and steep the tea for for 2-3 minutes. Remove the tea bags and squeeze out as much liquid as possible.

Melt cream cheese, butter and milk-tea mixture over a double boiler. Cool the mixture.

Combine the flour, corn starch and salt in a small bowl.

To the cream cheese mixture, fold in the flour mixture, egg yolks, 1 tbsp lemon juice and mix until smooth. If lumps remain at this stage, they will not come out later.

batter

Beat egg whites with cream of tartar (or vinegar or lemon juice) until foamy. Add in the sugar and beat until soft peaks form.

Lighten the cheese mixture by mixing it with 1/3 of the egg white mixture.

Add the rest of the egg white mixture to the cheese mixture and gently fold. The batter should be well combined.

Bake cheesecake in a water bath (the water should be warm but not boiling) for 1 hour and 10 minutes or until set and golden brown on top.

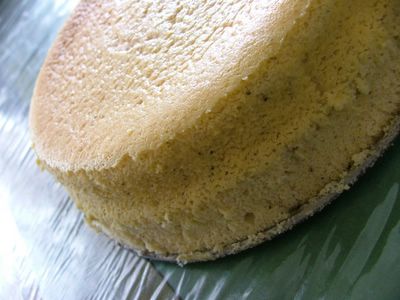
whole cheesecake

My cheesecake came out wondrously smooth and puffy. Then it pulled away from the sides of the pan, and the top wrinkled as the cake shrunk.

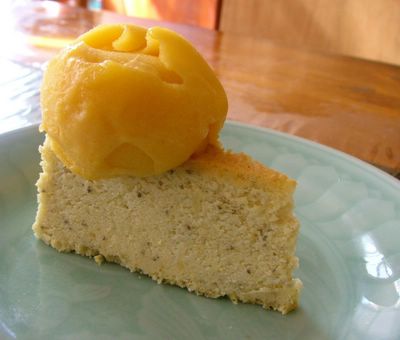
Serving suggestion: garnish with a scoop of lychee sherbet (my favorite combination!), red bean ice cream, green tea ice cream, or mango sorbet (pictured).

mango sorbet with green tea cheesecake

This cake was subtly sweet and lightly buttery/cheesy. It wasn’t as good as Fay Da’s (I got more crumbs than spongy bubbles), but I think it’s because I accidentally used corn flour instead of corn starch.

Comments (7)      Email Email      Print Print

Rice is nice

As a demonstration on how to be the most popular person in the office, a co-worker brought in homemade rice pudding today. We showered him with praise, of course. There was creamy pudding, soft rice and just a bit of tartness. It was even better than Alice Medrich?s (my favorite cookbook author) recipe for rice pudding.

But the cooler thing was that it brought people together. Unexpected conversations and smiles abounded as we crammed into pudding man’s office. My friend Jimmy agrees that food is a great conversation starter. For a while, I’ve thought about displaying homemade treats in my cubicle. I love baking, but I can never finish my creations by myself. (Well, I can if I cram half of it in the freezer and subsequently grow tired of eating the same thing.) What better way to bring joy back into the work place and perhaps strike up deep conversations?

Comments (1)      Email Email      Print Print

Valentine’s Day: Celebrate with chocolate

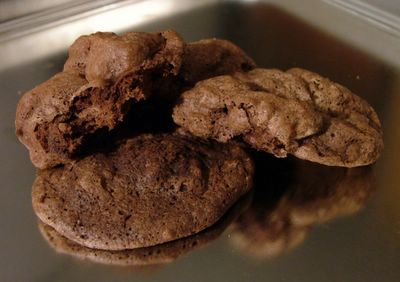
chocolate truffle cookies

With Valentine’s Day and Chinese New Year falling so closely together, you could say that February’s theme color is red. Red symbolizes love and good fortune (in Chinese culture), of course.

But I say February’s theme color is brown, because there’s no better month to indulge in chocolate!

I recently made Beacon Hill Cookies from Alice Medrich’s Cookies and Brownies. Alice Medrich is a goddess on so many levels. Entrepreneur magazine named her America’s “First Lady of Chocolate.” Not only are her recipes decadent (I’ve never encountered a bad recipe from her), but her book Chocolate and the Art of Low-Fat Desserts is the best low-fat, if not dessert, book out there. You can have low-fat dessert and never know the difference!

Back to the cookies… I prefer to call them Truffle Cookies because it’s a much better description. It’s basically melted chocolate with just enough beaten egg whites to aerate it. Upon biting into the cookie, the paper thin crust shatters to reveal a creamy center.

You should use the finest quality chocolate you can find. Because there’s so few ingredients, the chocolate can’t hide behind the “dough.” I used chocolate that I bought in Europe last May. Even after seven months, the chocolate was still in its prime. Of course proper storage helped. Since New York is humid in the summer, I wrapped the chocolate in plastic wrap, refrigerated it in a metal tin (so flavors in the fridge wouldn’t seap through), and didn’t unwrap the chocolate until it came to room temperature. If you unwrap it any earlier, condensation will cause the chocolate to develop white spots (bloom). A little water + chocolate is like oil + water. Not a good combination! The original Beacon Hill cookie recipe calls for chocolate chips. You could use them, but chips have additives that help them keep their shape.

Warning, these cookies are deadly! These are not cookies you scarf down mindlessly. You must savor the aroma and flavor of each bite, doting on the subtle flavors in your chocolate.

Last note about the ingredients: cream of tartar stabilizes the whites and helps them beat faster. If you’ve ever beaten whites but instead got a white curd floating on top of a watery mess, you’ve overbeaten the whites. Cream of tartar acts as insurance. However, a tiny jar costs about $5, and as Alton Brown says, it’s a one-hit wonder. I prefer kitchen multitaskers, so you can substitute it with twice the amount of distilled white vinegar or lemon juice. Some people complain about the off flavor of vinegar, but I can never detect it in the baked product.

Chocolate Truffle Cookies
adapted from Alice Medrich’s Cookies and Brownies

These are best eaten the day they’re baked. They’re still good a couple days later, but they lose their truffle-like creaminess.

Makes about 30 2-inch cookies

Ingredients
6 ounces bittersweet or semisweet chocolate, cut into pieces
2 large egg whites, at room temperature (hint: whites are easier to separate when they’re cold but beat better when they’re at room temperature)
1/4 teaspoon cream of tartar or 1/2 teaspon white vinegar or 1/2 teaspon lemon juice
1/2 teaspoon vanilla extract
1/4 cup sugar
3/4 cup chopped walnuts

Equipment
2 cookie sheets, lined with parchment paper or greased

Optional step: To bring out the flavors of the nuts, toast them whole in a 325F oven for about 10 minutes, or until they’re fragrant and browned. Chop them when they’ve cooled.

Preheat the oven to 350F. Position racks in the upper and lower thirds of the oven.

Melt the chocolate in a heatproof bowl in the microwave on medium for 2 to 2 1/2 minutes, or set the chocolate in a double boiler. Stir frequently until the chocolate is almost completely melted. Remove from the heat and stir to complete the melting. Set aside.

Beat egg whites with the cream of tartar (or vinegar or lemon juice) and vanilla until soft peaks form when you lift the beaters. Add the sugar gradually, continuing to beat until the egg whites are stiff but not dry. They’re ready if you invert the beaters and the egg whites stand straight up. If they droop, they’re not ready. Pour the nuts and all of the warm chocolate over the egg whites. Fold with a rubber spatula until the color is uniform.

Right away, drop level teaspoons of batter at least 1 inch apart on the cookie sheets. Bake for 10 to 12 minutes, or until the cookies are shiny and cracked, firm when you press them but still gooey inside. Rotate the sheets from front to back and top to bottom of the oven about halfway through the baking time to ensure even baking. Store airtight for up to 3 days.

Frugal me…while the cookies are baking, lick the bowl clean, because the batter’s like chocolate mousse. If some of the chocolate solidified in the double boiler or spatula, pour warm milk over it to remelt it. Then treat yourself to a cup of real hot chocolate.

Some ideas for lightening the cookie:

  • Use half the nuts and toast them so you can get away with using less. Also chop them finer so every cookie has nuts.
  • Substitute a mixture of cocoa powder and sugar for half of the chocolate.
  • Substitute softened Nutella for the chocolate and omit the sugar. Okay, the Nutella doesn’t really help, but it’s an interesting variation.
  • Use low-fat chocolate souffle as the batter but bake as directed above.

I only tried the first option, so I have no idea how the other variations work. If you try it, let me know!

Comments (2)      Email Email      Print Print

Chinese New Year Bash: Roast Pork Buns

roast pork buns

On Sunday, my apartment threw a dinner party not for the Superbowl (bah, what’s that?) but for Chinese New Year. I decided to go all out and make roast pork buns (char siu bao) completely from scratch. The buns come in two styles: fluffy, white steamed dough or eggy baked bread. I baked mine because I don’t have a giant steamer.

Of course, the star ingredient of the buns is roast pork. You may buy the cooked meat from a Chinese restaurant or make your own.

Roast Pork (Char Siu)
from The Key to Chinese Cooking by Irene Kuo

Cantonese barbecue meat is characterized by its deep red color, sweet flavor, and charred edges. Thinly sliced pieces are perfect as a stand-alone appetizer. The meat can also be added to fried rice, lo mein (ribbon-like rice noodles), Singapore (curry) noodles, and roast pork buns. A common error is to add salt to the marinade, which toughens the meat. You can substitute ketchup for the traditional red dye. It thickens the marinade for better coating.

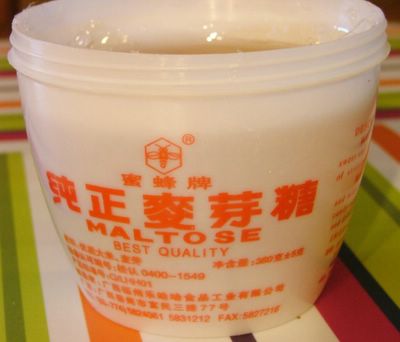
Maltose (the same sugary goo that coats Peking Duck to crisp its skin) is traditionally used in the marinade, but honey can be substituted.

maltose

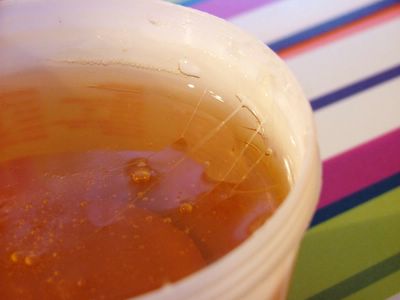
While honey has floral or fruity undertones (depending on what kind of pollen the bees hang around), maltose has a more neutral flavor. Maltose is also so thick that you can grab a chunk with your bare hands. But when you try to separate it, cobweb-like strands form at the edges, kind of like the cheese on pizza, but worse.

maltose

Ingredients:
Meat:
2 pounds boneless pork loin

Marinade:
3 tbsp light soy sauce
2 tbsp bean paste
1 tbsp Shao Xing rice wine or dry sherry
2 tbsp ketchup
2 tbsp pineapple or orange juice
1 tbsp sugar
1 tbsp maltose (also sold as malt extract I believe), honey, or corn syrup
2 cloves garlic, curhsed, peeled and coarsely chopped
1/2 tsp five-spice powder (a mixture of ground star anise, fennel, cloves, cinnamon and ginger)

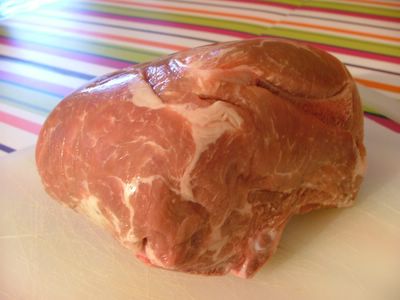
Trim the meat of excess fat. I used rib loin to save money. When I deboned and de-fatted the meat, I only had half of what I started with.
pork rib loin

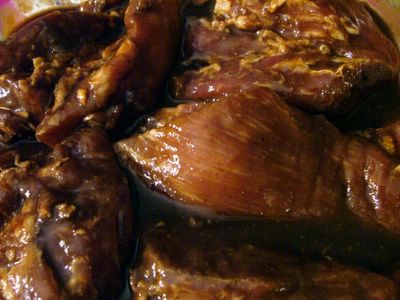
Slice it lengthwise, with the grain, into strips about 2 inches wide, 1 inch thick, and 5 to 6 inches long. Note to self: the grain runs in the same direction as the fat. Place them flat in a shallow pan. Stir the marinade ingredients in a bowl until well blended (if using maltose, heat the marinade over low heat to dissolve it) and pour over the meat, rubbing it well into both sides. Cover and marinate for about 3 hours at room temperature, turning the meat a couple times. You could also refrigerate the meat and bring it to room temperature before roasting, but it shouldn’t be marinated longer than 6 hours — prolonged soaking damages the firm texture.

marinating char siu (Chinese roast pork)
My strips were too small because I couldn’t tell which way the grain ran and cut with it.

Remove all the racks from your oven but the topmost one. Pour a few inches of water into a roasting or broiling water and place it on the floor of the oven to catch drippings and prevent smoking. Preheat the oven to 350 degrees.

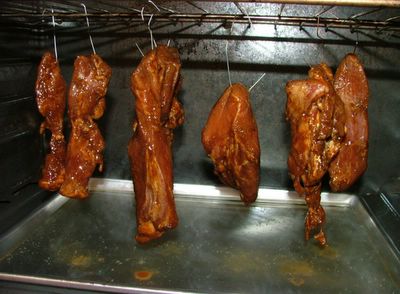
Insert a meat hook, drapery hook, or even a bent strong paper clip into one end of each strip (1 hook per strip) and hook the strips onto the top rack over the drip pan in one line.

baking char siu (Chinese roast pork) at home
Hanging meat, ghetto Chinatown style.

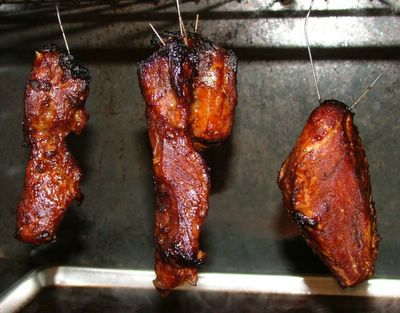
Roast the strips for 1 hour. Then increase heat to 400 degrees and roast for 10 more minutes.

char siu (Chinese roast pork)
Remove meat and take out the hooks.

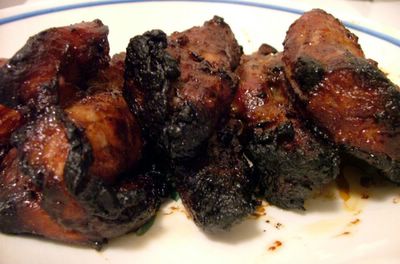
cooked char siu meat (Chinese roast pork)
The “char” of char siu. Aka instant cancer, but it sure tastes good!

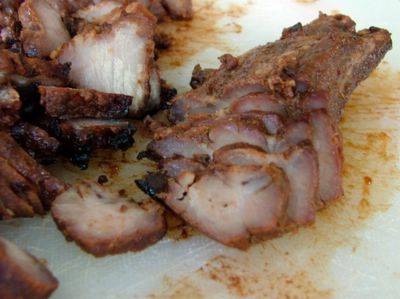
Let the strips cool and firm slightly and then slice them crosswise, against the grain. The pork is good hot, at room temperature, or cold.

sliced char siu (Chinese roast pork)
To reheat cold or frozen pork, place slices in an overlapping line in a snug shallow ovenproof dish. Pour a little meat stock over the meat (about 1/8 inch) and heat in a moderate oven or under a slow broiler until the liquid is steaming, the meat is hot inside, and the top surface is crisp. If you have no stock, you could season some water with soy sauce and honey or syrup to taste.

Don’t throw away the leftover marinade either! Just boil it on the stove for a couple minutes and save the liquid gold as a topping over rice or noodles. Thanks to Renee of Shiokadelicious for the tip!

Once again, The Key to Chinese Cooking came through for me. The book is like the Chinese version of The Joy of Cooking: reliable and thorough. I really liked the method of hanging the meat over water. No turning or basting was required, since heat evenly circulated the meat, and the water kept the meat moist. Roast pork is easy to make, and it’s okay (favorable, actually) to overcook it slightly so you get the crispy charred bits.

I thought the meat tasted more like Korean barbecue than Chinese roast pork, but it was delicious! Next time I’ll put a little less bean paste and more maltose. I’m not a meat person, but I could eat this roast pork on a stick.

Baked Pork Buns (Char Siu Bao)
adapted from The Chinese Kitchen (not as thorough as The Key to Chinese Cooking, but its strong suit is its dim sum recipes) by Eileen Yin-Fei Lo

For the Filling (make while the dough is rising):
5 tablespoons low-sodium chicken stock skimmed of fat (I used my roast pork drippings, skimmed)
1 tbsp oyster sauce
2 1/2 tsp sugar
2 1/4 tsp tapioca or corn starch
2 tsp ketchup
1 1/2 tsp dark soy sauce
Pinch ground white pepper
1 tbsp oil
1 small onion, cut into 1/4-inch pieces
3/4 cup barbecued pork, cut into 1/2-inch pieces
1 1/2 tsp Shao Xing rice wine or gin
1 tsp toasted sesame oil

In a small bowl, combine chicken stock, oyster sauce, sugar, tapioca starch, ketchup, soy sauce, and white pepper; set aside.

Heat a wok over high heat for 40 seconds and add oil. Coat wok with oil using a spatula. When a wisp of white smoke appears, add onion. Lower heat to medium, and cook until onion turns light brown, about 2 minutes. Raise heat to high, add pork, and cook, stirring, for 2 minutes. Add wine, and stir to combine.

Stir the reserved stock mixture and add it to the wok. Cook, stirring, until the sauce thickens and turns brown, 1 to 1 1/2 minutes. Add sesame oil, and stir to combine. Transfer to a shallow dish. Cool to room temperature.

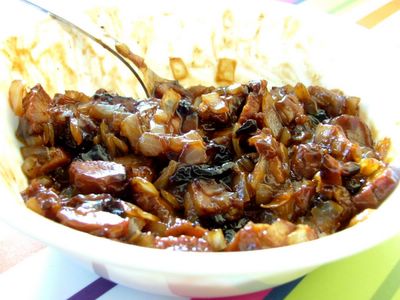
char siu bao filling (Chinese roast pork for buns)

For the dough:
One 1/4-ounce envelope active dry yeast
1/3 cup sugar
1/2 cup warm water (110 F)
2 cups bread flour
1 large egg, beaten
3 tbsp lard or oil
1/2 tsp salt
1 1/2 tbsp scallion-infused oil or plain oil (optional)

In a large mixing bowl, dissolve the yeast and sugar in the hot water. Put in a warm place for 30 minutes to 1 hour, depending on the outside temperature. (In cooler weather, the longer time will be required.) When the yeast rises and brownish foam appears on top, add the flour, salt, oil and half the egg, stirring constantly with your hand.

Begin kneading. When the mixture becomes cohesive, sprinkle the work surface with flour and place the dough on it. Continue kneading for about 15 minutes, picking up the dough with a scraper and flouring the work surface to prevent sticking. When smooth and elastic, place the dough in a large bowl. Cover with a damp cloth or plastic wrap and put in a warm place for 2 to 4 hours, depending on the temperature. The dough is ready when it has tripled in size.

Heat the oven to 350F. Cut parchment paper into 12 pieces, 3 1/2 inches square. Or, grease a large piece of foil. Remove the dough from the bowl, knead several times, then roll out into a cylinder 12 inches long. Divide into 1-inch pieces.

Work with one piece at a time, keeping the others covered with a damp cloth. Roll each piece into a ball. (I used a trick I learned at my cousin’s bakery. I cupped my hand and rolled the ball between my palm and the work surface. I moved my hand very quickly to make the surface taught. The dough was ready when it bounced back after I stuck my finger in it. If you can leave an indentation in the dough ball, the surface isn’t tight enough.)

Press with your fingers to create a well in the ball. Place 1 1/2 tbsp of the filling into the well, hold a bun in one hand, and with the other turn the bun, pinching it closed. Press firmly to seal. Place the bun, seam side down, on the parchment paper or foil. Repeat until all 12 are done.

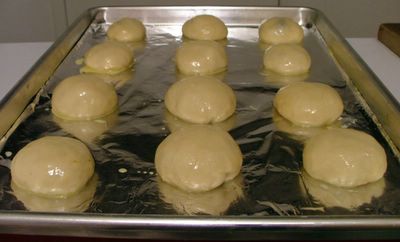
Place the buns on a cookie sheet, at least 2 inches apart to allow for expansion. Place the buns in a warm place to rise for 1 hour. Spritz each bun lightly with warm water. Make an egg wash by taking the remaining beaten egg and combining it with an equal amount of water. Brush each bun with the egg mixture.

proofing char siu bao (Chinese roast pork buns)
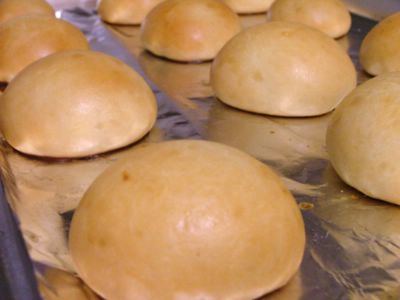
Bake for 15 to 20 minutes, or until golden brown. Halfway through the baking time, turn the cookie sheet around.

cooked char siu bao (Chinese roast pork buns)
As the buns cool, their crusts will become slightly hard. If you want them to remain soft, brush lightly with oil immediately after baking.

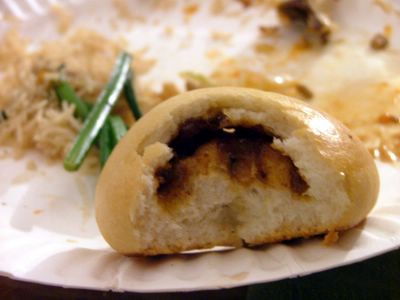
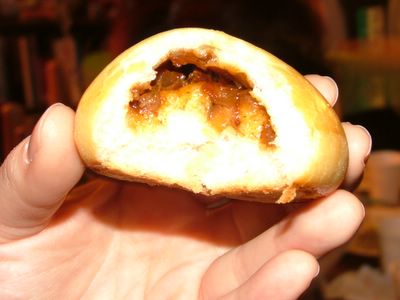
interior of char siu bao (Chinese roast pork bun)
These were really good straight out of the oven, with the filling piping hot and the dough still soft. The filling was perfect. It was just the right mixture of sweet and savory. It was also thick but not unnaturally jelly-like. The dough was rich and slightly sweet, just like the kind you get in Chinatown. However, my dough wasn’t as airy because I was in a rush and only let it rise till double its size (not triple, like the recipe stated). Also, the recipe didn’t call for any salt in the dough. A touch of salt is always needed to bring out the flavor of baked goods.

I probably won’t make these from scratch again because it’s labor intensive, but I’m proud of my creation.

Comments (19)      Email Email      Print Print

Bean Cuisine part 2: Black-Eyed Pea Spring Rolls

After complaining last week about the unreliable recipes in Vegetarian Times, I actually went back to the magazine for another recipe: Black-eyed pea spring rolls. I guess I’m on a bean roll since participating in last week’s bean-themed Is My Blog Burning. The idea of bean filling sounded really good, and I’d be using up tons of leftovers. I had year-old frozen peas (which was in one chunk, studded with ice crystals), six-month-old frozen dumpling skins, an x-month old (I can’t remember the exact age) carrot, and of course lots of dried black-eyed peas.

Since I didn’t want to do any deep-frying, I make black-eyed pea dumplings instead.

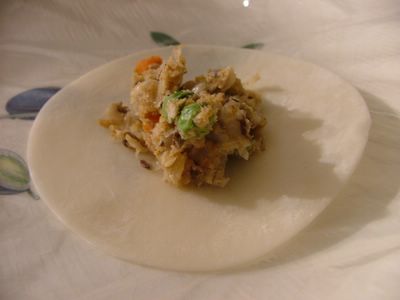
The filling was basically mashed beans, carrots, peas and some spices. It was really tasty on its own. I would have been happy eating it as is.

I put a rounded teaspoon in each skin.

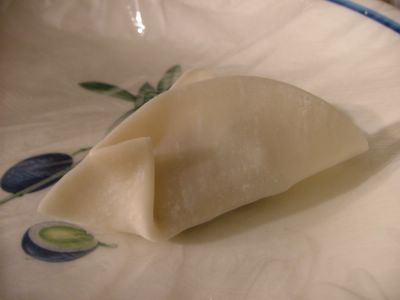
I dipped my index finger in water and lined the outer centimeter of the skin with the liquid. Then I folded the skin in half, put in a crease…

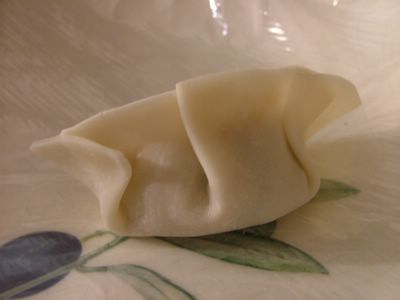
…and finished creasing till everything was shut. It’s important to pinch the edges again and make sure there are no holes, or else the dumpling will explode during cooking.

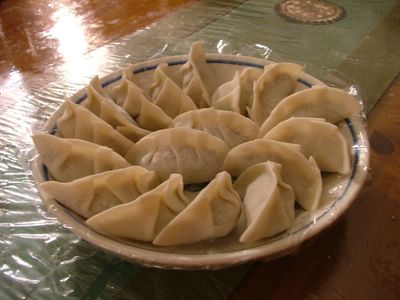
The finished platter. Actually, I ran out of skins and still had half the filling left.

I dropped a couple dumplings in boiling water and cooked till they floated to the top (it was almost instantaneous, since these were fresh).

The interior was a bit dry, since the recipe said to pre-cook the filling until “it dries.” If any of you make this recipe, I recommend cooking the filling until it resembles mashed potatoes. The filling should definitely be creamy, not dry like mine.

While the filling was delicious, it was actually too strong for the delicately flavored dumpling skin. It would probably be good in an egg roll, since the skin is heartier.

The rest of my uncooked dumplings were individually frozen (so they wouldn’t stick together), then bagged for a quick weekday meal. Whenever I come home from work, sticking something in the microwave is all I have energy for. Boiling a pot of water shouldn’t be much more difficult than punching numbers on a microwave keypad.

The recipe:

Black-Eyed Pea Spring Rolls
adapted from Vegetarian Times, Feb. 2005


Photo: Vegetarian Times

Serves 8
Note to vegans: Most egg roll wrappers are made with cornstarch, flour and water, but some contain eggs. Check labels.

1 large carrot, peeled and diced
2 Tbs. canola oil plus about 4 cups for deep-frying
1/2 cup minced onion
2 Tbs. minced fresh ginger
2 serrano chiles, seeded and minced (about 1 Tbs.) (Sriracha hot sauce also works)
3 cups cooked black-eyed peas, drained and mashed
1 cup frozen green peas
Salt to taste
1 Tbs. garam masala or curry powder
1 tsp. ground coriander
3 Tbs. lemon juice (Important: this brightens up the flavors)
1/2 tsp. cayenne, or to taste
16 egg roll wrappers
1 Tbs. cornstarch mixed with 2 Tbs. water

  1. If using dried beans, note that 1 cup dried beans=3 1/2 cups cooked. Sort through the peas and pick out tiny stones and stray seeds. This is best done by spreading them on a table with a pot in your lap and pulling the good peas into the pot. To soak dried black-eyed peas, rinse them, and place them in a pot. Add enough water to cover them plus at least 4 inches more. Add 1/4 tsp. baking soda to the water, and stir. (This pulls out the sugars that cause gas in the intestines.) Let them sit overnight. Rinse thoroughly. The beans will cook perfectly in fewer than 90 minutes. Add salt after cooking.
  2. Put carrots in 3 cups boiling water, and cook about 15 minutes, or until very tender. Or, steam for about 15 minutes. Drain, and set aside.
  3. Heat 2 Tbs. oil in 2-qt. saucepan over medium heat. Add onion, ginger and serrano chiles, and saute about 2 minutes, until soft and fragrant.
  4. Add mashed black-eyed peas, and cook mixture about 10 minutes, or until the consistency is like mashed potatoes. Add water if necessary. Add green peas, carrots, salt, garam masala, coriander, lemon juice and cayenne. Mix, and set aside.
  5. Place egg roll wrapper on counter with one corner pointing toward you. Shape 1/4 cup mixture into 3-inch-long log, and place it on wrapper, parallel to edge of counter and far enough above closest corner to be within edges of wrapper. Fold corner over filling, fold sides over tightly and roll tightly to far corner. Moisten corner with cornstarch mixture to help keep roll closed. Repeat with remaining wrappers and filling. Set aside, or cook immediately.
  6. Heat 2 inches oil in skillet over medium heat. Fry 3 or 4 rolls at a time about 5 minutes, until crisp and golden. Keep hot in 250F oven. Serve immediately.

PER SERVING; 340 CAL; 13G PROT; 7G TOTAL FAT (0.5G SAT. FAT); 57G CARB; 5MG CHOL; 390MG SOD; 7G FIBER; 4G SUGARS

Some ideas for leftover filling:

  • Eat it just as it is. It’s like hearty mashed potatoes.
  • Use as a sandwich or pita filling.
  • Make patties: Shape the filling. Dip it in flour(seasoned with salt and pepper) and shake off the excess. Dip it in beaten egg and let the excess drip off. It’s important to get rid of the excess so the crust sticks. Dip the patty in breadcrumbs (preferably panko, seasoned with salt and pepper). Then pan fry. (Fill a pan with 1/2″ oil for a classic crispy crust. Or barely coat the pan with oil if you’re eating light.) To get a good crust, don’t touch the patties for the first couple of minutes. This technique also works really well for polenta (what I had when I boiled down Vegetarian Times‘ goopy corn mush). Panko-crusted polenta is wonderfully crispy on the outside and creamy on the inside. Actually, I might try this method for Chinese turnip cakes, savory rice cakes (nien gow), sweet red bean rice cakes, or mochi.

Comments (1)      Email Email      Print Print

Is My Blog Burning: Black-Eyed Pea Cake


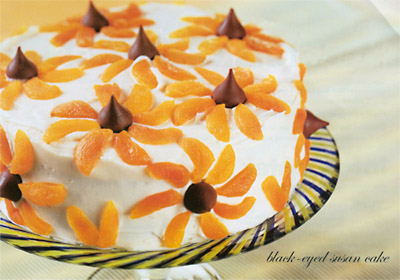
Photo: Vegetarian Times-Feb. 2005

For my first post, I’ve decided to participate in Is My Blog Burning?, a designated day where bloggers cook with a common ingredient or method. This time, the theme is beans. I think a dessert can be made from virtually any ingredient, so why not try a bean cake?

When I first saw the Black-Eyed Bean Cake recipe in the Feb. 2005 issue of Vegetarian Times, I wondered if I could substitute Asian red beans (azukis) for the black-eyes and red dates for the apricot puree to make a Chinese-ified cake. Before getting too adventurous though, I tested the original recipe to see if it was any good.

I had doubts about this recipe because a couple days earlier, I made the Fungi (cornmeal mush) from the same issue. I expected it to be a mixture between cornbread and oatmeal, but instead I got tasteless, watery goop. I’ll usually eat anything, but I seriously considered throwing the Fungi out. After boiling it on the stove for another 40 minutes (the recipe said I’d only need to boil it for two min.), the mixture reduced to one-third its volume and was quite good. It got nice and firm, like polenta.

Anyway, on to the recipe!

Black-Eyed Susan Cake
adapted from Vegetarian Times, Feb. 2005

Serves 12

Cake
2 cups dried apricots
2 cups cooked, drained and rinsed black-eyed peas
1/4 cup canola oil
1 cup packed light brown sugar
3 large eggs
1 cup whole wheat flour
2 tsp. ground cinnamon
1/2 tsp. ground cloves
1 1/2 tsp. baking soda
1/2 tsp. baking powder
2/3 cup golden or regular raisins
1 cup chopped pecans, optional

Frosting
1/3 of 8-oz. pkg. fat-free cream cheese
2 1/2 cups confectioners’ sugar
2 tsp. lemon zest
1 tsp. vanilla extract

Optional Decoration
12 chocolate drops or stars
32 dried apricots

  1. If using dried beans, measure out a little more than 1/2 a cup. (1 cup dried=3 1/2 cups cooked, so if you do some algebra, you’ll actually need .57 cups). Sort through the peas and pick out tiny stones and stray seeds. This is best done by spreading them on a table with a pot in your lap and pulling the good peas into the pot. To soak dried black-eyed peas, rinse them, and place them in a pot. Add enough water to cover them plus at least 4 inches more. Add 1/4 tsp. baking soda to the water, and stir. (This pulls out the sugars that cause gas in the intestines.) Let them sit overnight. Rinse thoroughly. The beans will cook perfectly in fewer than 90 minutes. Add salt after cooking.
  2. Preheat oven to 375F (350F if using glass or dark-colored pans). Grease and flour 2 8-inch cake pans, or grease and line pans with circles of parchment.
  3. To make Cake: Cook apricots in 2 cups water, about 12 minutes, until very soft. Measure out 1 cup apricots and liquid, and set aside. Put remaining apricots and liquid in blender, and puree. Add peas, and puree.
  4. Put oil, brown sugar and eggs in mixing bowl; beat on high 3 minutes. Mixture will look creamy. Whisk flour, cinnamon, cloves, baking soda and baking powder in separate bowl. Mix in raisin and pecans, if using. (Hint: tossing nuts, fruit, or chocolate chips with flour keeps them from sinking to the bottom of the cake.)
  5. Pour egg mixture over puree, and fold together. Gently fold in flour mixture. Pour into prepared cake pans.
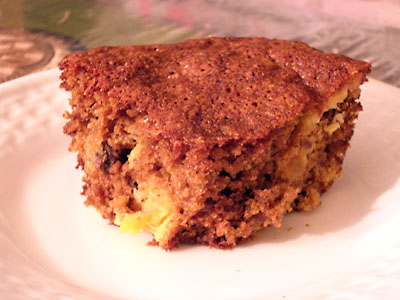
  6. Bake 35 to 40 minutes, or until toothpick inserted in center of cake comes out clean. Remove from pans, and cool completely on wire rack. Ooh, nice and crusty! While this cake was baking, the entire kitchen smelled like gingerbread.
  7. To make Frosting: Using an electric mixer, beat cream cheese until creamy. Beat in remaining ingredients. Frosting should be soft; it will firm upon sitting.
  8. Place one cake layer on plate, and spread reserved apricots evenly over it. Top with second layer. Spread frosting evenly over top and sides of cake.
  9. To decorate, cut apricots into slices. Place chocolate drop on cake, and arrange 8 apricot “petals” around it (skin side up). Repeat until cake is covered.

PER SERVING: 290 CAL; 6G PROT; 6G TOTAL FAT (1 G SAT. FAT); 55G CARB; 55MG CHOL; 200MG SOD; 5G FIBER; 35G SUGARS

I didn’t make the filling or the frosting…Growing up, my mom always complained that frosting was too sweet. So out of habit, I made my cake plain.

My handblender didn’t puree the apricot-bean mixture all the way, so you can see a chunk of apricot in the front and a white stripe of beans on the right.

The verdict: the texture was very good. The cake was moist and not dense (as is the problem with whole-wheat baked goods). I could not tell it was low-fat. Aside from the couple streaks, you can’t tell there’s beans in it either. This cake would be a good joke to play on friends. Imagine their faces when you tell them the secret ingredient!

EDIT:

I was unimpressed with the flavor on the first day, but on the second day, the flavors intensified. The cake got even more moist, but it wasn’t soggy or damp. My only complaint is that it’s a bit sweet, and I can’t really taste the spices. The cake is kind of like spice cake without the spices or carrot cake with extra brown sugar and no carrots.

Maybe to spice up the flavor, I’ll spread some apple butter (recipe featured at 101 Cookbooks) on the cake.

2nd EDIT:

On further investigation, I found out that I added too much sweetener. Brown sugar is simply white sugar plus molasses. I made my own brown sugar for this cake. According to the Grandma’s molasses package, 1 c brown sugar = 1 c white sugar + 1/2 c molasses. Or, it’s 2 parts white sugar, 1 part molasses. In previous experience, I found this ratio to be overkill, so I used 4 parts white sugar to 1 part molasses. On the Grandma’s molasses site though, it recommends 9 parts white sugar to 1 part molasses. Also, Baking 911 recommends 1-2 tbsp molasses for 1 cup of white sugar (or, 8-16 parts white sugar to 1 part molasses). Bottom line: I used waaaay too much molasses.

Partly because of my traumatic experience with the cornmeal mush, I still have qualms with Vegetarian Times recipes. Case in point: this recipe doesn’t tell you how much salt to add to the beans. I put a pinch. Evidently I needed more to bring out the spice flavors. Also, I seriously doubt 375F is a good temperature for the cake. Since I had an 8×8 glass pan (I halved the recipe), which conducts heat better than aluminum, I lowered the temperature to 350F. The edges browned very quickly, and I baked at 325F for the last five minutes.

So, this is a good cake, but it’s not to die for. I like the wholesome ingredients though. If you ever want to eat cake for breakfast, you can “fool” yourself by making healthy muffins with this recipe.

Maybe I’ll try the Chinese variation, but not anytime soon. My desk is exploding with “to try” recipes, and they’re from trusted sources.

Comments (8)      Email Email      Print Print