Archive for Savory

Bacon Cookies

The idea hit me like a stroke of genius. If everything tastes better with bacon, surely dessert does too. A handful of them get it right, like Roni-Sue’s bacon buttercrunch. (Save yourself from Vosges’ bacon bar though.) But I wanted to try something new: “double” bacon cookies.

A couple years ago, The NY Times ran a recipe for bacon-dripping cookies, but there was no bacon in them. Other recipes have bacon bits, but they make no mention of drippings. Why oh why would you waste pork fat?

The draw of bacon cookies is the balance of sweet and salty, and I know of no other recipe that epitomizes the two like olive shortbread. I love them so much that I used them as a base for these experimental cookies. Of course I substituted the olives with crumbled bacon, and instead of butter, I used the drippings. After all that work, I expected to hit the jackpot. But my flash of genius was more like a flash in the pan. The cookies were nauseatingly rich. The texture was literally like sand; they wouldn’t hold together. Maybe I didn’t render enough fat (more on that later), or maybe you can’t make all-lard cookies. I think the bacon-and-lard idea is better suited for savory crackers. Not so avant-garde, I know.

Why did I even bother sharing this idea then? Because I kick myself when someone beats me to it. Like the time I made the crispiest pizza without a wood-fired oven or a pizza stone. A cast iron skillet did the trick. By the time I made it known, it was too late: Heston Blumenthal was credited with the idea. Never mind that I did it more than a year before he documented it in his book, In Search of Perfection. See what procrastination does?

Or sometimes I do start a popular idea, and it gets passed down so much that people forget the source. More than three years ago, I created a knock-off recipe for Nutella. One that had cocoa powder instead of melted chocolate, just like Nutella itself. At the time, I couldn’t find any such recipes on the Internet, so I shared it here. This Feb., the L.A. Times ran a similar recipe, citing the same book that I did. Heck, even the title was similar. “Nuts for Nutella” vs. “Nutty for Nutella.” Perhaps I’m paranoid, but in the past people have copied my recipe word for word and passed it off as their own.

Let this serve as a marker. If three months or three years from now, someone comes up with a great bacon shortbread recipe, perhaps a seed was planted here. For those who are wondering, here’s the recipe I used. I didn’t like it though. Sorry, no pictures, as I only had a pile of crumbs. These would probably be better with butter instead of drippings. Too lazy to try it again though.

P.S. – this dough is also good with seaweed or furikake.

Bacon Shortbread Cookies

Adapted from Susan Herrmann Loomis and The Traveler’s Lunchbox
Yield: about 34 cookies

1 to 1 1/2 lbs uncooked bacon, to yield 1/2 cup drippings and 1/2 cup bacon bits
3/4 cup powdered sugar, sifted or 1/4 cup plus 2 tablespoons granulated sugar, whizzed in a food processor until fine
1 Tablespoon neutral-flavored oil (Don’t get smart and try olive oil, peanut oil, etc. Your tastebuds will go into shock)
1 1/4 cups all purpose flour
1/8 teaspoon salt

Cook the bacon. The cleanest, unfussiest way is to bake it at 400° F in a large foil-lined baking sheet for about 20 min. Turn the bacon over half way through cooking. Don’t put the bacon on racks. The little grates are a pain to clean. Also, don’t be like me and bake it at 200° F for 3 hours, no matter how good it sounds. The fat won’t render all the way.

Reserve 1/2 cup of bacon fat and let it cool to room temperature. Crumble 1/2 a cup of bacon, and save the rest. It keeps for a long time in the freezer.

Preheat oven to 350° F. Line two baking sheets with parchment paper or foil.

In a large bowl or the bowl of an electric mixer, cream the bacon fat until it is soft. Mix in the sugar until blended, then drizzle in the oil and mix until combined. Add the flour and the salt, and mix gently but thoroughly until the dough is smooth, then add the bacon bits and mix until they are thoroughly incorporated into the dough.

With your hands, press the dough into the pan until it is 1/4-inch thick. Refrigerate the dough for at least 30 minutes, and up to 24 hours. Score the dough into rectangles with a knife.

Bake until the cookies are golden, about 15 minutes. Remove from oven and immediately cut the cookies while they are still hot. Cool on wire racks.

If you find that the middle pieces are still doughy, re-bake them in a preheated 300° F oven for about 10 minutes.

Comments (9)      Email Email      Print Print

Cookies from the Sea

olive shortbread

This shortbread has such a short ingredient list that you might be tempted to overlook it. There’s no chocolate or vanilla. Not even eggs or baking powder/soda. There’s just flour, sugar, butter, and salt (and a secret flavoring agent).

Despite its simple nature, there’s an amazing number of things that can go wrong with shortbread: it comes out too plain, hard, dry, doughy, greasy, or stale-tasting. But you can’t mess up shortbread if you make olive cookies (scourtins) from the reputable French chef, Susan Loomis. The dough is crisp yet delicate. Every bite melts in your mouth. The olives don’t overpower the cookies, either. Whether you can taste it or not, every dessert has a pinch of salt to round out the flavors. In this case, the salt predominantly comes from the olives. (For more olive oil desserts, try making chocolate mousse, truffles, or gelato.)

The first time I made these cookies, they were supposed to be a birthday gift. Then I ate 10 in one sitting, and I eventually had to re-bake an entire batch. They were so addictive that I made about six more batches after that (as gifts, of course). They’re the most repeated dessert I’ve made all year.

Since the genius of these cookies is their unusual source of salt, I thought of another savory substitute: seaweed. I know vegetables don’t sound appetizing in cookies, but just think of seaweed as the complex version of sea salt.

seaweed cookies

When I thumbed through my pantry last night, I saw furikake (a mix of soy-glazed bonito flakes, sesame seeds, and nori) and thought, “Hey, why not? Fish come from the sea, too.” So I made two batches of cookies (which you should always do with this recipe, because you will run out!).

While the furikake tasted great in the raw dough (I loved the sweet-salty combo of the fish and the soy sauce), the fish flakes didn’t keep their crunchy texture, and the flavor became too distracting. It was still tasty, but I preferred the seaweed version.

PS-I conceptualized these cookies a long time ago, but that darn David Lebovitz scooped me. But my adaptation is different, as there’s a lot more seaweed but no egg. For another sweet-savory twist, I bet bacon would be good, and you could substitute some rendered bacon fat for the butter.

Seaweed Shortbread Cookies

This recipe doubles easily (trust me, you will need to double it), so you can munch on the cookies and still have some left for gifting. They stay delicious for weeks and hold up well in the mail.

Adapted from Susan Herrmann Loomis and The Traveler’s Lunchbox
Yield: about 34 cookies

1 stick unsalted butter, softened
3/4 cup powdered sugar, sifted or 1/4 cup plus 2 tablespoons granulated sugar, whizzed in a food processor until fine
1 Tablespoon roasted sesame oil (recommended brand: Kadoya)
1 1/4 cups all purpose flour
1/8 teaspoon salt
1/4 cup crushed wakame flakes

Preheat oven to 350° F. Line two baking sheets with parchment paper or foil.

In a large bowl or the bowl of an electric mixer, cream the butter until it is soft and pale yellow. Mix in the sugar until blended, then drizzle in the sesame oil and mix until combined. Add the flour and the salt, and mix gently but thoroughly until the dough is smooth, then add the wakame flakes and mix until they are thoroughly incorporated into the dough.

With your hands, press the dough into the pan until it is 1/4-inch thick. Refrigerate the dough for at least 30 minutes, and up to 24 hours. Score the dough into rectangles with a knife.

Bake until the cookies are golden, about 15 minutes. Remove from oven and immediately cut the cookies while they are still hot. Cool on wire racks.

If you find that the middle pieces are still doughy, re-bake them in a preheated 300° F oven for about 10 minutes.

Variation: Substitute 1/4 cup plus 2 tablespoons bonito-flavored furikake for the arame seaweed. (Furikake is like rice confetti. It’s also a delicious seasoning for cold silken tofu, eggs, noodles, popcorn, and salad. If you want to make your own, Gourmet and Egullet have recipes.)

Comments (7)      Email Email      Print Print

Savory Cheese Biscotti

cheese biscotti

For a twist on cheese straws, try making savory cheese biscotti. These “cookies” are macho enough for Super Bowl parties but elegant enough for other occasions.

This recipe is adapted from Marcy Goldman, the creative cook behind Betterbaking.com. Usually, recipes fall under two camps: classical or fun. Reference books like The Cake Bible have trustworthy recipes, but after a while, I want something more than basic sponge cake. Then there’s the comfort-food recipes, like Paula Deen’s bacon-wrapped mac and cheese. But can you trust Paula Deen? She of the Velveeta chocolate fudge? Fortunately, you get great results with Marcy’s recipes, and there’s a twist to keep things interesting.

The secret to these biscotti is wine, which makes them taste even cheesier. I paired Gewürztraminer with Mimolette cheese (leftover from the CulinaryCorps potluck). Mimolette looks like cantaloupe, but the flavor is a cross between cheddar and parmesan. Because it’s firm, crunchy bits of cheese remain after baking.

After the first baking, these biscotti are as flavorful and tender as Red Lobster’s cheddar biscuits. I don’t know what the “unscotti” are like when they’re cool; I couldn’t wait that long. But my gut says that this recipe is a two-for-one. Bake once, and you have biscuits. Bake twice, and you have crunchy cheese sticks.

Savory Cheese Biscotti

Adapted from A Passion for Baking by Marcy Goldman

Makes 2 1/2 to 3 1/2 dozen biscotti, depending on size

Any firm cheese and wine will work here: the original recipe calls for Parmesan and Chianti. To lighten things up, you can probably reduce the oil by half, since these biscotti are rich.

1/2 cup olive oil
3 large eggs
1 1/4 teaspoons salt, or to taste (depending on how salty your cheese is, you can reduce or increase the salt by 1/4 teaspoon)
1 tablespoon sugar
4 teaspoons cracked black pepper
2 tablespoons finely minced fresh rosemary, parsley, or chives
1 teaspoon garlic powder
1/2 cup spicy white wine, such as Gewürztraminer
2 cups freshly grated Mimolette cheese
2 teaspoons baking powder
1/4 teaspoon baking soda
2 to 2 1/4 cups all-purpose flour

  1. Preheat oven to 350°Â F. Line a baking sheet with parchment paper or greased foil.
  2. In a mixer bowl, blend oil, eggs, salt, pepper, herbs, and garlic powder. Blend in wine, cheese, baking powder, baking soda, and flour to make a stiff dough.
  3. Spread dough into a log about 10 inches long and 4 to 5 inches across and pat down to square off the dough neatly.
  4. Bake until set, about 35 to 45 minutes. Cool slightly on baking sheet. Wrap and refrigerate log 1 hour (this step ensures that the biscotti don’t fall apart when you slice them). Using a long serrated knife, slice log into 1/4-inch-thick slices.
  5. Preheat oven to 300°Â F. Return biscotti to baking sheets and bake a second time to crisp, about 20 minutes, turning once at midway point to ensure even baking.
  6. Taste one biscotto after it cools. If it is crisp, biscotti are done. Otherwise, bake a little longer, 5 to 10 minutes. Let cool completely on baking sheets.

Comments (5)      Email Email      Print Print

Mmm, pumpkin hummus

pumpkin hummus

It takes a lot to steer me away from sweets. Once in a while, something so good comes along that I can’t wait to eat it first thing in the morning. One such food is hummus, which I’ve gobbled down at breakfast. It’s so versatile. It can be a dip, sandwich filling, and if thinned out enough, pasta sauce or salad dressing. You don’t even have to stick to the combo of chickpeas and sesame butter. Cashew butter is an excellent substitute: according to Venturesome Vegetarian Cooking, it makes everything creamy and sweet. (Full disclosure: I’ve worked with the author before, but this book packs the easiest, most delicious vegan recipes out there.)

Since it’s fall, I made pumpkin hummus with cashew butter. I’ve eaten it for breakfast several times, and I hope you do too! This version can be used for sweet or savory applications. If you want it “sweeter,” add cinnamon. It will taste like pumpkin pie dip but without any added sugar. If you’re looking for more Thanksgiving recipes, give this one a try.

Pumpkin Hummus

1 cup raw cashews
1 1/2 cups pumpkin puree (canned is fine)
1 tablespoon olive oil
1/8 teaspoon ground nutmeg
1/2 teaspoon paprika
1/8 teaspoon salt

  1. Toast the cashews in a preheated 350F oven until golden brown, about 15 minutes. Check the nuts halfway through and stir them to ensure even browning.
  2. In a food processor, grind the cashews for several minutes and scrape down the bowl occasionally, until they turn into nut butter.
  3. Add the remaining ingredients and process until smooth. If desired, add a couple tablespoons of water to thin the mixture out.
  4. Serve with chips, crackers, bread, sliced vegetables or apples.

Variations:
Pumpkin pie: Add 1/2 teaspoon ground cinnamon and omit the paprika.
Savory: Increase the salt to 1/4 teaspoon and add 1/8 teaspoon ground cumin and a dash of cayenne pepper.

Notes:
If you don’t want to toast and grind your cashews, substitute 1/2 cup minus 1 tablespoon cashew butter and reduce the salt.

Like a lazy cook, I eyeballed the salt and spices, so you don’t have to follow the amounts exactly. Just add them to taste.

Comments (3)      Email Email      Print Print

Real Pan Pizza

cast iron skillet pizza

Sur la Table and the Food Network want you to believe that you need a $200 KitchenAid stand mixer or Le Crueset pan to be a serious cook. In reality, you only need $10 to buy one of the most durable and versatile pieces of cookware: the cast iron skillet. It is nonstick (no need to worry about Teflon poisoning), browns evenly and can go from the stove to the oven. I’ve had great success using it for pancakes, chicken with 40 cloves of garlic (you get an amazing crust and sweet, creamy garlic), tarte tatin and BREAD.

The secret to crusty artisan-style bread is baking on a pizza stone. Of course, it’s a huge investment. You can get around it by buying a ceramic tile from a hardware store, but what else are you going to use that tile for? Because of cast iron’s ability to hold in heat, it makes beautiful brown crusts. Plus, you can use it as a griddle, casserole dish, frying pan and bakeware.

Before Sullivan Street Bakery revealed its wildly popular no-knead bread recipe (it’s baked in a cast iron pot) and Mario Batali sold cast iron pizza pans, I made cast iron skillet-pizza, two years ago. Honest, look at the file information in the photos!

charred pizza crust

By baking in cast iron, you get charred crusts that’s the stuff of New York legends. You don’t need a pizza stone. You don’t need a coal-fired oven. Just start with your favorite pizza crust recipe and preheat the oven with the pan inside. Then, generously dust a pizza peel or cutting board with cornmeal or rice flour. Shape your crust on the board and add the toppings. When ready, slide the crust into the smoking hot pan and bake as directed.

To reheat leftover pizza, cover it any pan (cast iron or not) over low heat for 5-10 minutes, or until the crust comes back to life and the cheese is melted. Even Domino’s tastes divine this way.

Resources:

How to care for a cast iron skillet
Note that you’re not supposed to wash it, which may be good or bad, depending on how much you like clean up. Also, you can’t cook acidic foods like tomatoes in it. They are very heavy too, but that means that they practically last forever.

Comments (11)      Email Email      Print Print

Soy sweet nuts

soy-candied walnuts

In the past couple years, salt has taken on culinary heights as an accompaniment to chocolate, ice cream and caramel candies. The flavors work because salt contrasts sweetness. Fleur de sel and gray salt are the typical stars, but one form of sodium has been overlooked: soy sauce. Think about it: soy sauce is aged for months until malty/caramel flavors develop. It actually pairs very well with sugar.

For this candied walnut recipe, soy sauce and molasses are boiled down to create a robust glaze. These nuts are fantastic with broccoli, caramelized onions, ice cream or straight out of your hand. Be sure to drain the glaze well, or it will remain sticky and slightly messy. If that happens, store them in the fridge to harden.

Soy Sauce-Candied Walnuts

by Michel Nischan for O, The Oprah Magazine

Ingredients
2 cups walnut halves
1/4 cup molasses
2 Tbsp tamari or soy sauce

Preheat oven to 350°F. In a small saucepan, combine walnuts, molasses and tamari; bring to a boil. Reduce heat and simmer 5 minutes; drain nuts well in a sieve set over a bowl. Spread walnuts on a baking rack coated with cooking spray set over a cookie sheet. Bake until browned, 8 to 10 minutes. Remove and let cool.

Comments (3)      Email Email      Print Print

Chocolate-chile almonds

mound of chocolate-chile almonds

Combining chocolate and chiles seems like avant-garde cuisine, but South Americans have been doing it for more than 1400 years. Before chocolate bars were invented, the Aztecs enjoyed hot chocolate by grinding cocoa pods with chiles and cinnamon. Other recipes, like mole negro (a thick sauce made with unsweetened chocolate, chiles, nuts and seeds) remain a staple in Mexican cuisine.

The sensation came into American consciousness with the 2001 movie, Chocolat, in which Juliet Binoche’s character spiced up romances through handmade chocolates. Real-life chocolatiers, like Jacques Torres, have capitalized on the “new” flavor by offering wicked hot chocolate.

You needn’t go to a nouvelle chocolatier to tickle your tastebuds. In fact, the professionals often over or underwhelm chocolate with chiles. My favorite way to enjoy the flavors is to eat chili or curry on its own, then cool off my mouth with a square of chocolate. The heat from the food seems to melt the chocolate faster. The next time your mouth’s on fire, don’t reach for a glass of water or milk; go with chocolate!

Coming in a close second is Daisy Martinez’s recipe for “sweet & spicy almonds.” Cumin, cayenne pepper, cocoa and powdered sugar are layered onto almonds to create an addictive snack. They’re just sweet enough to satisfy a dessert craving but salty enough to inhale like Lay’s “betcha can’t eat just one” potato chips.

There’s two delightful ways to eat them. You can just pop them in and let the “brown snow” dance around your mouth. Or, if you’re more patient, don’t chew right away. Let the cocoa dissolve, then let the spice layer sting your tongue before giving way to the candy shell.

Plus, these almonds are highly nutritious. One ounce of almonds has 35% of the RDA of vitamin E, is high in fiber and high in heart-healthy fats. Plus, cocoa arguably has more antioxidants than green tea. Granted nuts are high in fat, but if you snack on them instead of potato chips, you’re well on your way to good health.

Chocolate-Chile Almonds

from Daisy Cooks! : Latin Flavors That Will Rock Your World

Ingredients:

1 Tbsp cumin
2 tsp coriander seeds
1 tsp salt
1/2 tsp cayenne pepper
1/2 tsp cinnamon
1 pound brown sugar or piloncillo (Mexican sugar)
1 cup water
3/4 pound (2 1/2 cups) whole unpeeled almonds
2/3 cup cocoa powder
1/4 cup powdered sugar

Directions:

Preheat oven to 300F. Stir together spices.

Heat brown sugar and water in a pot over medium heat until dissolved. Add almonds. Scoop out with a slotted spoon to drain out the liquid. Toss with spices.

Bake on a greased pan for 20 minutes, rotating half way. Meanwhile, stir together the cocoa and powdered sugar. Roll hot almonds in the cocoa mixture.

Notes:

  • Don’t use blanched almonds; the skin helps the spices stick.
  • Just use table salt; coarse salt won’t stick.
  • Any type of nut can be substituted. If you like Nutella, hazelnuts would be divine.
  • Honestly, my almonds didn’t taste hot, but that’s probably because my spices were old.
  • Use the leftover sugar syrup to sweeten drinks or as a topping for pancakes, etc.

Comments (4)      Email Email      Print Print

Extra, extra! Newsroom lunch!

Nic and Jessica in front of Al Gelato

As promised, Nic (of The Baking Sheet) and I met up at Newsroom Cafe on Dec. 30 in Los Angeles. Via the power of the Internet, we ‘ve exchanged e-mails, sent each other dessert over the mail and now, finally met in person. Suprisingly, our lunch wasn’t awkward: we chatted for a couple hours about local bakeries, famous chefs and cooking gear. I must say that Nic is one of the nicest people I have ever met.

Newsroom is Californian cuisine at its best: health-conscious fare with lots of fresh veggies and a Mexican influence. They also serve breakfast all day. That’s my kind of restaurant. Their extensive menu satisfies every palate, from meatlover to vegan and ethnic to American. Well, everyone except Nic and I, who had a hard time narrowing down our choices.

I settled on a grilled artichoke with tofunaise. The only vegan dips I’ve tried (at Blockhead’s and Better Burger in New York) were watery, grainy or curdled. They were acceptable for a tofu-lover like me but not appetizing. Newsroom’s dip was wonderously creamy. It tasted just like a mixture between sour cream and mayonaise. The artichoke was nicely browned yet tender. It was liberally oiled, but good nonetheless.

I also sampled my mom’s cast iron skillet blue cornbread. It was moist and tender with fresh corn and tomatoes on top. It also came with dual-layer salsa (spicy on top, mild on the bottom) so you could control the heat. I fall l in the middle of the cornbread camp: traditional Southern cornbread is made with 100% cornmeal and dries out quickly, while Yankee-style cornbread resembles a sweet muffin. I think cornbread should be hearty and moist, so I wish Newsroom’s cornbread was coarser. Their cornbread was cake-like. It was so cakey, in fact, that there wasn’t the thick crust I expected from a blackened skillet.

Nic had the blue corn blueberry muffin and daily soup. I didn’t try any, but they looked delicious!

Newsroom is not worth fighting L.A. traffic, getting lost and finding parking. Actually, it’s worth flying across the country for. I mean, I still have to try their Oaxacan tamales, blue corn waffle with chile honey, tandoori chicken sandwich, smoothies and dessert. I wish they had a cookbook, because I want to know how to make everything in their restaurant.

After the delicious meal, Nic and I headed to Al Gelato, but they were closed for the winter vacation. 🙁 So we just snapped a picture in front of the place.

All was not lost though: for sweets, Nic made me chocolate mint and vanilla marshmallows. They were dangerously fun to eat. Squish them between your fingers, let them bounce around in your mouth, cover them with chocolate, or dunk them in hot cocoa. You could also make kabobs by toasting marshmallows and bananas over an open flame. Then spread peanut butter all around. It would be heaven on a stick.

These marshmallows were better than the ones that Nic mailed me earlier. She’s been improving her technique. They weren’t too sweet, so they were suited for snacking. I may never buy supermarket marshmallows again.

Newsroom
120 N Robertson Blvd
Los Angeles, CA 90048-3115
(310) 652-4444

Comments (3)      Email Email      Print Print

The Beauty of a Bagel


Photo: Christopher Smith/New York Times

“A bagel is a round bread made of simple, elegant ingredients: high-gluten flour, salt, water, yeast and malt. Its dough is boiled, then baked, and the result should be a rich caramel color; it should not be pale and blond. A bagel should weigh four ounces or less and should make a slight cracking sound when you bite into it instead of a whoosh. A bagel should be eaten warm and, ideally, should be no more than four or five hours old when consumed.

“All else is not a bagel.” – Ed Levine, New York Times

Sometimes New Yorkers can seem like snobs, proclaiming that there is no other city in which to live. Surbanites resent that the “capital of the world” presents itself as the leader in museums, theater, fashion and media.But trust New Yorkers on this: they truly make great bagels.

I’m not trying to be a snob. I grew up loving Noah’s and Lender’s bagels. Almost everyday in eighth grade, I went to my local Socal store, Just Bagels, where I delighted in the chocolate chip and blueberry bagels. That was before I knew better.

A bagel, contrary to popular belief, is not a doughnut-shaped roll. There should be a marked difference in texture between the crust and the interior. The crust should crack, not crinkle, when you bite into it. The insides should be chewy, elastic and moist. Its crumbs should not resemble sawdust.

A plain New York bagel is so good that it does not need to be toasted, buttered or cream cheesed.

This weekend, my friend Thom hosted an after-church brunch. It was really an excuse for me to make bagels. I normally wouldn’t make them for myself, since I don’t have enough room in my overstuffed freezer to store the leftovers. I’m a huge fan of cooking and freezing, since it keeps food fresh and offers built-in portion control.

I used a recipe from The Bread Baker’s Apprentice. If you don’t live in New York, these are as close to an authentic bagel as you can get. Hot out of the oven, these are better plain than with any spread. It sounds like heresy, but Nutella detracts from the dough.

Basically you make a sponge out of high-protein flour, instant yeast and water. Let it sit for two hours, or until double. This extra step helps the dough develop more flavor.

Then you add some more flour, sweetener (preferably barley malt) and salt. After some heavy kneading, you shape the dough and let it retard in the fridge overnight.

The next morning, you briefly boil the dough and sprinkle on toppings while it’s still wet. I used oatmeal, black sesame, flax seed, chopped almonds and white sesame. Into a blistering hot oven it goes.

Notes/tips:
The bottoms developed a crunchy golden crust, thanks to the cornmeal-covered baking sheet. However, the tops did not brown, even though I cooked them for almost double the time. I suspect it’s because I put two sheets on the middle rack, thus preventing air circulation. Next time I’ll put the sheets on separate racks and alternate them halfway through baking. Don’t spoil your hard work by pulling out the bagels before they brown.

The texture of the interior was right on, and it tasted better than any grocery-store brand. However, the flavor wasn’t as complex as my favorite bagel, Murray’s Bagels. I suspect it’s because the sponge didn’t have enough time to develop its flavor. Since I had active dry instead of instant yeast, I made some changes to the recipe. Active dry yeast does not dissolve as readily, so I mixed it with hot water rather than room temperature water, as the recipe instructed. I also added all the yeast to the sponge, since the second step didn’t involve any liquid. As a result, my sponge doubled in only an hour. To slow down the rise, I’d dissolve the yeast in cooler water. I’d also divide the yeast and dissolve the second addition in 1/4 cup water (reserved from the sponge).

High-gluten (14% protein) or bread (13% protein) flour is necessary to give the bagel its texture and structure. You can make your own bread flour by adding 2 tsp vital wheat gluten to every cup of all-purpose flour.

Don’t be greedy with the toppings–every square inch doesn’t have to be covered. Any excess will fall off and be wasted, although sprinkling the extras over rice is tasty.

My dough was dimpled rather than smooth because it was difficult to knead by hand. The entire mass was as big as a basketball! And it only made 12 regular (or 24 mini) bagels. No wonder bagels have up to 400 calories, before the cream cheese! You’ll get better results if you use a stand mixer with a dough hook. But either way, the bagels are delicious.

Here’s how to spot an authentic bagel without even biting into it:

  • The exterior should be glossy – a sure sign that the bagel was boiled before being baked.
  • Little air bubbles peaking beneath the crust is a good sign. I suspect the dough blisters because of a hot oven (hence the term “blistering hot”).
  • When you tap the crust, it should sound like you’re hitting hard candy. If it sounds like a hollow football, you’ve hit a dud.
  • Avoid all bagels from New York street carts. They’re oversized, pillowy breads that “whoosh” when you bite into them.
  • Generally, authentic bagelries do not sell “gourmet” flavors. Asiago cheese and jalapeno toppings cover up a bagel’s shortcomings. I mean, would you ever eat a plain, untoasted and unadourned Thomas’ bagel? Ewwwwwwww.

    However, Bagel Oasis in Queens seems to be an exception.

If you visit New York, be sure to stop by my two favorite shops:

  • Murray’s Bagels-242 Eighth Avenue (between 22nd and 23rd Streets) or 500 Sixth Avenue (between 12th and 13th Streets)
  • Bagelry-429 Third Avenue (at 30th Street)

Comments (8)      Email Email      Print Print

Chinese New Year Bash: Roast Pork Buns

roast pork buns

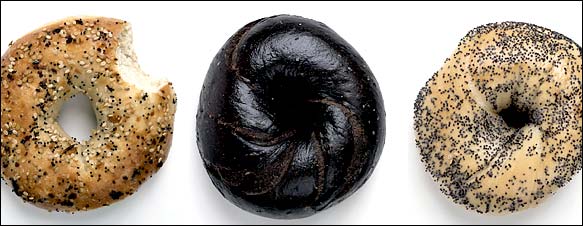
On Sunday, my apartment threw a dinner party not for the Superbowl (bah, what’s that?) but for Chinese New Year. I decided to go all out and make roast pork buns (char siu bao) completely from scratch. The buns come in two styles: fluffy, white steamed dough or eggy baked bread. I baked mine because I don’t have a giant steamer.

Of course, the star ingredient of the buns is roast pork. You may buy the cooked meat from a Chinese restaurant or make your own.

Roast Pork (Char Siu)
from The Key to Chinese Cooking by Irene Kuo

Cantonese barbecue meat is characterized by its deep red color, sweet flavor, and charred edges. Thinly sliced pieces are perfect as a stand-alone appetizer. The meat can also be added to fried rice, lo mein (ribbon-like rice noodles), Singapore (curry) noodles, and roast pork buns. A common error is to add salt to the marinade, which toughens the meat. You can substitute ketchup for the traditional red dye. It thickens the marinade for better coating.

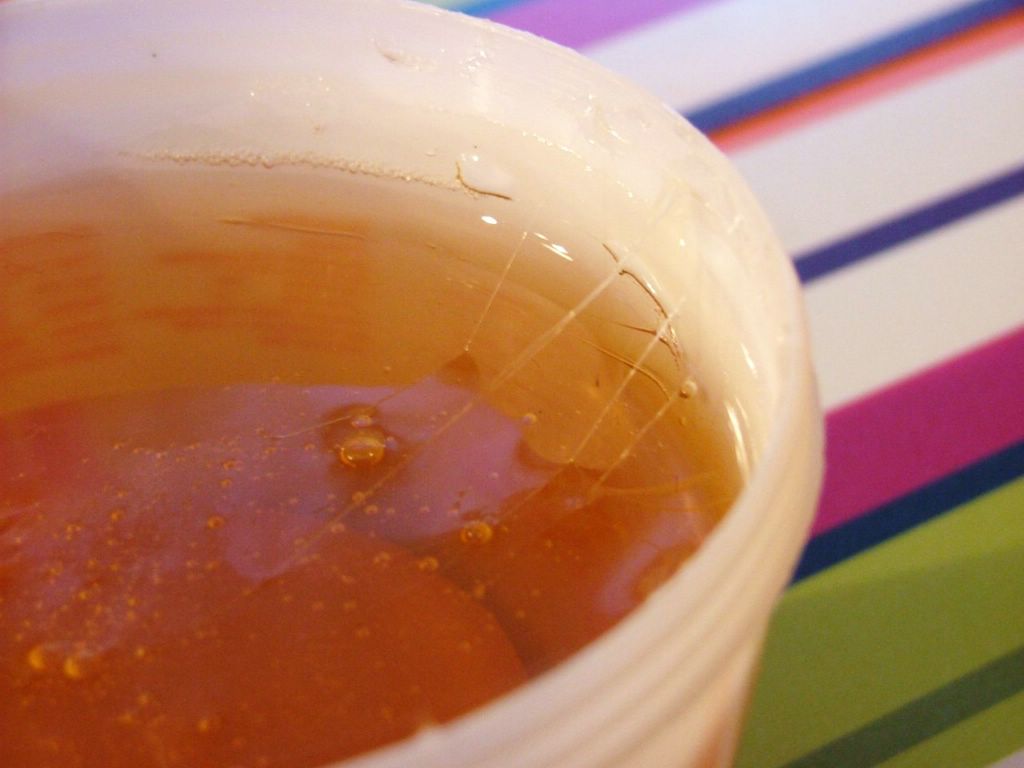
Maltose (the same sugary goo that coats Peking Duck to crisp its skin) is traditionally used in the marinade, but honey can be substituted.

maltose

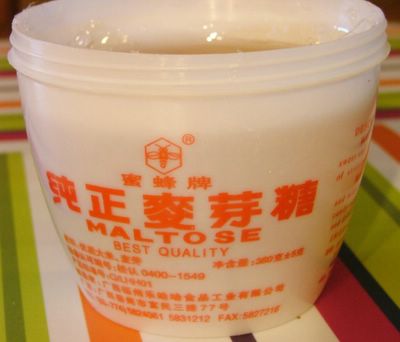
While honey has floral or fruity undertones (depending on what kind of pollen the bees hang around), maltose has a more neutral flavor. Maltose is also so thick that you can grab a chunk with your bare hands. But when you try to separate it, cobweb-like strands form at the edges, kind of like the cheese on pizza, but worse.

maltose

Ingredients:
Meat:
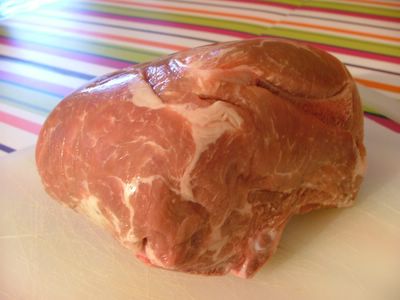
2 pounds boneless pork loin

Marinade:
3 tbsp light soy sauce
2 tbsp bean paste
1 tbsp Shao Xing rice wine or dry sherry
2 tbsp ketchup
2 tbsp pineapple or orange juice
1 tbsp sugar
1 tbsp maltose (also sold as malt extract I believe), honey, or corn syrup
2 cloves garlic, curhsed, peeled and coarsely chopped
1/2 tsp five-spice powder (a mixture of ground star anise, fennel, cloves, cinnamon and ginger)

Trim the meat of excess fat. I used rib loin to save money. When I deboned and de-fatted the meat, I only had half of what I started with.
pork rib loin

Slice it lengthwise, with the grain, into strips about 2 inches wide, 1 inch thick, and 5 to 6 inches long. Note to self: the grain runs in the same direction as the fat. Place them flat in a shallow pan. Stir the marinade ingredients in a bowl until well blended (if using maltose, heat the marinade over low heat to dissolve it) and pour over the meat, rubbing it well into both sides. Cover and marinate for about 3 hours at room temperature, turning the meat a couple times. You could also refrigerate the meat and bring it to room temperature before roasting, but it shouldn’t be marinated longer than 6 hours — prolonged soaking damages the firm texture.

marinating char siu (Chinese roast pork)
My strips were too small because I couldn’t tell which way the grain ran and cut with it.

Remove all the racks from your oven but the topmost one. Pour a few inches of water into a roasting or broiling water and place it on the floor of the oven to catch drippings and prevent smoking. Preheat the oven to 350 degrees.

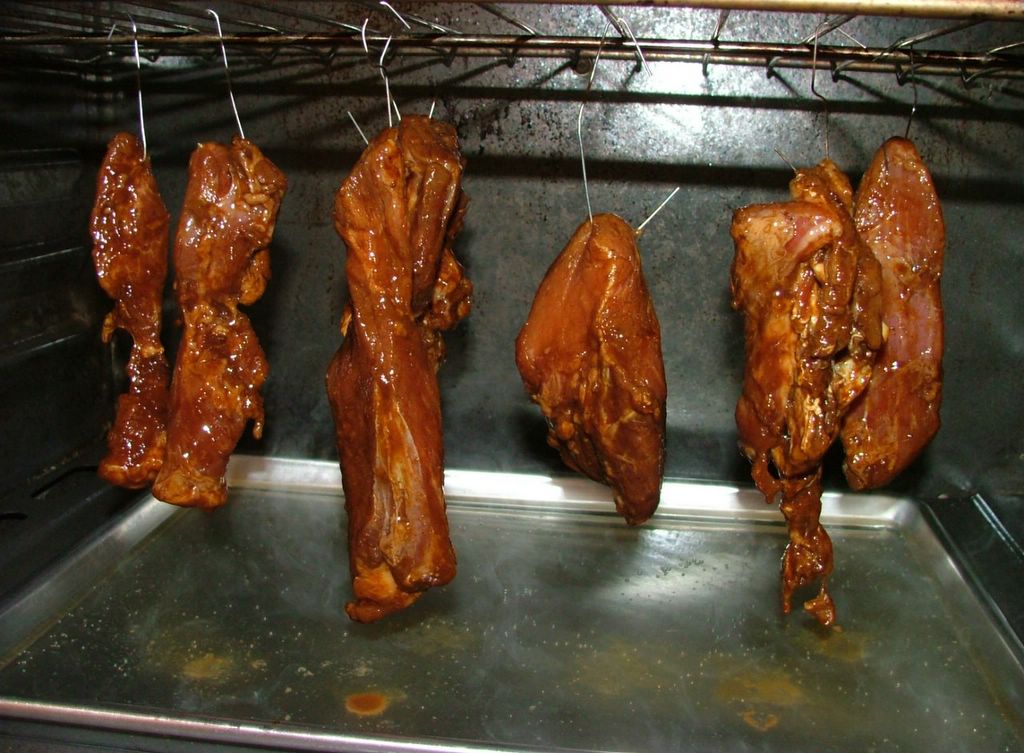
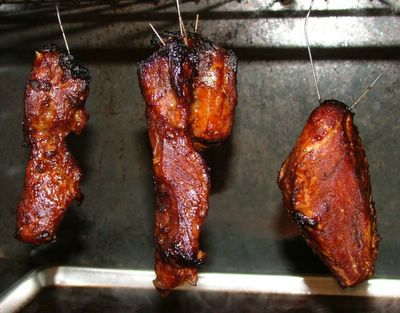
Insert a meat hook, drapery hook, or even a bent strong paper clip into one end of each strip (1 hook per strip) and hook the strips onto the top rack over the drip pan in one line.

baking char siu (Chinese roast pork) at home
Hanging meat, ghetto Chinatown style.

Roast the strips for 1 hour. Then increase heat to 400 degrees and roast for 10 more minutes.

char siu (Chinese roast pork)
Remove meat and take out the hooks.

cooked char siu meat (Chinese roast pork)
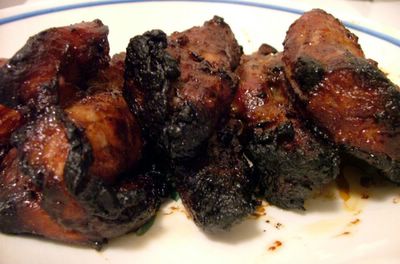
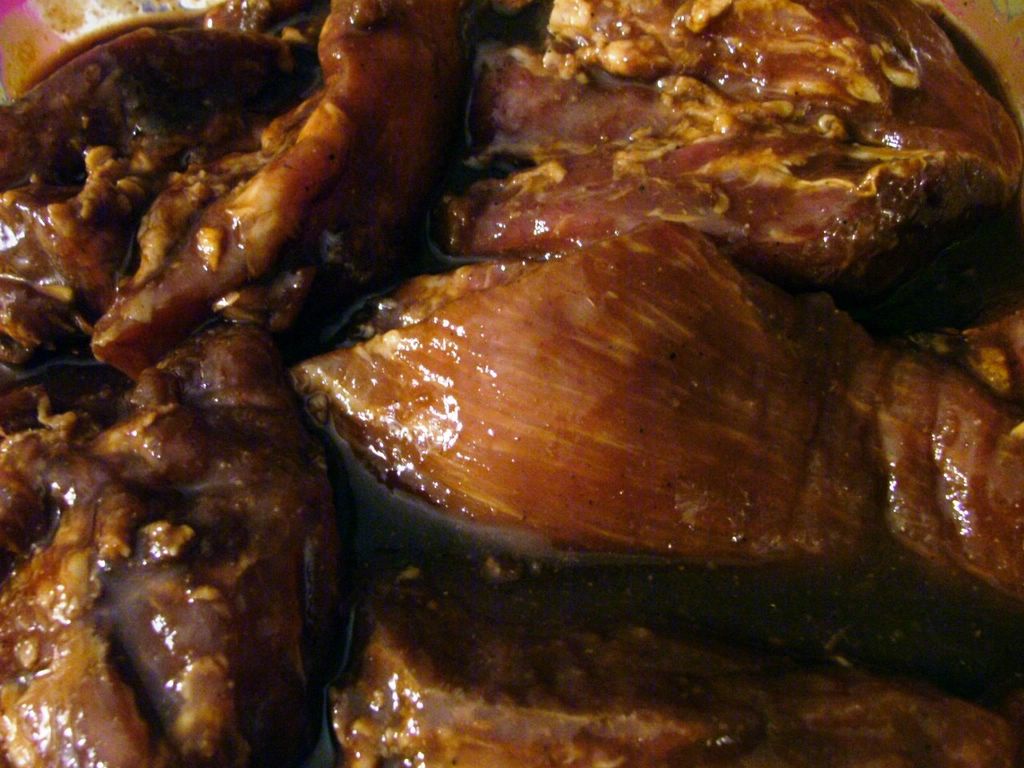
The “char” of char siu. Aka instant cancer, but it sure tastes good!

Let the strips cool and firm slightly and then slice them crosswise, against the grain. The pork is good hot, at room temperature, or cold.

sliced char siu (Chinese roast pork)
To reheat cold or frozen pork, place slices in an overlapping line in a snug shallow ovenproof dish. Pour a little meat stock over the meat (about 1/8 inch) and heat in a moderate oven or under a slow broiler until the liquid is steaming, the meat is hot inside, and the top surface is crisp. If you have no stock, you could season some water with soy sauce and honey or syrup to taste.

Don’t throw away the leftover marinade either! Just boil it on the stove for a couple minutes and save the liquid gold as a topping over rice or noodles. Thanks to Renee of Shiokadelicious for the tip!

Once again, The Key to Chinese Cooking came through for me. The book is like the Chinese version of The Joy of Cooking: reliable and thorough. I really liked the method of hanging the meat over water. No turning or basting was required, since heat evenly circulated the meat, and the water kept the meat moist. Roast pork is easy to make, and it’s okay (favorable, actually) to overcook it slightly so you get the crispy charred bits.

I thought the meat tasted more like Korean barbecue than Chinese roast pork, but it was delicious! Next time I’ll put a little less bean paste and more maltose. I’m not a meat person, but I could eat this roast pork on a stick.

Baked Pork Buns (Char Siu Bao)
adapted from The Chinese Kitchen (not as thorough as The Key to Chinese Cooking, but its strong suit is its dim sum recipes) by Eileen Yin-Fei Lo

For the Filling (make while the dough is rising):
5 tablespoons low-sodium chicken stock skimmed of fat (I used my roast pork drippings, skimmed)
1 tbsp oyster sauce
2 1/2 tsp sugar
2 1/4 tsp tapioca or corn starch
2 tsp ketchup
1 1/2 tsp dark soy sauce
Pinch ground white pepper
1 tbsp oil
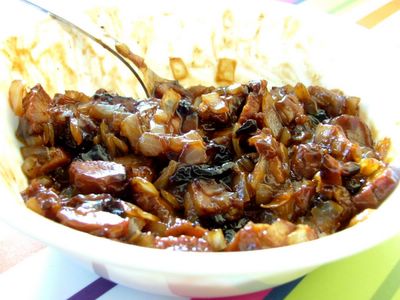
1 small onion, cut into 1/4-inch pieces
3/4 cup barbecued pork, cut into 1/2-inch pieces
1 1/2 tsp Shao Xing rice wine or gin
1 tsp toasted sesame oil

In a small bowl, combine chicken stock, oyster sauce, sugar, tapioca starch, ketchup, soy sauce, and white pepper; set aside.

Heat a wok over high heat for 40 seconds and add oil. Coat wok with oil using a spatula. When a wisp of white smoke appears, add onion. Lower heat to medium, and cook until onion turns light brown, about 2 minutes. Raise heat to high, add pork, and cook, stirring, for 2 minutes. Add wine, and stir to combine.

Stir the reserved stock mixture and add it to the wok. Cook, stirring, until the sauce thickens and turns brown, 1 to 1 1/2 minutes. Add sesame oil, and stir to combine. Transfer to a shallow dish. Cool to room temperature.

char siu bao filling (Chinese roast pork for buns)

For the dough:
One 1/4-ounce envelope active dry yeast
1/3 cup sugar
1/2 cup warm water (110 F)
2 cups bread flour
1 large egg, beaten
3 tbsp lard or oil
1/2 tsp salt
1 1/2 tbsp scallion-infused oil or plain oil (optional)

In a large mixing bowl, dissolve the yeast and sugar in the hot water. Put in a warm place for 30 minutes to 1 hour, depending on the outside temperature. (In cooler weather, the longer time will be required.) When the yeast rises and brownish foam appears on top, add the flour, salt, oil and half the egg, stirring constantly with your hand.

Begin kneading. When the mixture becomes cohesive, sprinkle the work surface with flour and place the dough on it. Continue kneading for about 15 minutes, picking up the dough with a scraper and flouring the work surface to prevent sticking. When smooth and elastic, place the dough in a large bowl. Cover with a damp cloth or plastic wrap and put in a warm place for 2 to 4 hours, depending on the temperature. The dough is ready when it has tripled in size.

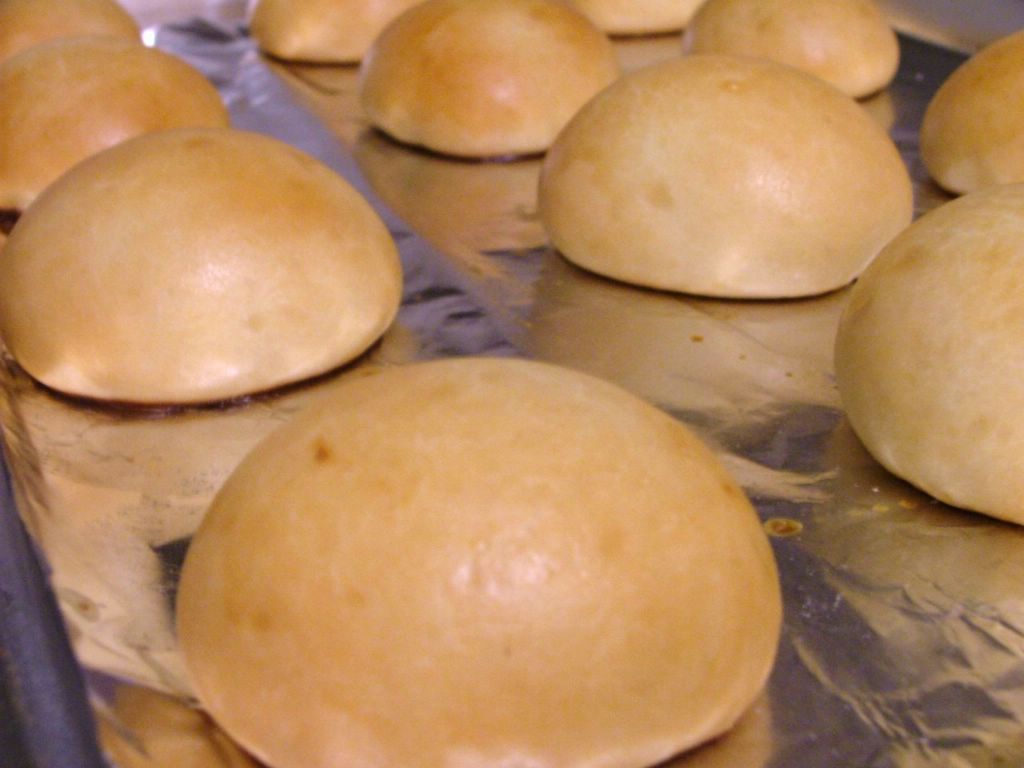
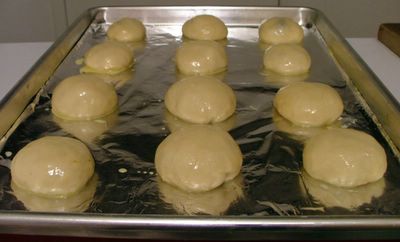
Heat the oven to 350F. Cut parchment paper into 12 pieces, 3 1/2 inches square. Or, grease a large piece of foil. Remove the dough from the bowl, knead several times, then roll out into a cylinder 12 inches long. Divide into 1-inch pieces.

Work with one piece at a time, keeping the others covered with a damp cloth. Roll each piece into a ball. (I used a trick I learned at my cousin’s bakery. I cupped my hand and rolled the ball between my palm and the work surface. I moved my hand very quickly to make the surface taught. The dough was ready when it bounced back after I stuck my finger in it. If you can leave an indentation in the dough ball, the surface isn’t tight enough.)

Press with your fingers to create a well in the ball. Place 1 1/2 tbsp of the filling into the well, hold a bun in one hand, and with the other turn the bun, pinching it closed. Press firmly to seal. Place the bun, seam side down, on the parchment paper or foil. Repeat until all 12 are done.

Place the buns on a cookie sheet, at least 2 inches apart to allow for expansion. Place the buns in a warm place to rise for 1 hour. Spritz each bun lightly with warm water. Make an egg wash by taking the remaining beaten egg and combining it with an equal amount of water. Brush each bun with the egg mixture.

proofing char siu bao (Chinese roast pork buns)
Bake for 15 to 20 minutes, or until golden brown. Halfway through the baking time, turn the cookie sheet around.

cooked char siu bao (Chinese roast pork buns)
As the buns cool, their crusts will become slightly hard. If you want them to remain soft, brush lightly with oil immediately after baking.

interior of char siu bao (Chinese roast pork bun)
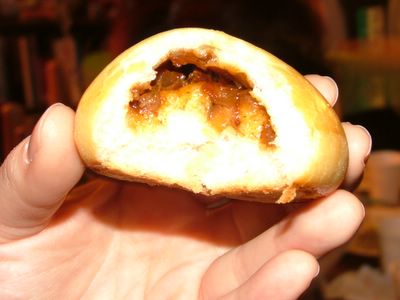
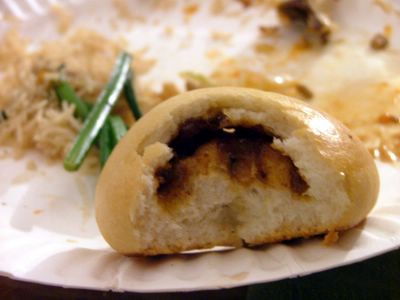
These were really good straight out of the oven, with the filling piping hot and the dough still soft. The filling was perfect. It was just the right mixture of sweet and savory. It was also thick but not unnaturally jelly-like. The dough was rich and slightly sweet, just like the kind you get in Chinatown. However, my dough wasn’t as airy because I was in a rush and only let it rise till double its size (not triple, like the recipe stated). Also, the recipe didn’t call for any salt in the dough. A touch of salt is always needed to bring out the flavor of baked goods.

I probably won’t make these from scratch again because it’s labor intensive, but I’m proud of my creation.

Comments (19)      Email Email      Print Print