Archive for May, 2005

Sahadi’s Stash

Italy has its olive and hazelnut oil, France has chestnut spread, Greece has fresh filo dough, Morocco has couscous, and China has roasted soybeans, but Sahadi’s in Brooklyn has it all.

This weekend, I prepared for the trek by bringing along an empty backpack. According to Gothamist, Sahadi’s shelves of imported oils, coffee, tea, spices, dried fruits, nuts and cheeses guarantee that shoppers will buy more than they can carry.

I told myself that I was just stocking up on ingredients for Su Good Sweets, but who was I kidding? I brought home this stash instead.

Clockwise:
Cocoa – $3.50/lb
Hazelnuts – $5.25/lb
Whole wheat couscous – $1.40/lb
Dried natural mango slices – $3.50/lb
Zatar (A woodsy, lemony spice blend consisting of sumac, sesame seeds, oregano and thyme. It’s excellent when combined with thick yogurt, used as a dry rub, or mixed with olive oil and spread on pitas.) – $2.50/lb
Dried natural Turkish apricots – $2.50/lb
Dried cranberries – $3.50/lb
Dried pitted dates – $2.35/lb
Knowing that I saved a buttload of money – priceless

New Yorkers in the know go to Fairway, Zabar’s and Gourmet Garage, but why pay $150 for balsamic vinegar again? Sahadi’s is just the first stop in Brooklyn off the 4/5 train. It’s a small price to pay for a cheap gourmet smorgasboard.

Supposedly Sahadi’s has super fresh ingredients since they have so many customers. My stash, however, was a mixed bag. Some of the dates were soft and moist, but most were a bit dry and chewy. The mangoes, while not doused in sugar, were not as fragrant as Costco’s Philippine variety. The stringy texture was also reminiscent of ginger. Thankfully, the cranberries were sweet, tart and moist.

If you’re in the neighborhood, be sure to stop by Damascus Bakery just a few doors down. Try their baklava (The almond and pistachio are equally good, but I don’t recommend the blonde bird’s nest: it’s too sweet and doesn’t have that toasty flavor.), mamool (The world’s first sweet cookie, traditionally made with semolina flour. I wasn’t too big on the oily, sandy texture), or pitas (6 for 75 cents in the unmarked bags!). Or, just nibble on whatever free sample they have out. While you’re in the ‘hood, you can also make a day out of exploring the entire street.

Sahadi’s
187-189 Atlantic Avenue
Brooklyn, NY 11201
Hours: Mon-Fri 9-7, Sat 8:30 -7
718-624-4550

Damascus Bakery
195 Atlantic Avenue
Brooklyn, NY 11201
Hours: Open 7 days 7AM-7PM
718-625-7070

Comments off      Email Email      Print Print

IMBB 15: Chocolate Mousse Truffles

This month, Elise at Simply Recipes is hosting the online foodie event, Is My Blog Burning. The theme this time is “Has my blog jelled?” – meaning people across the world will cook with gelatin, pectin, or agar agar and blog about it. Check out her round-up of all the recipes and try something!In America, gelatin is synonymous with Jell-O. It’s fun to look at the jiggly dessert, but it’s nothing more than extra sweet fruit juice that’s been chemically altered to hold its shape. Time and again, I’m seduced by the clear, sparkling colors, but the taste never matches up. And the texture’s rubbery.

I resolve to elevate gelatin from its kitschy roots. Stop using it to make wobbly pineapple-marshmallow ambrosia! There are better applications out there, like chocolate truffles.

Chocolate goddess Alice Medrich has found a way to freeze mousse and make them into luxurious truffles. These have just 2.7 grams of fat each and less than half the calories of regular truffles!

Chocolate Truffles
From Chocolate and the Art of Low-Fat Desserts by Alice Medrich
Makes about 45 truffles
Start working at least 1 day ahead

Chocolate truffle mousse center:
7/8 tsp. gelatin
1 egg, separated
1/4 cup unsweetened dutch process cocoa
1/4 cup plus 1/6 cup sugar
5/8 cup low-fat 1% milk
2 oz. bittersweet or semisweet chocolate, chopped fine
1/2 tsp. vanilla extract
1/16 tsp. cream of tartar

Coating:
16 oz. bittersweet or semi-sweet chocolate, chopped
1/3 cup unsweetened dutch process cocoa

Make the mousse:

  1. Sprinkle the gelatin over 1/8 cup cold water in a small cup. Let stand, untouched, for at least 5 minutes, or until needed.
  2. Place egg yolks in a medium bowl near the stove and have a small whisk ready on the side. Combine the cocoa with 1/6 cup of sugar in a 1- to 1 1/2-quart saucepan. Stir in enough milk to form a paste, then add in the remaining milk. Bring mixture to a simmer over medium heat, stirring frequently with a wooden spoon, reaching the bottom and sides of the pan to prevent burning. Stir the chocolate mixture continuously once it begins to simmer. Simmer gently, still stirring, for about 1 1/2 minutes.
  3. Turn off the heat and whisk a small amount of the hot mixture into the egg yolks. Scrape the mixture back into the pot and whisk well to combine. It’s now safe to eat and will thicken without anymore cooking. Stir in the softened gelatin, chopped chocolate, and vanilla. Let stand for a minute or so, and whisk again until chocolate’s completely melted and the mixture’s perfectly smooth.
  4. Set the saucepan in a large bowl of ice water to cool and thicken. Stir and scrape the sides occasionally. If the mixture begins to cool too quickly, remove from ice bath, whisk and set aside. Should the mixture actually set, place the pan in a bowl of hot water and stir just until resoftened.
  5. Make the meringue: Simmer 1 inch of water in a large skillet. Combine cream of tartar and 1 tsp of water in a 4- to 6-cup heatproof bowl. Whisk in the egg whites and 1/4 cup of sugar. Place an instant-read thermometer near the stove in a mug of very hot water. Place the bowl in the skillet. Stir the mixture briskly and constantly with a heat-proof spatula, scraping the sides and bottom often to avoid scrambling the whites. After 1 minute, remove the bowl from the skillet. Quickly insert thermometer, tilting bowl to cover the stem by at least 2 inches. If it’s less than 160 F, rinse the thermometer in the skillet water and return it to the mug. Place bowl in the skillet again. Stir as before until temperature reaches 160 F when bowl is removed. Beat on high speed until cool and stiff.
  6. Fold about a quarter of the cooled chocolate mixture into the beaten egg whites. Scrape the egg white mixture back into the remaining chocolate mixture. Fold to combine.
    Note: if you don’t mind raw egg whites, you don’t need to cook the whites beforehand. Simply beat the whites and cream of tartar in a bowl (water is unnecessary). When the mixture forms soft peaks, slowly sprinkle in the sugar and beat until stiff. Because this cooked meringue is firmer and deflates less than ordinary meringue, there’s a reversal in the conventional procedure for folding it with another mixture. If using regular meringue, lighten the mousse by folding a bit of the meringue in the chocolate mixture.
  7. Transfer to a bowl, cover, and freeze until firm enough to scoop, 5 hours or longer.

Form truffle centers:

  1. Get ready a bowl of hot water, a melon baller or spoon, a pan lined with wax paper, and the firm mousse. Dip the melon baller into the water and wipe dry. Form a scant 1-inch ball. Place it on the pan. Dip, wipe, and scoop centers until the mixture’s gone. Freeze centers at least 12 hours, or overnight. Centers may be prepared to this point and frozen for up to 2 weeks.

Coat the truffles:

  1. Melt chocolate in the top of a double boiler over barely simmering water, stirring frequently to prevent overheating. Or microwave on Medium (50% power) for about 3 minutes, stopping to stir several times. Chocolate is ready when it is completely melted and smooth and between 115 and 120 F.
  2. Pour cocoa into a shallow dish. Have ready another shallow dish for the completed truffles. Remove a third to a half of the frozen centers from the freezer and place them in a shallow dish next to the container of melted chocolate.
  3. With your right hand (left if you are left-handed), fingers together and slightly cupped, scoop a large handful of melted chocolate into your left hand. Rub both hands together to coat them with a thick layer of chocolate. Try not to get the chocolate on your fingers. Quickly pick up a frozen center with your left hand and roll it gently between your hands with a circular motion and as little pressure as possible, just long enough to cover it with a coating of chocolate. Add chocolate to your hands as you need it Immediately place the coated center in the cocoa dish. If you see any uncoated spots, dip a finger into the chocolate and patch the truffle. Have someone else shake the dish, roll the truffle in cocoa, and transfer it to a clean dish. Repeat until all the centers are coated, adding chocolate to your hands between each one. (If you’re alone, just divide the cocoa between 2 dishes. Place 2 or 3 truffles in the cocoa before stopping to shake the dish. Continue to add truffles and shake until the first cocoa dish is crowded with truffles, then start on the second.) Truffles may be stored in a tightly covered container in the freezer for up to 6 weeks. Serve frozen.

Notes:

  • Work quickly to keep the melted chocolate from hardening on your hands as you handle the frozen centers. Just keep the center moving–never let it rest in one place in your hands–and get it out of your hands as fast as possible.
  • You will have both chocolate and cocoa left over because the dipping technique requires that you work with more than you need. Place the leftovers in small plastic bags (strain the cocoa first). Store in the freezer (since they might have little of the melted truffle mixture) until needed for another recipe. Or heat the leftovers with milk and sugar to taste for decadent hot chocolate.
  • This should go without saying, but do not use a Hershey’s bar, chocolate chips or Baker’s chocolate. Use something decent, like Lindt, or Ghirardelli. Or splurge on Valrhona. I used the Valrhona that my brother gave me for my birthday.

Variations:
Add raspberry jam, peanut butter, coffee, Nutella, chile powder, cinnamon, or chopped nuts to the mousse mixture. Coat the truffles with chopped nuts, coconut, or sesame seeds.

Other applications for the low-fat filling:

Chocolate mousse: Double the mousse recipe and refrigerate it for four hours. Serve in 6-8 goblets. For an extra sensual experience, chop the chocolate coarsely, into 1-cm pieces, so it doesn’t dissolve completely in the hot milk mixture. The remaining chocolate bits will melt as they hit your tongue.

The mousse strikes a perfect balance between foaminess and creaminess.

It’s so rich that I could only eat a tablespoon at a time. Then I remembered how good it was and helped myself to some more and felt sick afterwards. Why oh why did I subject myself to such torture?

Bittersweet chocolate marquis: Double the mousse recipe and freeze it in a 4 to 5-cup loaf pan. Serve in 1/2-inch slices with creme anglaise (custard sauce) or strained raspberry puree. It’s richer than super-premium ice cream.

Chocolate gelato: Double the mousse recipe and freeze it in a container. No ice cream maker is necessary. Soften it in the fridge 15 minutes before serving and scoop into bowls. Gelato is softer and more flavorful than ice cream. This will explode in your mouth!

Frozen chocolate truffle sandwich cookies: Layer a thin coating of frozen mousse between two macaroon cookies and serve straight from the freezer.

Layered cake: Use the mousse immediately as a filling in your favorite cake. Refrigerate and serve when set.

Charlotte: Line a large bowl or round cake pan with plastic wrap. Then line the bottom and sides with ladyfingers or sponge cake and fill it with the mousse (triple the recipe above). Cover the top with berries and another layer of ladyfingers. Refrigerate 4 hours or until firm and invert the charlotte onto a serving platter.

Buche de Noel: Make your favorite sponge cake in a jelly-roll pan. Line it with the frozen mousse (triple the recipe above) and roll it into a cylinder. Cover the cake with meringue and freeze until ready to serve. Bake the cake in a 425 F oven until golden brown, about 4-6 minutes. Serve immediately.

Comments (4)      Email Email      Print Print

The Beauty of a Bagel


Photo: Christopher Smith/New York Times

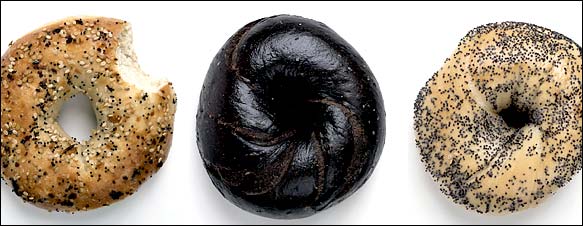
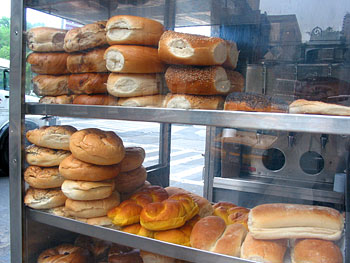
“A bagel is a round bread made of simple, elegant ingredients: high-gluten flour, salt, water, yeast and malt. Its dough is boiled, then baked, and the result should be a rich caramel color; it should not be pale and blond. A bagel should weigh four ounces or less and should make a slight cracking sound when you bite into it instead of a whoosh. A bagel should be eaten warm and, ideally, should be no more than four or five hours old when consumed.

“All else is not a bagel.” – Ed Levine, New York Times

Sometimes New Yorkers can seem like snobs, proclaiming that there is no other city in which to live. Surbanites resent that the “capital of the world” presents itself as the leader in museums, theater, fashion and media.But trust New Yorkers on this: they truly make great bagels.

I’m not trying to be a snob. I grew up loving Noah’s and Lender’s bagels. Almost everyday in eighth grade, I went to my local Socal store, Just Bagels, where I delighted in the chocolate chip and blueberry bagels. That was before I knew better.

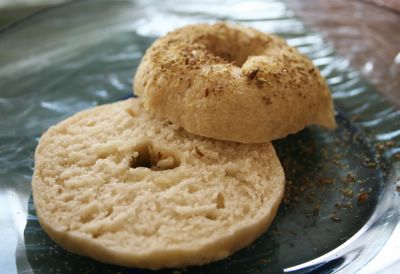
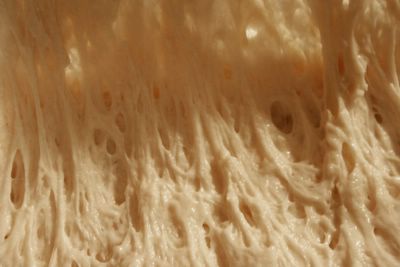
A bagel, contrary to popular belief, is not a doughnut-shaped roll. There should be a marked difference in texture between the crust and the interior. The crust should crack, not crinkle, when you bite into it. The insides should be chewy, elastic and moist. Its crumbs should not resemble sawdust.

A plain New York bagel is so good that it does not need to be toasted, buttered or cream cheesed.

This weekend, my friend Thom hosted an after-church brunch. It was really an excuse for me to make bagels. I normally wouldn’t make them for myself, since I don’t have enough room in my overstuffed freezer to store the leftovers. I’m a huge fan of cooking and freezing, since it keeps food fresh and offers built-in portion control.

I used a recipe from The Bread Baker’s Apprentice. If you don’t live in New York, these are as close to an authentic bagel as you can get. Hot out of the oven, these are better plain than with any spread. It sounds like heresy, but Nutella detracts from the dough.

Basically you make a sponge out of high-protein flour, instant yeast and water. Let it sit for two hours, or until double. This extra step helps the dough develop more flavor.

Then you add some more flour, sweetener (preferably barley malt) and salt. After some heavy kneading, you shape the dough and let it retard in the fridge overnight.

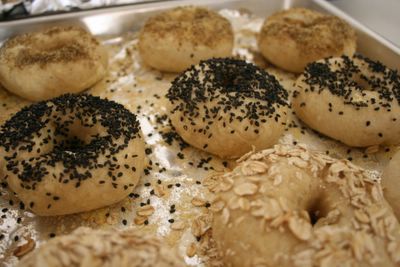
The next morning, you briefly boil the dough and sprinkle on toppings while it’s still wet. I used oatmeal, black sesame, flax seed, chopped almonds and white sesame. Into a blistering hot oven it goes.

Notes/tips:
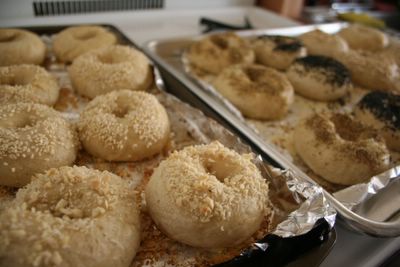
The bottoms developed a crunchy golden crust, thanks to the cornmeal-covered baking sheet. However, the tops did not brown, even though I cooked them for almost double the time. I suspect it’s because I put two sheets on the middle rack, thus preventing air circulation. Next time I’ll put the sheets on separate racks and alternate them halfway through baking. Don’t spoil your hard work by pulling out the bagels before they brown.

The texture of the interior was right on, and it tasted better than any grocery-store brand. However, the flavor wasn’t as complex as my favorite bagel, Murray’s Bagels. I suspect it’s because the sponge didn’t have enough time to develop its flavor. Since I had active dry instead of instant yeast, I made some changes to the recipe. Active dry yeast does not dissolve as readily, so I mixed it with hot water rather than room temperature water, as the recipe instructed. I also added all the yeast to the sponge, since the second step didn’t involve any liquid. As a result, my sponge doubled in only an hour. To slow down the rise, I’d dissolve the yeast in cooler water. I’d also divide the yeast and dissolve the second addition in 1/4 cup water (reserved from the sponge).

High-gluten (14% protein) or bread (13% protein) flour is necessary to give the bagel its texture and structure. You can make your own bread flour by adding 2 tsp vital wheat gluten to every cup of all-purpose flour.

Don’t be greedy with the toppings–every square inch doesn’t have to be covered. Any excess will fall off and be wasted, although sprinkling the extras over rice is tasty.

My dough was dimpled rather than smooth because it was difficult to knead by hand. The entire mass was as big as a basketball! And it only made 12 regular (or 24 mini) bagels. No wonder bagels have up to 400 calories, before the cream cheese! You’ll get better results if you use a stand mixer with a dough hook. But either way, the bagels are delicious.

Here’s how to spot an authentic bagel without even biting into it:

  • The exterior should be glossy – a sure sign that the bagel was boiled before being baked.
  • Little air bubbles peaking beneath the crust is a good sign. I suspect the dough blisters because of a hot oven (hence the term “blistering hot”).
  • When you tap the crust, it should sound like you’re hitting hard candy. If it sounds like a hollow football, you’ve hit a dud.
  • Avoid all bagels from New York street carts. They’re oversized, pillowy breads that “whoosh” when you bite into them.
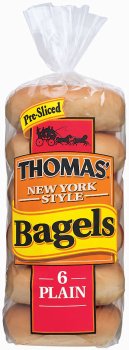
  • Generally, authentic bagelries do not sell “gourmet” flavors. Asiago cheese and jalapeno toppings cover up a bagel’s shortcomings. I mean, would you ever eat a plain, untoasted and unadourned Thomas’ bagel? Ewwwwwwww.

    However, Bagel Oasis in Queens seems to be an exception.

If you visit New York, be sure to stop by my two favorite shops:

  • Murray’s Bagels-242 Eighth Avenue (between 22nd and 23rd Streets) or 500 Sixth Avenue (between 12th and 13th Streets)
  • Bagelry-429 Third Avenue (at 30th Street)

Comments (8)      Email Email      Print Print