Archive for Cake

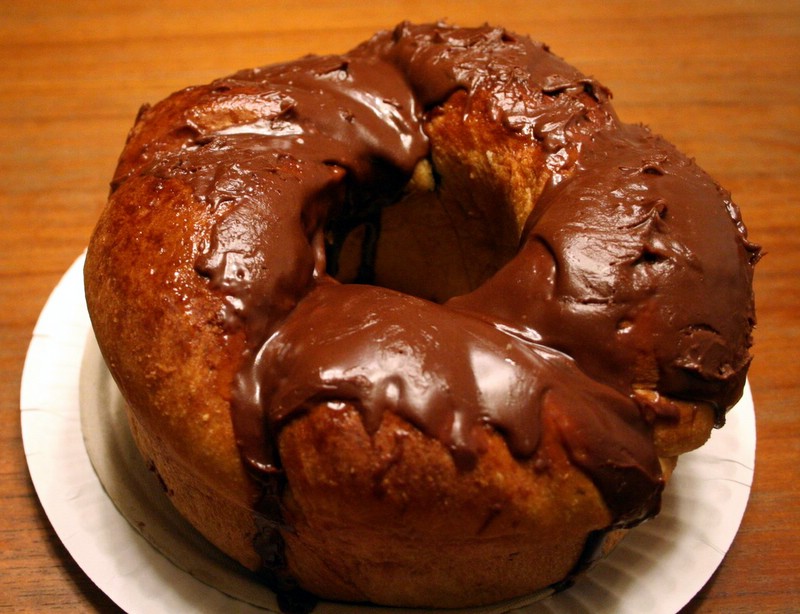
Chocolate-Hazelnut Cake x3

Nutella cake

Licking the jar clean is strictly encouraged when making a Nutella cake. That’s why it’s my favorite dessert to make. The recipe, from How to Be a Domestic Goddess, is kitschy yet decadent. A whole jar of Nutella, a stick of butter, a half dozen eggs, melted dark chocolate and ground hazelnuts combine to make a pudding-like cake.

Since I’m obsessed with all things with chocolate and hazelnut, I tested out two other recipes in search of the perfect cake. All were good in their own way, but I liked my first try the best. Here’s the taste-off:

Nutella Cake
lightened recipe from How to Be a Domestic Goddess

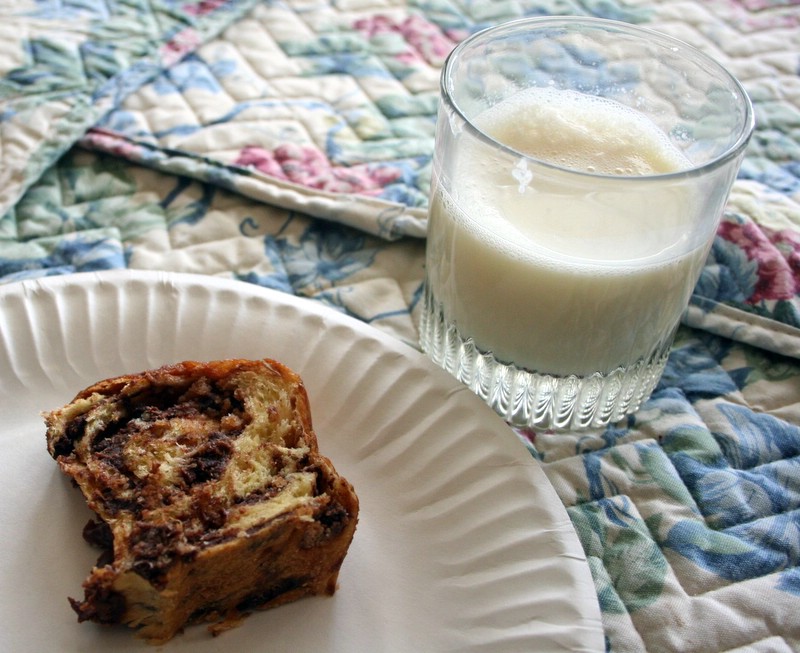
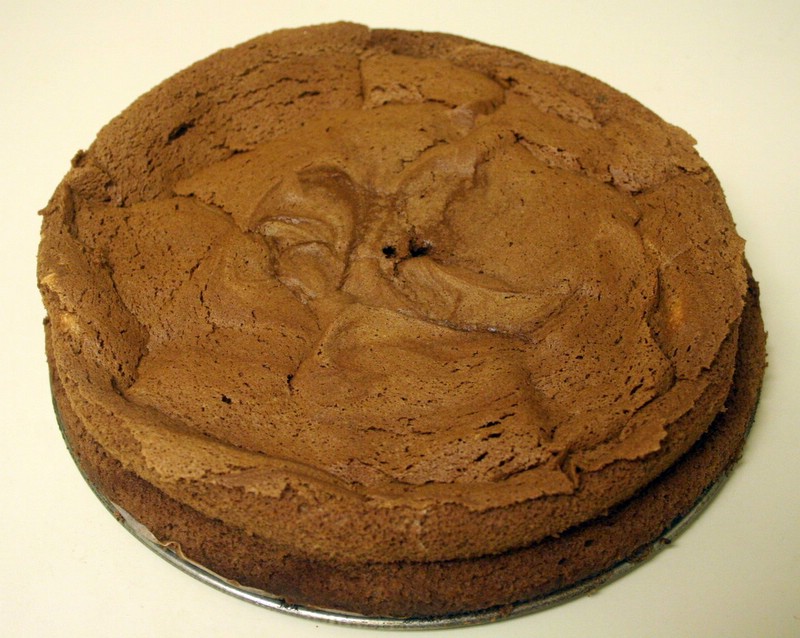
I had such great results halving the butter and replacing the chocolate with cocoa and sugar that I never bothered to make the full-fat recipe. This cake has virtually no grain; it’s like a solid slab of Nutella whose sweetness is offset by bitter cocoa. To see the interior of the cake, see The Skinny Epicurean.

I tried this recipe with homemade and store-bought chocolate-hazelnut spread. No need to get fancy: Nutella actually makes a better, smoother cake.

Makes 16 rich servings

CAKE:
1/2 cup toasted hazelnuts
1/2 cup plus 1 tbsp sugar
1/4 cup (half stick) soft unsalted butter
1 12-ounce jar of Nutella (chocolate-hazelnut spread)
1/2 cup cocoa
1 tablespoon Frangelico, rum or water
6 large eggs, separated
3/8 tsp cream of tarter or 3/4 tsp vinegar or lemon juice

  1. Preheat the oven to 350 degrees F. Prepare a 9-inch springform pan by lining the bottom with parchment or wax paper and greasing the sides.
  2. In a food processor, grind the hazelnuts with 1 tbsp of sugar until fine.
  3. In a large bowl, beat the butter and Nutella together. Add cocoa, Frangelico (or what you have chosen to use), egg yolks, and the ground hazelnut mixture. Set aside.
  4. In another large bowl, combine the egg whites and cream of tarter and beat till soft peaks form. Gradually sprinkle in 1/2 cup sugar and beat till stiff but not dry. This means that they will hold their peaks, yet still appear glossy and smooth.
  5. Lighten the chocolate mixture by stirring in a quarter of the egg whites, which you can beat in as roughly as you want. Gently fold in the rest of the egg whites a third at a time.
  6. Pour the batter into the prepared pan and cook for 40 minutes or until the cake’s beginning to come away at the sides and a toothpick inserted into the center comes out with a few moist crumbs cling to it. Cool on rack. The top crust will fall in the center like a crater.
  7. With your fingers, gently press down the sides of the cooled cake, so the edges are even with the center. Unmold by sliding a knife around the edges. If desired, trim the top crust with a large serrated knife. Invert the cake on a platter, or leave it on the base if you choose.

DECORATING:
adapted from Chocolate and the Art of Low-Fat Desserts by Alice Medrich
1/2 cup sugar
1 cup unsweetened cocoa powder
1/2 cup plus 1 Tbsp low-fat 1% buttermilk
1/2 tsp vanilla extract
4 ounces (1 scant cup) whole toasted hazelnuts

  1. Combine the sugar and cocoa in a heavy saucepan. Whisk in just enough buttermilk to form a smooth paste. Stir in the remaining buttermilk. Cook over medium heat until the mixture simmers and begins to boil, stirring constantly with a wooden spoon, scraping the sides and bottom of the pan. Boil gently for 2 minutes, stirring constantly to prevent burning. Turn off the heat and stir in the vanilla.
  2. Pour through a fine strainer. Allow to cool. To prevent a skin from forming, cover it with plastic wrap directly on the surface. Chill for several hours or overnight. It will thicken as it cools. It will keep in the refrigerator, covered, for at least 1 week.
  3. To assemble the cake, spread a thin layer of glaze over the top and sides of cake. Allow cake to set, at room temp, for at least 20 min. Spread another layer over the top and sides. Dot the top of the cake with the hazelnuts.
  4. Cake keeps at room temperature for up to one day or in the refrigerator for five.

Notes:

  • Toast the nuts in a 350-degree oven for 10-20 minutes to release their aroma. Stir half way through baking to ensure even browning. Nuts are done when they are fragrant and golden brown. Optional step: to get rid of the bitter skin, rub the cooled nuts in a paper towel.
  • Grinding the hazelnuts with some sugar ensures that those flavorful oils don’t go to waste. The sugar also acts as padding so you can grind the nuts finely without turning them into butter.
  • The boiling time is important in the sauce. This glaze makes a thick smooth covering for a cake, but it is not stiff enough to frost with swirls or peaks. If you cheat on the boiling time, it will not thicken enough (even after chilling) to coat a cake without dripping mostly off the sides, nor will it have the intensity of flavor it needs to be a great chocolate sauce.
  • To make one cup of buttermilk, measure 1 Tbsp vinegar and add enough milk to make one cup total.

Variation:

  • To make about 28 cupcakes, pour the batter into cupcake liners and bake for about 20 minutes.

Chocolate-Hazelnut Torte
adapted from Chocolate and the Art of Low-Fat Desserts by Alice Medrich

Chocolate Hazelnut Souffle Torte

I used hazelnuts in the Chocolate Walnut Torte recipe and got something very similar to the famous Fallen Chocolate Souffle Torte, printed on the preceeding page. While it wasn’t as pudding-like as the Nutella cake, it was delicious in its own right and did not taste low-fat at all. The torte was delicate and even better when warmed. You don’t need to microwave individual slices till hot, but just enough so the chocolate is oozy and melted. Since hazelnuts have less fat than walnuts, you can probably increase the yolks and chocolate to make the cake richer.

Serves 10

Ingredients:
1/3 cup toasted hazelnuts (1-1/3 ounces)
3 Tbsp all-purpose flour
2-1/2 ounces dark chocolate, chopped fine
1/3 cup unsweetened cocoa
1 cup sugar
1/3 cup boiling water
1 egg yolk
1 Tbsp rum (may omit)
1/2 tsp vanilla extract
4 egg whites
scant 1/4 tsp cream of tartar or 1/2 tsp vinegar or lemon juice
about 2 tsp powdered sugar, for dusting

  1. Position the rack in lower third of the oven and preheat to 350 F. Place a round of parchment paper in the bottom of an 8-inch springform pan and spray the sides with vegetable oil spray
  2. In a food processor or blender, grind the walnuts with the flour until very fine. Set aside.
  3. Combine the chopped chocolate, cocoa and 3/4 cupt of the sugar in a large mixing bowl. Pour in boiling water and whisk until the mixture is smooth and chocolate is completely melted. Stir in the egg yolk, rum, and vanilla. Set aside.
  4. Combine the egg whites and cream of tartar in a medium bowl. Beat at medium speed until soft peaks form. Gradually sprinkle in the remaining sugar and continue to beat at high speed until stiff but not dry. Whisk the walnuts into the chocolate. Fold a quarter of the egg whites into the chocolate batter to lighten it. Fold in the remaining egg whites. Scrape the batter into the pan and smooth the top. Bake until a skewer or toothpick inserted into the center of the torte comes out with a few moist crumbs clinging to it, about 25-30 minutes. Cool torte in the pan on a rack. It will sink dramatically in the center as it cools, leaving a raised crust around the edge. Torte may be stored, covered, at room temperature for 1 or 2 days or frozen, well wrapped in foil or plastic, for up to 2 months.
  5. To serve: slide a thin knife around the sides of the pan to release the torte. Remove sides and bottom of springform or invert cake pan to unmold. Remove paper liner from bottom and turn torte right side up on a cake circle or platter. Sieve a little powdered sugar on top.

Nutrition information (if made with walnuts)
calories per serving: 169; fat: 5.9 g; % calories from fat: 29%; protein: 3.5 g; carbohydrates: 28.6 g; cholesterol: 21.2 mg

Chocolate-Hazelnut Cake
from Eating Well, winter 2003

Eating Well chocolate hazelnut cake
Picture courtesy Eating Well

Much of the sweetness and moistness here comes from ground dates. Bread crumbs stand in for some of the hazelnuts to create the nubby texture. This low-fat, low-sugar cake is very good for what it is, but that’s not good enough for me. A mediocre healthy dessert doesn’t deserve to be called dessert. In reality, it’s just a health-ified sweet snack.

The test of a good dessert is how much you need to eat in order to feel satisfied. Because of the dates, this cake has a moist, cloying stickiness that never melts on your tongue. So you keep cutting another slice, hoping that the chocolate hit comes.

Ingredients

CAKE:
1/2 cup chopped pitted dates
1/2 cup unsweetened cocoa powder
1 teaspoon instant coffee granules
1/2 cup boiling water
1/2 cup chopped hazelnuts, plus 2 tablespoons for garnish
2 slices firm white sandwich bread, crusts trimmed
1/3 cup all-purpose flour
1/4 teaspoon salt
2/3 cup sugar, divided
2 tablespoons canola oil
1 teaspoon vanilla extract
1 large egg
3 large egg whites

GLAZE:
1/3 cup unsweetened cocoa powder
2 ounces bittersweet (not unsweetened) or semisweet chocolate, finely chopped (1/3 cup)
1 tablespoon corn syrup
1 teaspoon instant coffee granules
1/4 cup boiling water
1/2 teaspoon vanilla extract
1 cup confectioners’ sugar

To make:

To prepare cake:

  1. Preheat oven to 350°F. Coat a 9-inch round cake pan with cooking spray. Line the bottom with parchment or wax paper.
  2. Combine dates, cocoa and instant coffee in a small bowl. Add boiling water and stir until cocoa has dissolved. Cover and let stand until dates have softened and mixture has cooled to room temperature, about 20 minutes.
  3. Meanwhile, spread hazelnuts in a shallow baking dish and bake until fragrant and lightly toasted, 5 to 10 minutes. Transfer to a plate and let cool.
  4. Grind bread into fine crumbs in a food processor. Measure to make sure you have 1/2 cup. Transfer to a large bowl. (No need to wash the workbowl between steps.)
  5. Place 1/2 cup hazelnuts in the food processor. Add flour and salt; process until nuts are finely ground. Transfer to the bowl with the breadcrumbs.
  6. Scrape the cooled date mixture into the food processor. Add 1/3 cup sugar, oil, vanilla and whole egg; process until smooth, stopping several times to scrape down the sides of the workbowl. Scrape the mixture into the bowl with the breadcrumbs and nuts. Mix gently with a rubber spatula.
  7. In a large clean mixing bowl, beat egg whites with an electric mixer until soft peaks form. Gradually add remaining 1/3 cup sugar, beating until stiff, glossy peaks form. Add one-fourth of the beaten whites to the batter and whisk until blended. Fold in the remaining whites with a rubber spatula just until blended. Scrape the batter into the prepared pan, spreading evenly.
  8. Bake until the top springs back when touched lightly, about 20 minutes. Let cool in the pan on a wire rack for 5 minutes. Spray the rack with cooking spray and invert the cake onto it to cool completely.
  9. Meanwhile, to prepare glaze: Combine cocoa, chocolate, corn syrup and instant coffee in a medium bowl. Add boiling water and stir with a wooden spoon until the chocolate has melted and the mixture is smooth. Stir in vanilla. Cover with plastic wrap and refrigerate until chilled, at least 1 hour.
  10. Gradually add confectioners’ sugar to the chocolate mixture, beating with an electric mixer, slowly at first, then gradually increasing speed, until the glaze is smooth and thickened. (The mixture may seem lumpy at first, but it will smooth out.)
  11. To finish the cake, place it bottom side up on a serving plate. Place several strips of wax paper under the bottom edge to protect the plate from drips. Spoon on glaze and spread it evenly over the top and sides of the cake with an icing spatula or knife. Arrange the remaining 2 tablespoons hazelnuts around the top outside edge. Discard the wax paper before serving. Makes 12 servings.

Per serving: 233 calories; 9g total fat (2 g sat, 5 g mono); 18 mg cholesterol; 38 g carbohydrate; 5 g protein; 4 g fiber; 82 mg sodium.

Comments (12)      Email Email      Print Print

Four Star Meets Lone Star: Desserts by Johnny Iuzzini featuring Texas Grapefruit, part two

Frozen grapefruit and orange carpaccio with warm almond cake

Continuing on with four-star pastry chef Johnny Iuzzini’s grapefruit dessert demo, we have almond cake with frozen grapefruits and oranges.

The almond cake was served warm from the oven and was like a souffle: light, airy and creamy. It had a delicate browned upper crust. The frozen grapefruit and orange carpaccio’s (Italian for thinly sliced cold food) kaleidoscopic colors were elegant, but I didn’t care for the taste or texture. It was very icy, like a watered down popsicle. I think grapefruit sorbet, bursting with bright flavors, would have been more appropriate. Or, if you’re keen on contrasting textures from the pudding-like cake, a granita would work too.

Grapefruit-tarragon millefeuille

The most elaborate dessert was the grapefruit-tarragon millefeuille. While it did not have a thousand layers as the French name suggests, it did have several components neatly stacked on top of each other. The base was pate sable (tart dough),then citrus sponge cake, sweetened grapefruit sections, white chocolate, tarragon pastry cream, another layer of white chocolate and candied grapefruit peel on top. What a mouthful to say and eat.

With so many layers, I focused on getting an equal amount of everything in one bite. I literally had to stab the beautiful creation in my feeble attempt. The chocolate shattered into shards; the pastry cream drooped out; an entire grapefruit section slid out leaving subsequent bites naked; the fork hit resistance with the coarse cake; and the crust crumbled. The eating experience could easily be remedied by cutting the citrus sections into smaller pieces.

The dessert was heavy on craftsmanship, but my favorite parts were just the top three layers: cool pastry cream, crisp white chocolate, and some citrus for a little tang. The flavor combo was like an elegant creamsicle. For home application, you could make white chocolate cups, fill with your favorite pudding or pastry cream, then top with citrus sections.

Chocolate-grapefruit crepe suzette with meyer lemon confit

Rounding out the dessert tasting was a relatively simple chocolate crepe filled with grapefruit curd. My favorite dessert of the bunch, the smooth curd (a milkless pudding augmented with eggs and butter) oozed out of the crepe. Really great. At home, you can spread any citrus curd on a crepe, pancake or even tortilla. The buttery suzette sauce isn’t necessary, but the sugared lemon on top is a nice touch.

The experience made me more aware of the different styles of dessert. Iuzzini reminds me of The French Laundry’s Thomas Keller: both bring several components together for the final dish. Iuzzini is no doubt a talented craftsman. He has only worked at four star restaurants: Payard, Cafe Boulud, Daniel and Laduree (they claim to have invented the macaroon sandwich cookie in Paris). He has appeared on several best pastry chef lists from New York magazine, the James Beard Awards and Pastry Art & Design. However, his desserts aren’t for me. It’s haute cuisine: art that’s admired more for its concept than its usefulness (in this case, my stomach). I prefer not to be blatantly aware of every dessert component. It’s as if each part cries out, “Pay attention to me, I’m honey!” “I’m Meyer lemon!” “I’m tarragon!”

It’s not that I’m mindless when I eat. My philosophy is just to use a few quality ingredients and handle them minimally.

More info on Johnny Iuzzini:
New York profile
The Amateur Gourmet’s two reviews of Jean Georges

Jean Georges
1 Central Park W
New York, NY 10023-7703
(212) 299-3900

Comments off      Email Email      Print Print

Four Star Meets Lone Star: Desserts by Johnny Iuzzini featuring Texas Grapefruit

Johnny Iuzzini's signature dessert tasting
Photo courtesy StarChefs

Every day, four-star pastry chef Johnny Iuzzini dazzles diners at New York’s Jean-Georges with his signature dessert tastings. Contrasting textures and temperatures come together in a central theme, be it chocolate, berries or even beets. This Saturday, he did it for free at the French Culinary Insitute. The demo and tasting was sponsored by Pastryscoop.com (an online publication of the French Culinary Institute) and TexaSweet Citrus Marketing, Inc. Can you guess what the theme was?

Johnny Iuzzini shows off the red-fleshed grapefruit

For three hours, about 80 guests watched Iuzzini prepare five grapefruit desserts and ate the fruits of his labor (pun intended). As a bonus, each person brought home a grapefruit giftbox, a zester (made for dang right handers!) and Iuzzini’s recipes, which I’ve provided through the links below.

Although the desserts were specially created for this event, the building blocks are mainstays at Jean-Georges. The instructions are sparse and assume you have a working knowledge of pastries. If you get past the French terms like chinois and quenelle, you can re-create four-star desserts at home. Where applicable, I’ve included Iuzzini’s tips. I felt like I was at culinary school, greedily jotting down the master’s secrets. Also, the quanities are by weight. One cup of flour can weigh between four and six ounces, a 50% difference! The beloved cup and teaspoon aren’t so accurate after all. Pastry Scoop lists conversions for liquids, flour and sugar to help you out.

WARM HONEY TART, GRAPEFRUIT-SHISO GRANITE,CHARRED ORANGES

Iuzzini’s first dessert was a warm honey tart, accompanied with grapefruit-shiso granite (ice) and charred oranges. The tart crust was technically a pate sable, which is French for “sandy pastry.” The term sounds like a coarse, mealy dough, but it’s not! Pate sable is like a crisp cookie that disintegrates in your mouth. If you only try one tart dough, make it this one. The custard was exceptionally smooth and hid a layer of tart grapefruit sections for contrasting flavors. Continuing with the theme of contrast, the grapefruit granita was cold and chunky. I thought the soul of this dish was the custard and the crust. For home application, I’d skip the citrus sections and the granita. Besides, I couldn’t even tell what that Asian herb, shiso, tasted like.

GRAPEFRUIT MIRROIR, THAI BASIL, BRIOCHE, AND HONEY GINGER ICE CREAM

Next up was honey ginger ice cream, accompanied with grapefruit mirroir (like a runny Jell-O), brioche (a rich bread with lots of butter and eggs) croutons, and a drizzle of Thai basil oil. The point here was to contrast sweet, smooth cream with tart, textured jelly. The mirroir’s texture reminded me of (dare I say it?) brains. Sorry, all that time working at Court TV is infusing me with morbid humor. Iuzzini intended the crunchy croutons to add another dimension of texture, while the basil-infused oil was supposed to contribute a fresh flavor. I thought the dessert could have been fine without these two. At home, you can just layer premium vanilla ice cream with tart jam or citrus curd to get a similar experience.

Coming up in part two: almond cake with frozen grapefruit and oranges, grapefruit-tarragon millefeuille (layered pastry), and chocolate crepes filled with grapefruit curd.

Jean Georges
1 Central Park W
New York, NY 10023-7703
(212) 299-3900

Comments (4)      Email Email      Print Print

L.A. Dessert Crawl

The Adamson House in Malibu in the dead of winter

Los Angeles may be paradise when it comes to the weather, but is it a haven for dessert lovers? In a large city with a slew of celebrities to please, there’s bound to be at least one place that does dessert well. However, L.A.’s size is also its downfall: at 465 square miles (L.A. County is more than 4,000 square miles), you’ll spend much of the day driving and parking when exploring the area. When tackling L.A., stick to one of the various neighborhoods at a time and plan accordingly.

On the Westside of L.A. is Amandine Patisserie, a French-style bakery that serves croissants, tarts and sandwiches. I tried their pumpkin “pie” during Christmas, and it was delicious! The large pie is about one foot wide, but it’s very easy to eat two slices. The filling is stringy enough so you know it has fresh pumpkin but not so stringy that it gets stuck in your teeth. It’s completely covered with stiffly whipped cream and a generous dusting of cinnamon. I normally don’t like whipped cream because it often wheaps or tastes like whipped nothing. However, this whipped cream is as close to room-temperature ice cream as you can get. The pie already has a la mode built in! For even more decadence, the pie would also be delicious with a scoop of vanilla ice cream on top.

Adding to the untraditional nature of the pie is its cookie-like crust. There are no crimped edges. Instead, the crust is formed in a deep cake pan. I prefer flakey pie crusts, but in this case the sum (fresh pumpkin filling, whipped cream, cookie crust) is greater than its parts.

A minor complaint that I have is that the filling tasted like it had too much cream. Fat carries flavor, but it can also coat the tongue and deaden flavors. That’s why gelato, made with milk instead of cream, is more flavorful than ice cream. Using less cream or lightening up on egg yolks would make the pumpkin flavor brighter. But now I’m nitpicking; most people probably wouldn’t notice the difference.

Diddy Riese Cookies logo

If you catch a movie at the Mann Village or Bruin theaters (where most L.A. premieres are) in Westwood, be sure to stop by Diddy Riese Cookies for a $1 ice cream sandwich. Yes, for the same amount of money it costs to call 1-800-COLLECT, you can get a scoop of Dreyer’s (known as Edy’s on the East Coast) sandwiched between two soft-baked cookies. You can mix and match between the usual drop cookies, like chocolate chip, oatmeal raisin, snickerdoodle and sugar. Ssh, they are made with a mixture of butter and margarine. Tsk, tsk. I will fight to the end for butter-only baked goods.

Chain restaurants are infamous for serving cloned, commercial food. In New York, for example, the Au Bon Pain bakery cafes sound like they serve gourmet French fare, but in reality they’re a pain to dine at. I’ve witnessed a clerk mistake a jalapeno cheese bagel for a danish, and my co-workers have seen them use the same broom the brush the food shelves and floor.

Corner Bakery dessert

On the flip side, the Corner Bakery in the L.A. area and various other states serves delicious, dependable food. They have brownies, cookies, bread and even muffin tops in the Calabassas Commons location! As Seinfeld can attest, the best part of muffins are the tops, with their extra crust and crumb coating. How does a chocolate muffin with fresh bananas sound? Delicious, right?

Corner Bakery breakfast

For breakfast, I opted for the healthier Swiss oatmeal. Rolled oats are naturally sweetened with fresh apples, banana chunks, dried currants, dried cranberries and bound together with yogurt. The whole thing is accompanied by a “sweet crisp.” The crisp, made from toasted raisin pecan bread and sprinkled with coarse sugar, is like bread in biscotti form. It’s excellent when dipped in the oatmeal or eaten plain as a sweet chip. Corner Bakery sells packaged crisps to go, as well.

Corner Bakery sweet crisps

Corner Bakery also has savory fare, such as sandwiches, panini and salad. The Uptown Turkey sandwich comes with hickory smoked turkey breast, avocado and bacon on whole grain bread. It’s expertly layered so the cool tomato goes up against the creamy mayo and hot, toasted bread. The sandwiches also come with homemade potato chips and a crisp pickle. They’re not artisan sandwiches like the ones at ‘Wichcraft in New York, but at $6.29 for a large plate, they’re a much better value.

I may pretend that I’m a sophisticated New Yorker, but I grew up closer to the San Fernando Valley. Like totally, I’m a valley girl. Love’s Cool pointed me to the homey Bea’s Bakery, known for its Jewish specialties such as babka and chocolate chip challah (which is only available on Fridays, according to Nic at The Baking Sheet).

Bea's Bakery sign

The space is bustling with customers, but the nice ladies behind the counter move everyone quickly. Their goods are reasonably priced: $1-cupcakes and $4 per pound of chocolate chip, apple, cinnamon, cinnamon raisin or apple babkas. With other products such as Yum Yum Cake, it’s hard to choose what to get. Because of Love’s Cool’s recommendation, I chose the chocolate chip babka and added the pumperknickel raisin bread on an impulse buy.

whole babka

The babka is slathered with wine-y chocolate icing (imagine what doughnut glaze would be like if it never hardened). Inside are beautiful swirls of tangy chocolate chips and brown sugar streusel. The bread portion is colored yellow from eggs and reminded me of an Entenmann’s danish. I thought the bread was on the dry side, but when toasted, the chocolate chips get melty and compensate.

The pumperknickel bread has plump raisins and a soft interior. My favorite part is the crust. It borders on overdone, but it’s all the more better to make it chewy. The bread can be eaten plain out of hand, but I think the crust develops more bite when toasted. The crumb could be more elastic and have more of a fermented flavor.

Pastries by Edie, also in the Valley, has elaborately decorated cakes. Gleaming behind the display cases are two sizes of mini-pastries. The smallest size is just enough for one person to sample, while the larger variety is big enough for two to share. At $1.50 each, the minis are a great value for all the handiwork involved.

Pastries by Edie mini cakes
Photo courtesy Pastries by Edie

Pastries by Edie chocolate raspberry cake

The chocolate raspberry cake has layers of sponge cake, chocolate mousse and raspberry filling topped with a clean-tasting raspberry glaze. The decorations include gold-frosted chocolate, both on top and on the sides of the cake. While Pastries by Edie doesn’t skimp on the presentation, the pastry has a muted flavor. I would argue that if you closed your eyes, you wouldn’t know what you were eating. Raspberry and chocolate are a classic combination because of the fruit’s tanginess; there is no contrast between the raspberry and chocolate here. The chocolate garnishes have a nice texture though. It’s not too hard because of the coldness, nor is it greasy (bakers often add fat to refrigerated chocolate to combat the hardness). The flavor, however, is generic. It looks (err tastes) like someone skimped on the ingredients here.

Pastries by Edie also has homemade gelato. A sign in the shop informs customers that gelato has less overrun (whipped air) than ice cream and is made with milk so the flavors are brighter. The description promises authentic gelato, but the end product regretably resembles ice cream. The chocolate hazelnut gelato has a very strong hazelnut flavor, and the kiwi gelato is nice and tangy. It’s has too much dairy flavor to be called gelato though.

The biggest disappointment of the bakery, however, is its customer service. The woman who helped my mom and I gave us short answers when we inquired about the cake flavors and chided us when we asked if the cake had to be refrigerated. It’s a shame: the customer service could have redeemed the bakery for me.

Malibu beach

That’s the L.A. dessert wrap-up for now. On future visits, I’d like to go to La Brea Bakery (must try their granola and chocolate cherry bread!), Mani’s Bakery (known for their fruit-sweetened pastries), Susina Bakery, Clementine, and L’Artiste Patisserie.

Westside L.A.
Amandine Patisserie 12225 Wilshire Blvd., Los Angeles, CA 90025-1105 (310) 979-3211
Diddy Riese Cookies 926 Broxton Ave., Los Angeles, CA 90024-2802 (310) 208-0448

San Fernando Valley
Bea’s Bakery 18450 Clark St, Tarzana, CA 91356-3504 (818) 344-0100
Pastries by Edie 21608 Sherman Way, Canoga Park, CA 91303 (818) 716-7033

Various locations
Corner Bakery

Comments (5)      Email Email      Print Print

Cupcake Interview

Cupcakes Take the Cake logo

Cupcakes Take the Cake is a super niche blog.  It doesn’t just specialize in dessert, but it devotes every post to the humble cupcake.  Besides posting pics of every cupcake imaginable, they review several cupcake bakeries and interview cupcake fans.  This blog tipped me off about free cupcakes every Tuesday at the Original Penguin store by Bryant Park.  It is messy to shop for clothing (or pretend to) while gorging on a generously frosted Sugar Sweet Sunshine cupcake, but Penguin also offers napkins and excellent customer service.

A couple weeks ago, I met two of Cupcakes Take the Cake’s founders at a party that Susie Felber, a co-worker/comedian/romance novelist’s daughter (all separate "occupations"), threw for her mom.  Small world.

Some conversations led to others, and Nichelle interviewed me for the site!  Check it out!

Comments off      Email Email      Print Print

IMBB 20: Chocolate Chestnut “Su-fle” Cake

chocolate chestnut souffle cake

It’s a shame what Jeffrey Steingarten has done. The Vogue food writer’s two versions of lobster soufflé take 10 hours to prepare, enough to scare away even expert cooks.

For Is My Blog Blog Burning 20: Has my Blog Fallen?, Kitchen Chick sought to convince people that soufflés aren’t so difficult to make after all. Souffles are simply custards that have been leavened with beaten egg whites. Although souffles are notorious for collapsing quickly, soufflé cakes are easy to make because they’re meant to be served in their non-peak state.

The chestnuts in this low-fat “su-fle” (ha ha, get it?) cake add wonderful creaminess. You won’t taste the chestnuts unless someone points them out, but they definitely contribute to the cake’s texture. On the first day, it resembles chiffon cake but on the second day, its flavor develops and resembles mousse. Your patience will be rewarded!

Chocolate Chestnut Soufflé Cake

Adapted from Chocolate and the Art of Low-Fat Desserts by Alice Medrich

Ingredients:
4 ounces bittersweet or semisweet chocolate, chopped fine
1/2 cup plus 1/2 tablespoon unsweetened Dutch process cocoa
3/4 cup sugar
1/2 cup boiling water
1/2 cup chestnut spread (sweetened chestnut puree) (picture)
2 egg yolks
1 Tbsp rum
1 tsp vanilla extract
4 egg whites
1/4 tsp cream of tarter or 1/2 tsp vinegar or 1/2 tsp lemon juice
1/4 cup all-purpose flour
1 to 2 tsp powdered sugar, for dusting
vanilla ice cream, vanilla frozen yogurt, whipped cream, creme fraiche, sour cream, or sweetened pureed cottage cheese (optional but recommended)

Instructions:

  1. Position the rack in the lower third of the oven and preheat to 350F. Place a round of parchment paper on the bottom of the pan and grease the sides.
  2. Combine the chopped chocolate, cocoa and half of the sugar in a large mixing bowl. Pour in boiling water and whisk until the mixture is smooth and chocolate is completely melted.  Stir in the chestnut spread, egg yolks, rum and vanilla.  Set aside.
    chocolate mixture
  3. Combine the egg whites with the cream of tarter, lemon juice or vinegar. Beat at medium speed until soft peaks form. Gradually sprinkle in the remaining sugar and continue to beat at high speed until stiff but not dry. Whisk the flour into the chocolate mixture. Fold in a quarter of the egg whites. At this point, you don’t have to be too careful because you’re just lightening the chocolate so it will be easier to combine later. Then, carefully fold in the remaining whites. (Cut a spoon or spatula into the bottom of the bowl and plop the chocolate on top of the whites. Turn the bowl 90 degrees and repeat until no white streaks remain. The batter doesn’t have to be perfectly uniform in color. When in doubt, err on the side of undermixing so you keep the volume in the whites.) Scrape the batter into the pan and smooth the top. Bake until a skewer or toothpick inserted into the center comes out with a few moist crumbs clinging to it, about 30 to 35 minutes. Cool torte in the pan on a rack. rise
    [Rise…]It will sink in the center as it cools.
    fall
    […and fall]Cake may be prepared to this point and stored, covered at room temperature or refrigerated for 2 days or frozen, well wrapped, for up to 2 months.
  4. To serve: Slide a thin knife or spatula around the sides of the pan to release the cake.  
    Remove the sides and bottom of springform or invert cake onto a platter. Remove the paper liner from the bottom and turn the torte right side up. Dust with powdered sugar and serve with a dollop of dairy, if desired.

Notes/tips:

  • While this cake did not taste low-fat, I didn’t think it was rich enough. I used mildly sweetened chestnut puree and forgot to add the cocoa, so your results may vary.
  • For a milk chocolate-flavored cake, use unsweetened chestnut puree and do not add cocoa.
  • You may make your own chestnut puree by boiling canned roasted chestnuts with enough water to cover and brown sugar (I used 2 Tbsp for 14 ounces of chestnuts. My puree was slightly sweet but not like a confection.) for 45-60 minutes, or until most of the water is absorbed and the nuts are soft. Puree the mixture with 1/2 tsp vanilla in a food processor until creamy.
  • I’m not big on garnishes, but a dollop of a plain dairy product really enhances the chestnut’s creaminess.  Regular yogurt is not recommended though, because it’s too tangy.
  • Eggs are easier to separate when they are cold (the yolks are less prone to break), but the whites whip better when they’re at room temperature.
  • Cream of tarter, an acid, stabilizes the whites to insure against overbeating. You’ve overbeaten the whites when a white glob floats on top of a watery mess. For a couple bucks, you can buy one ounce of cream of tarter, a uni-tasker. Or, you can buy a big bottle of vinegar for less than a dollar and save it for a ton of other uses.  😉 Simply substitute twice the amount of vinegar or lemon juice for cream of tarter in all of your whipped egg white recipes.

Tagged with: IMBB # 20 + Souffle

Comments (6)      Email Email      Print Print

Lazy Sunday Pavlova

Since today was Easter (see what Easter means to me), my friend Heather hosted a potluck lunch at her cozy Upper West Side apartment.

Lunch felt like an old-fashioned affair. There was no agenda to worry about and no reason to rush. It was a lazy Sunday afternoon shared by a group of friends.

Heather decorated the table with pastel napkins, plates and egg-shaped name tags. Instead of candy, the “eggs” held a different kind of suprise. When it came time to eat, we flipped over the name tags and read Bible verses from the back of them. It was like group theater meets a holiday celebration.

Then we said grace and slowly savored sweet potato vichyssoise (that’s soup for you non-culinary minded folk), salad with raspberry-glazed pecans, spiced potatoes, bread and my baked brown rice pilaf. For dessert, we paired date bars and my pavlova (recipe courtesy Nigella Lawson’s Forever Summer) with tea.

The pavlova had a crisp, meringue crust. The inside was a mixture between squidgy (as Nigella says) marshmallow and creamy, airy mousse. The whole thing was studded with bittersweet chocolate chunks, which gave it little jolts of richness.

It was super easy to make and rustic yet sophisticated. Don’t worry when the edges crack; it adds to the pavlova’s character. Besides, there’s nothing that can’t be repaired (er, covered up) with dollops of whipped cream and elegantly arranged fruit.

Notes/tips:
You can top the pavlova with any kind of semi-firm fruit, such as raspberries, kiwi, or blueberries. I chose strawberries because one pound is only $1 in Chinatown! (My favorite place to get fresh produce is the intersection of Canal and Walker. There’s lots of food stands, which ensures competitive pricing. Also, the fish so fresh that it’s odorless.)

Do not spread the batter all the way to the edges of the nine-inch circle, because it expands as it bakes.

To lighten the dessert, you can replace the whipped cream topping with yogurt cheese. Simply drain vanilla yogurt (with no gelatin) with a cheesecloth, coffee filter or paper towel fitted over a strainer overnight in the fridge. One cup yogurt yields about 1/3 cup cheese.

Or, if you’re lactose intolerant like Heather, take one 12-ounce block of extra-firm silken tofu (recommended brand: Morinu) , combine with 2 tbsp sugar, and blitz it in a blender till smooth. Refrigerate overnight to firm it up. It’s not the same as whipped cream, but I don’t think anyone knew they were eating tofu today.

The pavlova is extremely sweet, so I recommend adding an extra tbsp of cocoa to make it 1/4 cup. I would also decrease the sugar from 1 1/2 cups to 1 1/4 cups or even 1 cup.

Since the pavlova only has two ounces of chocolate, use the best chocolate you can find to make the flavor stretch further.

It’s easier to separate eggs when they’re cold but easier to beat when they’re at room temperature.

Comments (4)      Email Email      Print Print

Is My Blog Burning: Fluffernutter Cupcakes


Cupcakes take the cake! At least that’s what Maki at I Was Just Really Hungry says for this month’s edition of Is My Blog Burning.

Cupcakes take me back to my childhood, when the best thing about celebrating classmates’ birthdays was the obligatory cupcakes. Ha, forget about wishing them a good birthday. Just give me the cupcake…a cake I don’t have to share with anyone else.

Remember the good old days, before schools banned cupcakes? At least Texas reversed its decision.

And perhaps no other food encompasses childhood like the Fluffernutter sandwich. Before artisan breads became stylish, before we had to worry about eating whole grains, stick-to-the-roof-of-your-mouth peanut butter and marshmallow fluff on soft white bread was perfectly acceptable.

So I made a Fluffernutter sandwich in cupcake form. These are semi-healthy, since most of the fat comes from the peanuts. Most cupcake recipes call for a stick of butter each for the batter and frosting. This recipe has 1/8 of a stick of butter!

The first thing I noticed about these cupcakes was the intense peanut butter smell. Although they weren’t as moist as the cakes from Sugar Sweet Sunshine (which can be remedied by adding butter of course), they were a satisfying snack for a sweet ‘n’ salty craving.

Fluffernutter Cupcakes
(adapted from The Joy of Cooking)
Makes 15-18 cupcakes

For the peanut butter cupcakes:
1 1/4 cups all-purpose flour
3/4 cup packed light or dark brown sugar
1 1/2 tsp baking powder
1/2 tsp salt
3/4 cup milk
1/3 cup creamy peanut butter
1 large egg
1 tbsp unsalted butter, softened
1 tbsp vegetable oil
1 tsp vanilla
3/4 cup semisweet chocolate chips (optional)

Preheat oven to 350 F. Line muffin pans with paper liners.

Combine all ingredients in a food processor. Pulse for a few seconds to mix. Scrape the sides of the bowl and the blade and pulse until smooth. The entire mixing process should not take more than 5 seconds.

If you don’t have a food processor, whisk all the dry ingredients in a bowl and set aside. Cream the butter, oil and peanut butter with an electric mixer until smooth. Add the sugar. When incorporated, add the egg and vanilla. Scrape down the sides of the mixing bowl frequently with a rubber spatula to keep the batter smooth. On low-speed, alternately add the dry mixture in three additions with the milk in two additions, beginning and ending with the dry mixture. Stir in chocolate chips, if using. Hint: toss the chips with a bit of flour to keep them from sinking to the bottom of the cake.

Fill the muffin cups about two-thirds full. Hint: for mess-free, consistent portion control, use an ice cream scoop.

Bake until a toothpick inserted in the center of a cupcake comes out clean, 25-30 minutes.

Remove from the pan and let cool completely on a rack before frosting. Hint: put more frosting than you think you need on a spatula/knife and place it in the middle of the cake. Without lifting the spatula, spread the frosting to the edges by rotating your wrist.

For the marshmallow (aka seven-minute) frosting:
(adapted from The Joy of Cooking)
Makes 2 cups

2 1/2 tbsp water
1/8 tsp cream of tartar
2/3 cup sugar
1 large egg white
1/2 tbsp light corn syrup
1 tsp vanilla

Have the egg whites at room temperature, 68-70 F. Whisk everything except the vanilla together in a large stainless-steel bowl. Whipe excess sugar off the side of the bowl, as it will be difficult to dissolve later.

Set the bowl in a wide, deep skillet filled with about 1 inch of simmering water. Make sure the water level is at least as high as the depth of the egg whites in the bowl.

Beat the whites on low speed until the mixture reaches 140F on an instant-read thermometer. Do not stop beating while the bowl is in the skillet, or the egg whites will be overcooked. If you cannot hold the thermometer stem in the egg whites while continuing to beat, remove the bowl from the skillet just to read the thermometer, then return the bowl to the skillet. Beat on high speed for exactly 5 minutes.

Remove the bowl from the skillet and add the vanilla.

Beat on high speed for 2-3 more minutes to cool. Use the day it is made.

Since I won a pack-rat/frugal food food award, here’s suggestions for leftover frosting:
Dollop hot cocoa with it
Make Fluffernutter sandwiches out of it
Melt it with 1-2 tbsp butter and stir in rice krispies/oatmeal (1-2 cups) to make bars
Spoon it on top of ice cream

Variations:

Chocolate Peanut Butter Cupcakes
Frost with chocolate frosting for a richer cupcake.

Chocolate Frosting:
(adapted from The Joy of Cooking)
Makes about 2 cups

1 cup plus 2 tbsp sugar
1 cup unsweetened cocoa
1 cup milk
1 tsp vanilla
6 ounces milk chocolate, finely chopped (You can substitute dark chocolate for adult tastes. Or you can simply use 3 ounces dark chocolate to cut the fat and keep the flavor)

Combine sugar and cocoa small, heavy saucepan. Gradually add just enough milk to make a paste, and then stir in the rest.

Cook, stirring constantly with a wooden spoon and reaching into the corners of the pan, over medium heat until the mixture comes to a boil Boil gently, sirring, for about 2 minutes. Remove from the heat and add vanilla.

Let cool for 5 minutes. Stir in chocolate until melted and smooth. Cover the surgace of the frosting with a piece of wax or parchment paper and let cool until spreadable.

This keeps, refrigerated, for up to 1 week. Or freeze for up to 6 months.

Peanut Butter Jelly Cupakes
Swirl 1/3 cup melted jelly in the batter. Or, fill muffin cups 1/3 of the way up, spoon in 1 tsp jelly, and top with batter to fill the cups 2/3 full.

Nutella-Peanut Butter Cupakes
Frost cupcakes with Nutella. Melt the Nutella with a couple tablespoons milk, or it will be too thick and tear the cupcakes.

Honey Nut Cupcakes
Substitute sugar with 1/2 cup + 1 2/3 tbsp honey and reduce milk to 1/2 cup + 2 tbsp. Also add 1/8 tsp baking soda. Note that honey browns faster than sugar, so the cakes will probably cook faster. Thanks to Good Eats for the adaptation. I have no idea if it works.

Frost with:
Honey Cream Cheese Frosting
(Adapted from The Joy of Cooking)

8 ounces cream cheese
5 tbsp unsalted butter (optional)
2 tsp vanilla
1 1/2 to 2 cups honey (feel free to change based on your tastes)

Have the cream cheese cold and the butter at room temperature, 68-70 F.

In a medium bowl, beat cheese, butter and vanilla just until blended. Add the honey one-third at a time and beat just until smooth and the desired consistency. If the frosting is too stiff, beat for a few seconds longer. Do not overbeat.

This keeps, refrigerated, for about 1 week. Or freeze for up to 3 months. Soften and stir until smooth before using.

Comments (12)      Email Email      Print Print

Is My Blog Burning: Black-Eyed Pea Cake


Photo: Vegetarian Times-Feb. 2005

For my first post, I’ve decided to participate in Is My Blog Burning?, a designated day where bloggers cook with a common ingredient or method. This time, the theme is beans. I think a dessert can be made from virtually any ingredient, so why not try a bean cake?

When I first saw the Black-Eyed Bean Cake recipe in the Feb. 2005 issue of Vegetarian Times, I wondered if I could substitute Asian red beans (azukis) for the black-eyes and red dates for the apricot puree to make a Chinese-ified cake. Before getting too adventurous though, I tested the original recipe to see if it was any good.

I had doubts about this recipe because a couple days earlier, I made the Fungi (cornmeal mush) from the same issue. I expected it to be a mixture between cornbread and oatmeal, but instead I got tasteless, watery goop. I’ll usually eat anything, but I seriously considered throwing the Fungi out. After boiling it on the stove for another 40 minutes (the recipe said I’d only need to boil it for two min.), the mixture reduced to one-third its volume and was quite good. It got nice and firm, like polenta.

Anyway, on to the recipe!

Black-Eyed Susan Cake
adapted from Vegetarian Times, Feb. 2005

Serves 12

Cake
2 cups dried apricots
2 cups cooked, drained and rinsed black-eyed peas
1/4 cup canola oil
1 cup packed light brown sugar
3 large eggs
1 cup whole wheat flour
2 tsp. ground cinnamon
1/2 tsp. ground cloves
1 1/2 tsp. baking soda
1/2 tsp. baking powder
2/3 cup golden or regular raisins
1 cup chopped pecans, optional

Frosting
1/3 of 8-oz. pkg. fat-free cream cheese
2 1/2 cups confectioners’ sugar
2 tsp. lemon zest
1 tsp. vanilla extract

Optional Decoration
12 chocolate drops or stars
32 dried apricots

  1. If using dried beans, measure out a little more than 1/2 a cup. (1 cup dried=3 1/2 cups cooked, so if you do some algebra, you’ll actually need .57 cups). Sort through the peas and pick out tiny stones and stray seeds. This is best done by spreading them on a table with a pot in your lap and pulling the good peas into the pot. To soak dried black-eyed peas, rinse them, and place them in a pot. Add enough water to cover them plus at least 4 inches more. Add 1/4 tsp. baking soda to the water, and stir. (This pulls out the sugars that cause gas in the intestines.) Let them sit overnight. Rinse thoroughly. The beans will cook perfectly in fewer than 90 minutes. Add salt after cooking.
  2. Preheat oven to 375F (350F if using glass or dark-colored pans). Grease and flour 2 8-inch cake pans, or grease and line pans with circles of parchment.
  3. To make Cake: Cook apricots in 2 cups water, about 12 minutes, until very soft. Measure out 1 cup apricots and liquid, and set aside. Put remaining apricots and liquid in blender, and puree. Add peas, and puree.
  4. Put oil, brown sugar and eggs in mixing bowl; beat on high 3 minutes. Mixture will look creamy. Whisk flour, cinnamon, cloves, baking soda and baking powder in separate bowl. Mix in raisin and pecans, if using. (Hint: tossing nuts, fruit, or chocolate chips with flour keeps them from sinking to the bottom of the cake.)
  5. Pour egg mixture over puree, and fold together. Gently fold in flour mixture. Pour into prepared cake pans.
  6. Bake 35 to 40 minutes, or until toothpick inserted in center of cake comes out clean. Remove from pans, and cool completely on wire rack. 
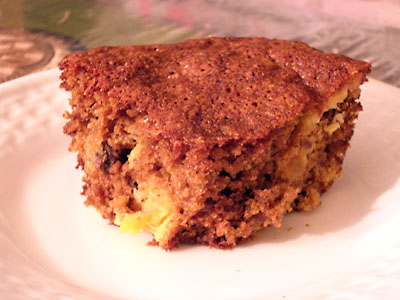
Ooh, nice and crusty! While this cake was baking, the entire kitchen smelled like gingerbread.
  7. To make Frosting: Using an electric mixer, beat cream cheese until creamy. Beat in remaining ingredients. Frosting should be soft; it will firm upon sitting.
  8. Place one cake layer on plate, and spread reserved apricots evenly over it. Top with second layer. Spread frosting evenly over top and sides of cake.
  9. To decorate, cut apricots into slices. Place chocolate drop on cake, and arrange 8 apricot “petals” around it (skin side up). Repeat until cake is covered.

PER SERVING: 290 CAL; 6G PROT; 6G TOTAL FAT (1 G SAT. FAT); 55G CARB; 55MG CHOL; 200MG SOD; 5G FIBER; 35G SUGARS

I didn’t make the filling or the frosting…Growing up, my mom always complained that frosting was too sweet. So out of habit, I made my cake plain.

My handblender didn’t puree the apricot-bean mixture all the way, so you can see a chunk of apricot in the front and a white stripe of beans on the right.

The verdict: the texture was very good. The cake was moist and not dense (as is the problem with whole-wheat baked goods). I could not tell it was low-fat. Aside from the couple streaks, you can’t tell there’s beans in it either. This cake would be a good joke to play on friends. Imagine their faces when you tell them the secret ingredient!

EDIT:

I was unimpressed with the flavor on the first day, but on the second day, the flavors intensified. The cake got even more moist, but it wasn’t soggy or damp. My only complaint is that it’s a bit sweet, and I can’t really taste the spices. The cake is kind of like spice cake without the spices or carrot cake with extra brown sugar and no carrots.

Maybe to spice up the flavor, I’ll spread some apple butter (recipe featured at 101 Cookbooks) on the cake.

2nd EDIT:

On further investigation, I found out that I added too much sweetener. Brown sugar is simply white sugar plus molasses. I made my own brown sugar for this cake. According to the Grandma’s molasses package, 1 c brown sugar = 1 c white sugar + 1/2 c molasses. Or, it’s 2 parts white sugar, 1 part molasses. In previous experience, I found this ratio to be overkill, so I used 4 parts white sugar to 1 part molasses. On the Grandma’s molasses site though, it recommends 9 parts white sugar to 1 part molasses. Also, Baking 911 recommends 1-2 tbsp molasses for 1 cup of white sugar (or, 8-16 parts white sugar to 1 part molasses). Bottom line: I used waaaay too much molasses.

Partly because of my traumatic experience with the cornmeal mush, I still have qualms with Vegetarian Times recipes. Case in point: this recipe doesn’t tell you how much salt to add to the beans. I put a pinch. Evidently I needed more to bring out the spice flavors. Also, I seriously doubt 375F is a good temperature for the cake. Since I had an 8×8 glass pan (I halved the recipe), which conducts heat better than aluminum, I lowered the temperature to 350F. The edges browned very quickly, and I baked at 325F for the last five minutes.

So, this is a good cake, but it’s not to die for. I like the wholesome ingredients though. If you ever want to eat cake for breakfast, you can “fool” yourself by making healthy muffins with this recipe.

Maybe I’ll try the Chinese variation, but not anytime soon. My desk is exploding with “to try” recipes, and they’re from trusted sources.

Comments (8)      Email Email      Print Print