Archive for Nutella

World Nutella Day: Pierre Herme’s Nutella Tart

World Nutella Day

I once ate a chocolate chip cookie that fell in the dirt. I wash ziplock bags and reuse them. I like taking the second-to-last item on a dish so someone else will feel guilty about taking the last one.

Up until I visited my first food blog three years ago, “I like to eat Nutella straight off my finger” would have joined the list of culinary confessions above. I was so crazy about that chocolate-hazelnut spread that I Googled it, which brought me to Il Forno’s post about Nutella’s 40th birthday. After reading about Nutella’s history in detail, I no longer felt like a nut. I may eaten a jar of Nutella in one week, but one girl finished it by the spoonful over three days.

Another case in point: Sara from Ms. Adventures in Italy and Shelley from At Home in Rome solemnly declare today “World Nutella Day” – a day to celebrate, to get creative with, and most importantly, to EAT Nutella.

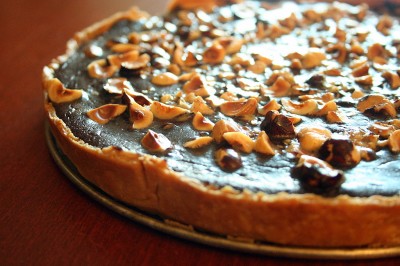
I made a Nutella tart from Pierre Herme, known worldwide as the Picasso of Pastry. When I went to Paris last November, I bought a 6 Euro slice of cake and a 2 Euro macaroon from his store. Boy, were they worth it. All the textures and flavors were perfectly balanced. That man is a culinary engineer.

Nutella tart

The recipe was first posted on Il Forno’s site. It’s a mouth-shattering crust with a layer of Nutella, bittersweet chocolate cream, and toasted hazelnuts. A couple notes:

  • Use unsalted butter, or the salt will overpower the chocolate. If you only have regular butter, you can be a smart aleck and call it “salted chocolate hazelnut tart” (not that it’s my thing).
  • Drizzle the butter into the chocolate mixture and mix thoroughly. The mixture will want to split because it’s so greasy. I actually think silken tofu would make a fine substitute, but that’s another post.
  • You only need half the amount of hazelnuts called for: a half cup.
  • If you don’t have a tart pan, form the dough in a 9-inch springform pan, making the sides 1-inch tall.
  • People have complained that Herme’s tart dough is difficult to work with, so here’s a recipe from Into to Fine Baking at The New School’s Culinary Arts program.

Lynn’s Tart Dough – Pate Brisee aux Oeufs (French Pastry Dough with Eggs)

by Lynn Kutner

This dough is a dream to work with: it hardly sticks and can withstand heavy rolling. The secret ingredient, an egg, enriches the dough.

Take the extra effort to blind bake the dough so it keeps its shape. Brushing the crust with egg wash and sugar will make it stay crispy.

1 1/2 cups all-purpose flour
1/2 tsp salt
1 stick unsalted butter, at room temperature
1 egg yolk (save the white to glaze the crust)
2 tablespoons ice water (a few more drops if necessary)

In a bowl, combine the flour and salt. With your fingers, rub in the butter until the mixture feels mealy (small bits of butter are still visible). Aerate the dough with your hands as you work.

In a measuring cup, add the egg yolk. Add water ALMOST to the 1/4 cup mark. (1/4 cup is the maximum total of egg and water)

Make a well in the flour-butter mixture and pour the liquid in the center. With a rubber spatula, flip the flour from the outside in. If the dough is too dry, break it up in the center and add a few more teaspoons of water.

Flatten the dough into a circle about 1/2″ to 3/4″-thick. Wrap in plastic and chill two hours to overnight.

If you chilled the dough overnight or froze it, let it sit at room temperature until it is pliable but not soft. If the dough cracks when you work it, let it heat up a little longer.

Lightly dust a rolling pin and work surface with flour. Roll the dough 1/8″-thick. Work from the center and roll in one direction, stopping just short of the edge. Turn the dough 90 degrees and continue till finished. Gently ease the dough into a tart mold and trim the edges. Cover with the surface plastic wrap or wax paper and freeze while you preheat the oven to 400 F.

When the oven is ready, prick the dough with a fork all over. Cover the dough with foil and weigh it down with raw dried beans, rice or metal pie weights. Bake for 20 minutes, or until the crust is lightly colored.

Remove the foil. In a small bowl, combine the leftover egg white and a couple teaspoons of water. Brush the egg wash on the crust and sprinkle with a couple teaspoons of sugar. Return the crust to the oven and bake for until golden brown, about 5-10 minutes.

Related links:
Nutella cake
Su Good Sweets’ homemade chocolate-hazelnut spread recipe
All other Nutella posts

Chocolate Desserts by Pierre Herme

Comments (5)      Email Email      Print Print

Chocolate-Hazelnut Cake x3

Nutella cake

Licking the jar clean is strictly encouraged when making a Nutella cake. That’s why it’s my favorite dessert to make. The recipe, from How to Be a Domestic Goddess, is kitschy yet decadent. A whole jar of Nutella, a stick of butter, a half dozen eggs, melted dark chocolate and ground hazelnuts combine to make a pudding-like cake.

Since I’m obsessed with all things with chocolate and hazelnut, I tested out two other recipes in search of the perfect cake. All were good in their own way, but I liked my first try the best. Here’s the taste-off:

Nutella Cake
lightened recipe from How to Be a Domestic Goddess

I had such great results halving the butter and replacing the chocolate with cocoa and sugar that I never bothered to make the full-fat recipe. This cake has virtually no grain; it’s like a solid slab of Nutella whose sweetness is offset by bitter cocoa. To see the interior of the cake, see The Skinny Epicurean.

I tried this recipe with homemade and store-bought chocolate-hazelnut spread. No need to get fancy: Nutella actually makes a better, smoother cake.

Makes 16 rich servings

CAKE:
1/2 cup toasted hazelnuts
1/2 cup plus 1 tbsp sugar
1/4 cup (half stick) soft unsalted butter
1 12-ounce jar of Nutella (chocolate-hazelnut spread)
1/2 cup cocoa
1 tablespoon Frangelico, rum or water
6 large eggs, separated
3/8 tsp cream of tarter or 3/4 tsp vinegar or lemon juice

  1. Preheat the oven to 350 degrees F. Prepare a 9-inch springform pan by lining the bottom with parchment or wax paper and greasing the sides.
  2. In a food processor, grind the hazelnuts with 1 tbsp of sugar until fine.
  3. In a large bowl, beat the butter and Nutella together. Add cocoa, Frangelico (or what you have chosen to use), egg yolks, and the ground hazelnut mixture. Set aside.
  4. In another large bowl, combine the egg whites and cream of tarter and beat till soft peaks form. Gradually sprinkle in 1/2 cup sugar and beat till stiff but not dry. This means that they will hold their peaks, yet still appear glossy and smooth.
  5. Lighten the chocolate mixture by stirring in a quarter of the egg whites, which you can beat in as roughly as you want. Gently fold in the rest of the egg whites a third at a time.
  6. Pour the batter into the prepared pan and cook for 40 minutes or until the cake’s beginning to come away at the sides and a toothpick inserted into the center comes out with a few moist crumbs cling to it. Cool on rack. The top crust will fall in the center like a crater.
  7. With your fingers, gently press down the sides of the cooled cake, so the edges are even with the center. Unmold by sliding a knife around the edges. If desired, trim the top crust with a large serrated knife. Invert the cake on a platter, or leave it on the base if you choose.

DECORATING:
adapted from Chocolate and the Art of Low-Fat Desserts by Alice Medrich
1/2 cup sugar
1 cup unsweetened cocoa powder
1/2 cup plus 1 Tbsp low-fat 1% buttermilk
1/2 tsp vanilla extract
4 ounces (1 scant cup) whole toasted hazelnuts

  1. Combine the sugar and cocoa in a heavy saucepan. Whisk in just enough buttermilk to form a smooth paste. Stir in the remaining buttermilk. Cook over medium heat until the mixture simmers and begins to boil, stirring constantly with a wooden spoon, scraping the sides and bottom of the pan. Boil gently for 2 minutes, stirring constantly to prevent burning. Turn off the heat and stir in the vanilla.
  2. Pour through a fine strainer. Allow to cool. To prevent a skin from forming, cover it with plastic wrap directly on the surface. Chill for several hours or overnight. It will thicken as it cools. It will keep in the refrigerator, covered, for at least 1 week.
  3. To assemble the cake, spread a thin layer of glaze over the top and sides of cake. Allow cake to set, at room temp, for at least 20 min. Spread another layer over the top and sides. Dot the top of the cake with the hazelnuts.
  4. Cake keeps at room temperature for up to one day or in the refrigerator for five.

Notes:

  • Toast the nuts in a 350-degree oven for 10-20 minutes to release their aroma. Stir half way through baking to ensure even browning. Nuts are done when they are fragrant and golden brown. Optional step: to get rid of the bitter skin, rub the cooled nuts in a paper towel.
  • Grinding the hazelnuts with some sugar ensures that those flavorful oils don’t go to waste. The sugar also acts as padding so you can grind the nuts finely without turning them into butter.
  • The boiling time is important in the sauce. This glaze makes a thick smooth covering for a cake, but it is not stiff enough to frost with swirls or peaks. If you cheat on the boiling time, it will not thicken enough (even after chilling) to coat a cake without dripping mostly off the sides, nor will it have the intensity of flavor it needs to be a great chocolate sauce.
  • To make one cup of buttermilk, measure 1 Tbsp vinegar and add enough milk to make one cup total.

Variation:

  • To make about 28 cupcakes, pour the batter into cupcake liners and bake for about 20 minutes.

Chocolate-Hazelnut Torte
adapted from Chocolate and the Art of Low-Fat Desserts by Alice Medrich
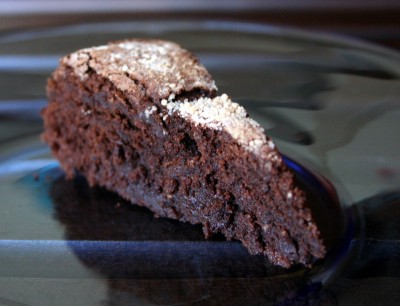
Chocolate Hazelnut Souffle Torte

I used hazelnuts in the Chocolate Walnut Torte recipe and got something very similar to the famous Fallen Chocolate Souffle Torte, printed on the preceeding page. While it wasn’t as pudding-like as the Nutella cake, it was delicious in its own right and did not taste low-fat at all. The torte was delicate and even better when warmed. You don’t need to microwave individual slices till hot, but just enough so the chocolate is oozy and melted. Since hazelnuts have less fat than walnuts, you can probably increase the yolks and chocolate to make the cake richer.

Serves 10

Ingredients:
1/3 cup toasted hazelnuts (1-1/3 ounces)
3 Tbsp all-purpose flour
2-1/2 ounces dark chocolate, chopped fine
1/3 cup unsweetened cocoa
1 cup sugar
1/3 cup boiling water
1 egg yolk
1 Tbsp rum (may omit)
1/2 tsp vanilla extract
4 egg whites
scant 1/4 tsp cream of tartar or 1/2 tsp vinegar or lemon juice
about 2 tsp powdered sugar, for dusting

  1. Position the rack in lower third of the oven and preheat to 350 F. Place a round of parchment paper in the bottom of an 8-inch springform pan and spray the sides with vegetable oil spray
  2. In a food processor or blender, grind the walnuts with the flour until very fine. Set aside.
  3. Combine the chopped chocolate, cocoa and 3/4 cupt of the sugar in a large mixing bowl. Pour in boiling water and whisk until the mixture is smooth and chocolate is completely melted. Stir in the egg yolk, rum, and vanilla. Set aside.
  4. Combine the egg whites and cream of tartar in a medium bowl. Beat at medium speed until soft peaks form. Gradually sprinkle in the remaining sugar and continue to beat at high speed until stiff but not dry. Whisk the walnuts into the chocolate. Fold a quarter of the egg whites into the chocolate batter to lighten it. Fold in the remaining egg whites. Scrape the batter into the pan and smooth the top. Bake until a skewer or toothpick inserted into the center of the torte comes out with a few moist crumbs clinging to it, about 25-30 minutes. Cool torte in the pan on a rack. It will sink dramatically in the center as it cools, leaving a raised crust around the edge. Torte may be stored, covered, at room temperature for 1 or 2 days or frozen, well wrapped in foil or plastic, for up to 2 months.
  5. To serve: slide a thin knife around the sides of the pan to release the torte. Remove sides and bottom of springform or invert cake pan to unmold. Remove paper liner from bottom and turn torte right side up on a cake circle or platter. Sieve a little powdered sugar on top.

Nutrition information (if made with walnuts)
calories per serving: 169; fat: 5.9 g; % calories from fat: 29%; protein: 3.5 g; carbohydrates: 28.6 g; cholesterol: 21.2 mg

Chocolate-Hazelnut Cake
from Eating Well, winter 2003
Eating Well chocolate hazelnut cake
Picture courtesy Eating Well

Much of the sweetness and moistness here comes from ground dates. Bread crumbs stand in for some of the hazelnuts to create the nubby texture. This low-fat, low-sugar cake is very good for what it is, but that’s not good enough for me. A mediocre healthy dessert doesn’t deserve to be called dessert. In reality, it’s just a health-ified sweet snack.

The test of a good dessert is how much you need to eat in order to feel satisfied. Because of the dates, this cake has a moist, cloying stickiness that never melts on your tongue. So you keep cutting another slice, hoping that the chocolate hit comes.

Ingredients

CAKE:
1/2 cup chopped pitted dates
1/2 cup unsweetened cocoa powder
1 teaspoon instant coffee granules
1/2 cup boiling water
1/2 cup chopped hazelnuts, plus 2 tablespoons for garnish
2 slices firm white sandwich bread, crusts trimmed
1/3 cup all-purpose flour
1/4 teaspoon salt
2/3 cup sugar, divided
2 tablespoons canola oil
1 teaspoon vanilla extract
1 large egg
3 large egg whites

GLAZE:
1/3 cup unsweetened cocoa powder
2 ounces bittersweet (not unsweetened) or semisweet chocolate, finely chopped (1/3 cup)
1 tablespoon corn syrup
1 teaspoon instant coffee granules
1/4 cup boiling water
1/2 teaspoon vanilla extract
1 cup confectioners’ sugar

To make:

To prepare cake:

  1. Preheat oven to 350°F. Coat a 9-inch round cake pan with cooking spray. Line the bottom with parchment or wax paper.
  2. Combine dates, cocoa and instant coffee in a small bowl. Add boiling water and stir until cocoa has dissolved. Cover and let stand until dates have softened and mixture has cooled to room temperature, about 20 minutes.
  3. Meanwhile, spread hazelnuts in a shallow baking dish and bake until fragrant and lightly toasted, 5 to 10 minutes. Transfer to a plate and let cool.
  4. Grind bread into fine crumbs in a food processor. Measure to make sure you have 1/2 cup. Transfer to a large bowl. (No need to wash the workbowl between steps.)
  5. Place 1/2 cup hazelnuts in the food processor. Add flour and salt; process until nuts are finely ground. Transfer to the bowl with the breadcrumbs.
  6. Scrape the cooled date mixture into the food processor. Add 1/3 cup sugar, oil, vanilla and whole egg; process until smooth, stopping several times to scrape down the sides of the workbowl. Scrape the mixture into the bowl with the breadcrumbs and nuts. Mix gently with a rubber spatula.
  7. In a large clean mixing bowl, beat egg whites with an electric mixer until soft peaks form. Gradually add remaining 1/3 cup sugar, beating until stiff, glossy peaks form. Add one-fourth of the beaten whites to the batter and whisk until blended. Fold in the remaining whites with a rubber spatula just until blended. Scrape the batter into the prepared pan, spreading evenly.
  8. Bake until the top springs back when touched lightly, about 20 minutes. Let cool in the pan on a wire rack for 5 minutes. Spray the rack with cooking spray and invert the cake onto it to cool completely.
  9. Meanwhile, to prepare glaze: Combine cocoa, chocolate, corn syrup and instant coffee in a medium bowl. Add boiling water and stir with a wooden spoon until the chocolate has melted and the mixture is smooth. Stir in vanilla. Cover with plastic wrap and refrigerate until chilled, at least 1 hour.
  10. Gradually add confectioners’ sugar to the chocolate mixture, beating with an electric mixer, slowly at first, then gradually increasing speed, until the glaze is smooth and thickened. (The mixture may seem lumpy at first, but it will smooth out.)
  11. To finish the cake, place it bottom side up on a serving plate. Place several strips of wax paper under the bottom edge to protect the plate from drips. Spoon on glaze and spread it evenly over the top and sides of the cake with an icing spatula or knife. Arrange the remaining 2 tablespoons hazelnuts around the top outside edge. Discard the wax paper before serving. Makes 12 servings.

Per serving: 233 calories; 9g total fat (2 g sat, 5 g mono); 18 mg cholesterol; 38 g carbohydrate; 5 g protein; 4 g fiber; 82 mg sodium.
Comments (12)      Email Email      Print Print

The biggest jar of Nutella ever

3kg-nutella

Behold the largest jar of Nutella ever: this gold-topped beauty weighs 6.6 pounds and is about as big as a gallon of milk. By comparison, a regular jar weighs .75 pounds. It’s the perfect gift for the Nutella lover in your life! Just $43.95 plus $25 for ground shipping.

Or, pick it up in person at Buon Italia in Chelsea Market. The famous market was the former home of Nabisco and now houses the Food Network. There’s actually not much to see here, except for the Nutella. My favorite gourmet food shops are Fairway, Zabar’s and Sahadi’s. They have more eye-popping displays of unusual food (chickpea flour, a gazillion varieties of bread made from wild yeast, an international cheese counter, etc.), but alas they don’t have giant jars of Nutella.

Buon Italia
75 9th Avenue
New York, NY 10011
phone: 212-633-9090

Comments (3)      Email Email      Print Print

Homemade Chocolate-Hazelnut Spread Recipe (Better Than Nutella)

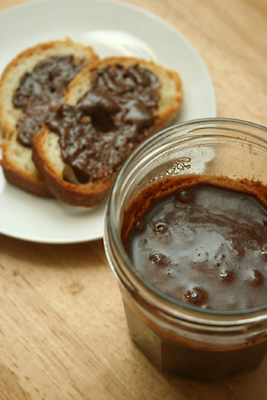
homemade chocolate-hazelnut spread (Nutella)

If someone offered you portable chocolate that could instantly be spread on bread, fruit, crackers and pastries, how could you refuse? Thus began my love affair with Nutella, a European spread made of hazelnut butter and cocoa.

During my days at NYU, I was at a make-your-own sandwich bar when I first tried Nutella with French bread. What a revelation! The chocolate oozed out of the nooks and crannies, while the spread’s smoothness contrasted the bread’s crust. I then saw that bagels were an excellent vehicle for Nutella. So were pretzels. And bananas. And gummy bears.

Fascinated by this new condiment, I bought myself a jar and finished it in one week. I’ve never met any food that does not taste better with a dollop of Nutella. Sometimes the best way to enjoy Nutella is to take a spoonful and just plop it in your mouth.

Nutella

According to Ferrero’s website, Nutella was created in the 1940s in the midst of a chocolate shortage. Pietro Ferrero, a pastry maker, stretched chocolate by thinning it out with ground hazelnuts. It became so popular that it’s as ubiquitous in Europe as peanut butter is in the U.S. If you ignore the high sugar content, Nutella actually has a nutritional profile similar to peanut butter. Its fat comes from the nuts, not the chocolate (Nutella gets its flavor from cocoa solids rather than cocoa butter). True, nuts are high in fat. But if you’re going to be eating fat, it might as well come from nuts rather than steaks.

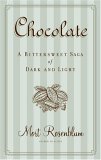
According to Mort Rosenblum’s Chocolate: A Bittersweet Saga of Dark and Light, a 13-ounce jar of Nutella contains 50 (2/3 cup) hazelnuts, 1 1/2 cups skim milk, “enough cocoa to make it brown, and a lot of sugar.” As much as I love Nutella, today’s commercial version is actually sugar that’s flavored with hazelnuts and cocoa. You can tell because sugar is first in the ingredient list. And there’s lots of added oil to make it spreadable.

The version that I make at home is truly chocolate-flavored hazelnut butter: I use 2 cups of hazelnuts rather than Ferrero’s puny 2/3 cup. This recipe is the same that I’ve sent out in Blogging by Mail and that Nic (of The Baking Sheet) used for her Nutella biscotti.

If you love this original recipe and repost it, please credit this site. Technically, recipes aren’t copyrightable, but the L.A. Times posted an eerily similar version.

Update: For an even richer version, try the second formula, which has caramel powder and no added oil. Unless you have a professional nut grinder, it won’t be as smooth as commercial Nutella, but the flavor more than makes up for it.

Chocolate-Hazelnut Spread (easy version)

Yield: about 12 ounces (1 1/2 cups)

2 cups whole raw hazelnuts
1 cup powdered sugar
1/4 cup unsweetened cocoa powder
up to 1/4 cup vegetable or nut oil
1/2 tsp vanilla extract

  1. Preheat oven to 350° F. Place hazelnuts in a single layer on a shallow baking pan. Toast until the skins are almost black and the meat is dark brown, about 15 minutes. Stir the nuts halfway through baking to ensure an even color.
  2. To get rid of the bitter skins, wrap the cooled hazelnuts in a clean kitchen towel or paper towel. Rub until most of the skins come off, but don’t worry if some remain.
  3. Process nuts in a food processor, scraping down the sides of the bowl occasionally, until they have liquefied, about 5 minutes. First, you will get coarsely chopped nuts, then a fine meal. After a little while, the nuts will form a ball around the blade, and it will seem like you only have a solid mass. Keep processing. The heat and friction will extract the natural oils, and you will get hazelnut butter!
  4. When the nuts have liquified, add the sugar, cocoa and vanilla. Slowly drizzle in enough oil to make a spreadable consistency. Since the mixture is warm, it will be more fluid now than at room temperature.
  5. Transfer the spread to an airtight container, and store in the refrigerator for 1-2 months. For best results, stir the chocolate-hazelnut spread before using.

Variations: To make any standard nut butter, use this procedure but omit the powdered sugar, cocoa, vanilla and extra oil. Add 1/2 tsp salt and up to 2 tbsp granulated sugar. Try making your own cashew butter: you may never go back to peanut butter again!

Chocolate-Hazelnut Spread (caramel base)

While this version requires a little more work, it has a richer, more sophisticated flavor.

Caramel instructions adapted from Chocolate and the Art of Low-Fat Desserts by Alice Medrich

Yield: about 12 ounces (1 1/2 cups)

Caramel:
1/2 cup sugar
1/4 cup water

Hazelnut Butter:
2 cups whole raw hazelnuts
1/4 cup unsweetened cocoa powder
1/2 tsp vanilla extract
1/8 tsp salt

  1. Preparation: Preheat oven to 350° F. Line a baking sheet with foil.
  2. Make the caramel: Combine the sugar and water in a 3- to 4-cup saucepan. To prevent crystallization, don’t stir it again during the cooking. Cover and bring the mixture to a simmer over medium heat. Remove the lid and wipe down the sides of the pan with a wet pastry brush or a scrunched up paper towel dipped in water. Cover and cook for 2 minutes, or until the sugar’s completely dissolved. Uncover and cook until the syrup looks like pale amber maple syrup. If your pan’s dark and you can’t gauge the color of the syrup, spoon a drop or two onto a white saucer. Swirl the pan gently, continuing to cook and test the color until the syrup turns medium amber.
  3. Immediately pour the caramel onto the lined baking sheet. Tilt the sheet to spread the caramel as thinly as possible. Let harden completely, about 15 minutes.
  4. Toast the nuts: Meanwhile, place the hazelnuts in a single layer on another baking sheet. Toast in the oven until the skins are almost black and the meat is dark brown, about 15 minutes. Stir the nuts halfway through baking to ensure an even color.
  5. To get rid of the bitter skins, wrap the cooled hazelnuts in a clean kitchen towel or paper towel. Rub until most of the skins come off, but don’t worry if some remain.
  6. Make the hazelnut butter: When the caramel is completely cool, break it into small pieces and pulverize in a food processor. Try to get the caramel as fine as possible at this stage (it won’t get finer once you add the nuts).
  7. Add the nuts and process until they have liquefied, about 5 minutes. Scrape down the sides of the bowl occasionally. Be patient; the nuts will go from a fine meal, to forming a ball around the blade, to nut butter. Add the cocoa, vanilla and salt and process until smooth.
  8. Transfer the spread to an airtight container, and store in the refrigerator for 1-2 months. For best results, stir the chocolate-hazelnut spread before using.

Notes:

  • Please use whole raw nuts, and toast them yourself to intensify the flavor. Pre-toasted or pre-chopped nuts are often spoiled.
  • To further intensify the nut flavor, use unrefined nut oil (for version 1), which is tan in color. Peanut oil is especially cheap in Chinese supermarkets: 20 ounces for $2.38! So if you’re looking for a “gourmet” ingredient, try an ethnic market.
  • You really need a full-sized food processor to make nut butter, not a mini version or a blender. I recommend a 7-cup Cuisinart: it’s large enough for most household tasks but isn’t too bulky.

Resources:
Official Nutella site
Nutella recipes

Comments (147)      Email Email      Print Print