IMBB 15: Chocolate Mousse Truffles
This month, Elise at Simply Recipes is hosting the online foodie event, Is My Blog Burning. The theme this time is “Has my blog jelled?” – meaning people across the world will cook with gelatin, pectin, or agar agar and blog about it. Check out her round-up of all the recipes and try something!In America, gelatin is synonymous with Jell-O. It’s fun to look at the jiggly dessert, but it’s nothing more than extra sweet fruit juice that’s been chemically altered to hold its shape. Time and again, I’m seduced by the clear, sparkling colors, but the taste never matches up. And the texture’s rubbery.
I resolve to elevate gelatin from its kitschy roots. Stop using it to make wobbly pineapple-marshmallow ambrosia! There are better applications out there, like chocolate truffles.
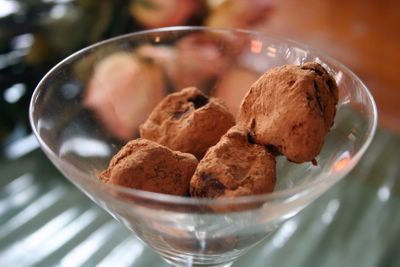
Chocolate goddess Alice Medrich has found a way to freeze mousse and make them into luxurious truffles. These have just 2.7 grams of fat each and less than half the calories of regular truffles!
Chocolate Truffles
From Chocolate and the Art of Low-Fat Desserts by Alice Medrich
Makes about 45 truffles
Start working at least 1 day ahead
Chocolate truffle mousse center:
7/8 tsp. gelatin
1 egg, separated
1/4 cup unsweetened dutch process cocoa
1/4 cup plus 1/6 cup sugar
5/8 cup low-fat 1% milk
2 oz. bittersweet or semisweet chocolate, chopped fine
1/2 tsp. vanilla extract
1/16 tsp. cream of tartar
Coating:
16 oz. bittersweet or semi-sweet chocolate, chopped
1/3 cup unsweetened dutch process cocoa
Make the mousse:
- Sprinkle the gelatin over 1/8 cup cold water in a small cup. Let stand, untouched, for at least 5 minutes, or until needed.
- Place egg yolks in a medium bowl near the stove and have a small whisk ready on the side. Combine the cocoa with 1/6 cup of sugar in a 1- to 1 1/2-quart saucepan. Stir in enough milk to form a paste, then add in the remaining milk. Bring mixture to a simmer over medium heat, stirring frequently with a wooden spoon, reaching the bottom and sides of the pan to prevent burning. Stir the chocolate mixture continuously once it begins to simmer. Simmer gently, still stirring, for about 1 1/2 minutes.
- Turn off the heat and whisk a small amount of the hot mixture into the egg yolks. Scrape the mixture back into the pot and whisk well to combine. It’s now safe to eat and will thicken without anymore cooking. Stir in the softened gelatin, chopped chocolate, and vanilla. Let stand for a minute or so, and whisk again until chocolate’s completely melted and the mixture’s perfectly smooth.
- Set the saucepan in a large bowl of ice water to cool and thicken. Stir and scrape the sides occasionally. If the mixture begins to cool too quickly, remove from ice bath, whisk and set aside. Should the mixture actually set, place the pan in a bowl of hot water and stir just until resoftened.
- Make the meringue: Simmer 1 inch of water in a large skillet. Combine cream of tartar and 1 tsp of water in a 4- to 6-cup heatproof bowl. Whisk in the egg whites and 1/4 cup of sugar. Place an instant-read thermometer near the stove in a mug of very hot water. Place the bowl in the skillet. Stir the mixture briskly and constantly with a heat-proof spatula, scraping the sides and bottom often to avoid scrambling the whites. After 1 minute, remove the bowl from the skillet. Quickly insert thermometer, tilting bowl to cover the stem by at least 2 inches. If it’s less than 160 F, rinse the thermometer in the skillet water and return it to the mug. Place bowl in the skillet again. Stir as before until temperature reaches 160 F when bowl is removed. Beat on high speed until cool and stiff.
- Fold about a quarter of the cooled chocolate mixture into the beaten egg whites. Scrape the egg white mixture back into the remaining chocolate mixture. Fold to combine.
Note: if you don’t mind raw egg whites, you don’t need to cook the whites beforehand. Simply beat the whites and cream of tartar in a bowl (water is unnecessary). When the mixture forms soft peaks, slowly sprinkle in the sugar and beat until stiff. Because this cooked meringue is firmer and deflates less than ordinary meringue, there’s a reversal in the conventional procedure for folding it with another mixture. If using regular meringue, lighten the mousse by folding a bit of the meringue in the chocolate mixture. - Transfer to a bowl, cover, and freeze until firm enough to scoop, 5 hours or longer.
Form truffle centers:
- Get ready a bowl of hot water, a melon baller or spoon, a pan lined with wax paper, and the firm mousse. Dip the melon baller into the water and wipe dry. Form a scant 1-inch ball. Place it on the pan. Dip, wipe, and scoop centers until the mixture’s gone. Freeze centers at least 12 hours, or overnight. Centers may be prepared to this point and frozen for up to 2 weeks.
Coat the truffles:
- Melt chocolate in the top of a double boiler over barely simmering water, stirring frequently to prevent overheating. Or microwave on Medium (50% power) for about 3 minutes, stopping to stir several times. Chocolate is ready when it is completely melted and smooth and between 115 and 120 F.
- Pour cocoa into a shallow dish. Have ready another shallow dish for the completed truffles. Remove a third to a half of the frozen centers from the freezer and place them in a shallow dish next to the container of melted chocolate.
- With your right hand (left if you are left-handed), fingers together and slightly cupped, scoop a large handful of melted chocolate into your left hand. Rub both hands together to coat them with a thick layer of chocolate. Try not to get the chocolate on your fingers. Quickly pick up a frozen center with your left hand and roll it gently between your hands with a circular motion and as little pressure as possible, just long enough to cover it with a coating of chocolate. Add chocolate to your hands as you need it Immediately place the coated center in the cocoa dish. If you see any uncoated spots, dip a finger into the chocolate and patch the truffle. Have someone else shake the dish, roll the truffle in cocoa, and transfer it to a clean dish. Repeat until all the centers are coated, adding chocolate to your hands between each one. (If you’re alone, just divide the cocoa between 2 dishes. Place 2 or 3 truffles in the cocoa before stopping to shake the dish. Continue to add truffles and shake until the first cocoa dish is crowded with truffles, then start on the second.) Truffles may be stored in a tightly covered container in the freezer for up to 6 weeks. Serve frozen.
Notes:
- Work quickly to keep the melted chocolate from hardening on your hands as you handle the frozen centers. Just keep the center moving–never let it rest in one place in your hands–and get it out of your hands as fast as possible.
- You will have both chocolate and cocoa left over because the dipping technique requires that you work with more than you need. Place the leftovers in small plastic bags (strain the cocoa first). Store in the freezer (since they might have little of the melted truffle mixture) until needed for another recipe. Or heat the leftovers with milk and sugar to taste for decadent hot chocolate.
- This should go without saying, but do not use a Hershey’s bar, chocolate chips or Baker’s chocolate. Use something decent, like Lindt, or Ghirardelli. Or splurge on Valrhona. I used the Valrhona that my brother gave me for my birthday.
Variations:
Add raspberry jam, peanut butter, coffee, Nutella, chile powder, cinnamon, or chopped nuts to the mousse mixture. Coat the truffles with chopped nuts, coconut, or sesame seeds.
Other applications for the low-fat filling:
Chocolate mousse: Double the mousse recipe and refrigerate it for four hours. Serve in 6-8 goblets. For an extra sensual experience, chop the chocolate coarsely, into 1-cm pieces, so it doesn’t dissolve completely in the hot milk mixture. The remaining chocolate bits will melt as they hit your tongue.
The mousse strikes a perfect balance between foaminess and creaminess.
It’s so rich that I could only eat a tablespoon at a time. Then I remembered how good it was and helped myself to some more and felt sick afterwards. Why oh why did I subject myself to such torture?
Bittersweet chocolate marquis: Double the mousse recipe and freeze it in a 4 to 5-cup loaf pan. Serve in 1/2-inch slices with creme anglaise (custard sauce) or strained raspberry puree. It’s richer than super-premium ice cream.
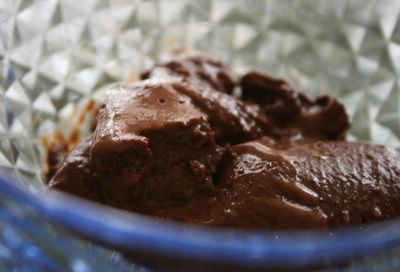
Chocolate gelato: Double the mousse recipe and freeze it in a container. No ice cream maker is necessary. Soften it in the fridge 15 minutes before serving and scoop into bowls. Gelato is softer and more flavorful than ice cream. This will explode in your mouth!
Frozen chocolate truffle sandwich cookies: Layer a thin coating of frozen mousse between two macaroon cookies and serve straight from the freezer.
Layered cake: Use the mousse immediately as a filling in your favorite cake. Refrigerate and serve when set.
Charlotte: Line a large bowl or round cake pan with plastic wrap. Then line the bottom and sides with ladyfingers or sponge cake and fill it with the mousse (triple the recipe above). Cover the top with berries and another layer of ladyfingers. Refrigerate 4 hours or until firm and invert the charlotte onto a serving platter.
Buche de Noel: Make your favorite sponge cake in a jelly-roll pan. Line it with the frozen mousse (triple the recipe above) and roll it into a cylinder. Cover the cake with meringue and freeze until ready to serve. Bake the cake in a 425 F oven until golden brown, about 4-6 minutes. Serve immediately.


elise said,
What a great idea! Though I think I would just eat more of them and neutralize any of the low-fat lower-cal benefits.
May 23, 2005 at 1:01 pm
Nic said,
Hey Jessica. I, of course, trust Alice M’s recipes, but how did they taste?
And I am still sorting out that mailing idea, just decided to wait until I get a bit less busy. Large amounts of work always seem to come in waves, don’t they?
May 23, 2005 at 3:15 pm
Homemaker Jane said,
Hi! I tried making the mousse because I trust and love Alice’s recipes. But I was just wondering how is the meringue supposed to look. My meringue did not look like a normal meringue, i.e. soft and billowy. My meringue looked very shiny and ‘heavy’! Is the amount of sugar (1/4 cup) correct?
Thanks!
July 4, 2014 at 11:09 am
Jessica "Su Good Sweets" said,
Jane-The meringue is glossy, smooth, and stiff. The amount of sugar is correct. As long as liquid hasn’t separated from the meringue, it should be okay, especially since it’s folded into the other ingredients.
July 17, 2014 at 9:49 pm