Bacon Cookies

The idea hit me like a stroke of genius. If everything tastes better with bacon, surely dessert does too. A handful of them get it right, like Roni-Sue’s bacon buttercrunch. (Save yourself from Vosges’ bacon bar though.) But I wanted to try something new: “double” bacon cookies.

A couple years ago, The NY Times ran a recipe for bacon-dripping cookies, but there was no bacon in them. Other recipes have bacon bits, but they make no mention of drippings. Why oh why would you waste pork fat?

The draw of bacon cookies is the balance of sweet and salty, and I know of no other recipe that epitomizes the two like olive shortbread. I love them so much that I used them as a base for these experimental cookies. Of course I substituted the olives with crumbled bacon, and instead of butter, I used the drippings. After all that work, I expected to hit the jackpot. But my flash of genius was more like a flash in the pan. The cookies were nauseatingly rich. The texture was literally like sand; they wouldn’t hold together. Maybe I didn’t render enough fat (more on that later), or maybe you can’t make all-lard cookies. I think the bacon-and-lard idea is better suited for savory crackers. Not so avant-garde, I know.

Why did I even bother sharing this idea then? Because I kick myself when someone beats me to it. Like the time I made the crispiest pizza without a wood-fired oven or a pizza stone. A cast iron skillet did the trick. By the time I made it known, it was too late: Heston Blumenthal was credited with the idea. Never mind that I did it more than a year before he documented it in his book, In Search of Perfection. See what procrastination does?

Or sometimes I do start a popular idea, and it gets passed down so much that people forget the source. More than three years ago, I created a knock-off recipe for Nutella. One that had cocoa powder instead of melted chocolate, just like Nutella itself. At the time, I couldn’t find any such recipes on the Internet, so I shared it here. This Feb., the L.A. Times ran a similar recipe, citing the same book that I did. Heck, even the title was similar. “Nuts for Nutella” vs. “Nutty for Nutella.” Perhaps I’m paranoid, but in the past people have copied my recipe word for word and passed it off as their own.

Let this serve as a marker. If three months or three years from now, someone comes up with a great bacon shortbread recipe, perhaps a seed was planted here. For those who are wondering, here’s the recipe I used. I didn’t like it though. Sorry, no pictures, as I only had a pile of crumbs. These would probably be better with butter instead of drippings. Too lazy to try it again though.

P.S. – this dough is also good with seaweed or furikake.

Bacon Shortbread Cookies

Adapted from Susan Herrmann Loomis and The Traveler’s Lunchbox
Yield: about 34 cookies

1 to 1 1/2 lbs uncooked bacon, to yield 1/2 cup drippings and 1/2 cup bacon bits
3/4 cup powdered sugar, sifted or 1/4 cup plus 2 tablespoons granulated sugar, whizzed in a food processor until fine
1 Tablespoon neutral-flavored oil (Don’t get smart and try olive oil, peanut oil, etc. Your tastebuds will go into shock)
1 1/4 cups all purpose flour
1/8 teaspoon salt

Cook the bacon. The cleanest, unfussiest way is to bake it at 400° F in a large foil-lined baking sheet for about 20 min. Turn the bacon over half way through cooking. Don’t put the bacon on racks. The little grates are a pain to clean. Also, don’t be like me and bake it at 200° F for 3 hours, no matter how good it sounds. The fat won’t render all the way.

Reserve 1/2 cup of bacon fat and let it cool to room temperature. Crumble 1/2 a cup of bacon, and save the rest. It keeps for a long time in the freezer.

Preheat oven to 350° F. Line two baking sheets with parchment paper or foil.

In a large bowl or the bowl of an electric mixer, cream the bacon fat until it is soft. Mix in the sugar until blended, then drizzle in the oil and mix until combined. Add the flour and the salt, and mix gently but thoroughly until the dough is smooth, then add the bacon bits and mix until they are thoroughly incorporated into the dough.

With your hands, press the dough into the pan until it is 1/4-inch thick. Refrigerate the dough for at least 30 minutes, and up to 24 hours. Score the dough into rectangles with a knife.

Bake until the cookies are golden, about 15 minutes. Remove from oven and immediately cut the cookies while they are still hot. Cool on wire racks.

If you find that the middle pieces are still doughy, re-bake them in a preheated 300° F oven for about 10 minutes.

Comments (9)      Email Email      Print Print

Asian Oatmeal Cookies

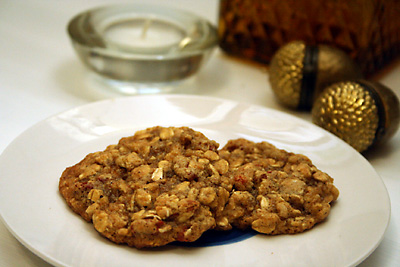
five-spice-oatmeal cookies

Goji berries used to be one the best-kept secrets in Chinese herbal medicine. Oddly enough, they’re usually used in savory dishes; my mom drops a handful into chicken or abalone soup. You can also make fruit “tea” by steeping dried gojis, Asian red dates, and logans in hot water. As the fruits reconstitute, they also infuse the water with their sweetness.

Now that gojis have gone mainstream in energy bars, chocolate, and cereal, I look at them not so much as medicine, but as dessert. Since they’re like a cross between raisins and cranberries (but with a slight medicinal aftertaste), why not put them in oatmeal cookies? And while I’m on that route, why not replace cinnamon with Chinese five-spice powder (a mixture of star anise, fennel, cinnamon, Szechuan pepper, and cloves)?

Since I’m not fond of fennel and anise, I made a back-up batch of six-spice cookies (with cinnamon, nutmeg, ginger, cloves, and cayenne), just in case I couldn’t stomach the five-spice powder.

For the base cookie dough, I used a recipe from Nick Malgieri’s Perfect Light Desserts (thanks to David Lebovitz for the find). As promised, they were chewy but not tough, cakey, or soggy (things that characterize most low-fat cookies). They obviously don’t taste as buttery as traditional cookies, but no one will know they’re “healthy.” BTW, my favorite low-fat oatmeal cookies are the florentines from Chocolate and the Art of Low-Fat Desserts by Alice Medrich, but that’s another post. Now those taste buttery.

In the end, the six-spice cookies were good, but the five-spice ones were better. The latter reminded me of my childhood: dim sum with my grandparents and my mom’s home cooking. They had an earthy taste, and five-spice powder works so well in desserts that I’m going to keep substituting it for cinnamon. It’s really good in coffee fruitcake, for example. Next experiment? My morning oatmeal.

The six-spice cookies had a little bit of heat, and I like that concept too. The point isn’t to make dessert taste like hot sauce, but to give your mouth a little sensation. I have an idea for another cayenne pepper dessert (not with chocolate though; that combination’s been played out enough). Stay tuned for that, if I get a chance to bake more. 🙂

P.S. I’m on Twitter. Come find me at twitter.com/sugoodsweets. It is Ruth Reichl‘s fault. I saw her there and realized how fun it is.

Asian Oatmeal Cookies

If the Chinese made oatmeal raisin cookies, these would be it. Goji berries have a sweet-tart flavor akin to raisins and cranberries, and they call out for Asian spices—in this case, Chinese five-spice powder.

For the best results, buy gojis from a reputable natural-foods store. They can cost $20/lb, which is sticker shock compared to the $6-lb bag in Chinese supermarkets, but we know better than to trust Chinese ingredients. I’ve heard horror stories of Chinese gojis that were dyed red. Besides, the better the berries, the more sweet (and less medicinal) they will taste. If you can’t find gojis, raisins or cranberries will work fine.

About 24 cookies

Adapted from Nick Malgieri’s Perfect Light Desserts: Fabulous Cakes, Cookies, Pies, and More Made with Real Butter, Sugar, Flour, and Eggs

1 cup flour (spoon flour into dry-measure cup and level off)
1 teaspoon baking powder
1/2 teaspoon baking soda
1/2 teaspoon salt
2 1/2 teaspoons Chinese five-spice powder
2 tablespoons unsalted butter, at room temperature
1/2 cup granulated sugar
1/2 cup (packed) light brown sugar
1 large egg
1/4 cup unsweetened applesauce
1 teaspoon vanilla extract
1 1/3 cups rolled oats (not instant)
1/2 cup goji berries

2 baking sheets lined with parchment paper, greased foil, or silicone mats

1. Preheat the oven to 375 degrees and set the rack on the lower and upper thirds of the oven.

2. In a small bowl, whisk together the flour, baking powder, baking soda, salt, and five-spice powder.

3. In a large mixing bowl, beat the butter and granulated sugar until smooth. Mix in the brown sugar, then the egg, applesauce, and vanilla.

4. Stir in the dry ingredients, then the oats and raisins.

5. Drop the batter by rounded teaspoons 2-inches apart on the baking sheets and use a fork to gently flatten the dough.

6. Bake the cookies for 10 to 12 minutes, or until they “look dull on the surface but are moist and soft.” Rotate baking sheets during baking for even heating.

Storage: Once cool, store the cookies in an airtight container at room temperature.

Six-Spice Variation: Substitute the five-spice powder with 1 teaspoon each of cinnamon, nutmeg, ginger and cloves, plus a big pinch of cloves and cayenne pepper.

Tip: Dough can be refrigerated for several hours before baking, which should make the cookies even better.

Comments (2)      Email Email      Print Print

Vegan Valentine’s Day Truffles

vegan chocolate truffles

What do you do with leftover frosting? If you have a little, you can lick it off your finger or spread some on toast. But when I have a whole cup left, I turn it into truffles. Because the filling is too soft to handle at room temperature, I freeze it prior to dipping. When you eat the truffles at room temperature, the filling explodes in your mouth. It’s so good that you’ll want to make frosting just for truffles.

You can probably use any frosting as the base, but ones with a high percentage of chocolate will melt in your mouth. I used Cook’s Illustrated‘s vegan ganache frosting. If you eat the truffles fresh, I swear no one will be able to detect the tofu. After a couple days, there is a slight spicy/beany flavor, but these are still some of the best truffles I’ve ever had.

These truffles require tempered chocolate, a process that involves heating, cooling and stirring chocolate. It’s laborious and virtually impossible to do without a thermometer. Fortunately, Alice Medrich developed a cheater’s method: Melt the chocolate at a low temperature and forget about the technical stuff. It requires chocolate that’s already in temper (one that looks smooth and glossy, not one with white streaks because it’s been sitting in your car).

This Valentine’s Day, make these vegan truffles or the simplest cream truffles ever (That recipe goes like this: Heat up cream. Pour over chocolate. Eat.).

Vegan Chocolate Truffles

Adapted from Cook’s Illustrated and Alice Medrich’s Cookies and Brownies

For truffle filling:
10 ounces semisweet chocolate, finely chopped (about 1 2/3 cup)
1/4 cup hot brewed coffee
2 tablespoons boiling water
1/4 cup light coconut milk
2 ounces silken tofu (recommended brand: Morinu)

For coating:
8 ounces semisweet chocolate, finely chopped (about 1 1/3 cup)
2 ounces extra chocolate, in 1 or 2 chunks

Special equipment:
Electric mixer
Melon baller scoop or a sharp knife
2 large sheet pans
Heatproof glass bowl with a 2 1/2- to 3-quart capacity
Instant-read thermometer
Rubber spatula
Roasting pan or large baking pan at least 2 inches deep

Make filling:

  • Set a medium bowl over a saucepan of barely simmering water. Place the chocolate in the bowl, and pour the hot coffee and boiling water over the chocolate. Whisk until smooth, then add coconut milk and whisk until incorporated.
  • Blend the chocolate mixture and tofu in food processor until smooth and combined, 10 to 15 seconds, scraping down bowl once or twice.
  • Transfer the mixture to a medium bowl and cover with plastic wrap. Refrigerate until cool and texture resembles firm cream cheese, 1 to 1 1/2 hours. (If the mixture has been chilled longer and is very stiff, let stand at room temperature for 1 hour.)
  • With an electric mixer, beat the mixture at high speed until fluffy, mousse-like, and it forms medium stiff peaks, 1 to 1 1/2 minutes.
  • Spread the mixture into a shallow pan and freeze until firm enough to scoop, at least 3 hours.
  • Have ready a bowl of hot water, a melon baller, a sheet pan lined with wax paper, and the firm filling. Dip the melon baller into the water and wipe dry. Scoop out a scant 1-inch ball of the filling. Set on the prepared sheet pan and repeat with the remaining truffle base. If you don’t have a melon-baller, use a sharp knife to cut the base into little squares. Roll each piece between your fingers until it resembles a ball.
  • Freeze the filling again until firm, about 1 hour.

Temper chocolate:
Tempering chocolate involves a sequence of heating, stirring, and cooling that stabilizes the cocoa butter and ensure that the chocolate becomes snappy and shiny. This method works only if it’s followed carefully. First, start with a fresh bar of solid chocolate. It should still be in temper if it’s glossy rather than gray or dull. The trick is to melt the tempered chocolate gently, so the temper isn’t destroyed. This method can’t be used for chocolate that is out of temper; been melted to an unknown temperature; or looks dull, spotted, or gray.

Use good chocolate, not chocolate chips or coating (which aren’t really chocolate). Don’t work in a hot room. Don’t let any moisture touch the chocolate. Don’t try to rush the process with extra heat, and DO chop the chocolate as finely as directed. Make sure that the inside of the bowl, the spatula, and the thermometer stem are clean and dry. Whenever you take the temperature of the chocolate or the water, wipe the stem clean and dry with a paper towel.

  • Cut 8 ounces of chocolate into pieces the size and shape of matchsticks, or chop it into small pebble-size pieces (you can also do this in batches in a food processor). Put the chocolate in the bowl and set the bowl in a roasting pan. Set the extra two ounces of chocolate chunks aside.
  • Pour hot tap water (120° to 130° F) into the roasting pan until it reaches just above the level of the chocolate in the bowl. Let sit for 5-6 min., or until the chocolate around the sides of the bowl begins to melt. Stir with a rubber spatula until the chocolate pieces are sticky and are begin to form together. There will be barely enough melted chocolate to accomplish this.
  • Remove the bowl of chocolate from the roasting pan, and replenish with hot tap water. Put the bowl back in the pan and let sit for 2-3 minutes. Begin stirring with the spatula, turning the sticky mass over and over. Keep stirring (it may take 5 minutes), spreading the chocolate against the sides of the warm bowl and scraping it off as it melts. Don’t replenish the hot water; it’s still warm enough.
  • When 3/4 of the chocolate is melted, check its temperature. If it is less than its maximum temperature of 90° F for dark chocolate (88° F for milk chocolate or white chocolate), continue to stir. Remove the bowl from the warm water as soon as the chocolate reaches the maximum temperature, even if it hasn’t melted entirely.
  • Wipe the outside of the bowl dry. Stir the chocolate for at least 30 seconds, to equalize the temperature and melt any remaining pieces. The chocolate is now melted and still in temper. Use it for dipping immediately.
  • If you accidentally exceed the maximum temperature, even by only a couple of degrees, the chocolate will probably be out of temper. Keep the bowl out of the roasting pan. Add the reserved chocolate chunks and stir until the temperature of the melted chocolate falls below the maximum (90° F for dark chocolate, 88° F for milk chocolate or white chocolate). The chunks will not be entirely melted, but the chocolate will be back in temper.
  • To test it, smear a dab of chocolate, 1/16-inch thick, on a small piece of wax paper and put it in a cool place in the room or in the refrigerator. If the smear begins to dry and set within 5 minutes in a cool place or 3 minutes in the refrigerator, it’s back in temper. Remove the chunks and refrigerate for 10 minutes, then reserve for reuse. Stir the chocolate thoroughly before dipping. If the smear still looks wet and shiny, continue to stir the chunks of chocolate in the bowl for 2 to 3 minutes more and test again. Repeat until the chocolate is in temper.
  • Stir the chocolate occasionally as you work with it. If it cools or thickens too much, set the bowl in a pan of water only 2 degrees warmer than the maximum temperature for the chocolate (see above), and stir until the chocolate is rewarmed.

Coat truffles:

  • Line another sheet pan with wax paper.
  • With your right hand (left if you are left-handed), fingers together and slightly cupped, scoop a large handful of melted chocolate into your left hand. Rub both hands together to coat them with a thick layer of chocolate. Try not to coat your fingers. Quickly pick up a frozen center with your left hand and roll it gently between your hands with a circular motion and as little pressure as possible, just long enough to cover it with a coating of chocolate. Add chocolate to your hands as necessary.
  • Set the truffles on the other prepared sheet and let harden.
  • Truffles keep at room temperature, in a well-sealed container, for one week.

Comments (3)      Email Email      Print Print

And the winner is…

Menu for Hope V logo

Thanks to everyone who donated to the fifth annual Menu for Hope campaign. We raised $62,000 to help feed children in Lesotho, Africa. That’s amazing, considering the economic climate.

The lucky winner of La Maison du Chocolat’s box of truffles is…Samantha Hanley. Samantha, come on down and claim your prize.

Comments (1)      Email Email      Print Print

Five More Days to Win La Maison du Chocolat!

The Menu for Hope campaign has been extended till Dec. 31! So far, we’ve raised $41,000 for the school lunch program in Lesotho. This is great, considering the state of the economy, but we still have a ways to go before matching last year’s $90,000. I know it’s difficult to give this year, but this is the time when people need help the most. You have the opportunity to make your donation go that much further!

If you’d like to win some of the best chocolates in the world from La Maison du Chocolat, bid on prize UE11.

Comments off      Email Email      Print Print

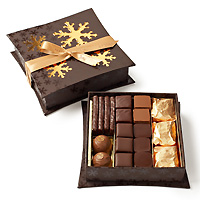
Menu for Hope V: Win La Maison Du Chocolat’s Shimmering Snowflake Coffret

Menu for Hope VLadies and gentlemen, start your bids. You can win some awesome prizes through the fifth annual Menu for Hope charity campaign. The premise is simple: for each $10 you donate, you’ll get one virtual raffle ticket toward the food-related prize of your choice. Last year, food bloggers from across the world raised more than $90,000 towards the UN World Food Programme‘s school lunch program in Lesotho, Africa.

This year, La Maison du Chocolat has graciously donated a shimmering snowflake coffret, filled with more than half a pound of chestnut, orange confit stick, dark ganache with banana, milk ganache with rosé Champagne, milk praliné feuilleté with hazelnuts and almonds, almond paste with citrus zest, and dark plain ganache confections. New York is the only place in the U.S. where you can buy these chocolates in person, but if you bid on prize UE11, you can get them at your door (provided you live in the U.S.). These are among the best chocolates in the world, and trust me, I’ve eaten a lot of other brands.

La Maison du Chocolat

If you don’t win, you can always make La Maison du Chocolat’s truffles at home, although it’ll never be as divine as the original. The company’s founder, Robert Linxe, sources his cream from an exclusive farm in France, and he married into the Valrhona family, so he works with a custom chocolate blend.

Also, my co-workers at Gourmet are giving away a copy of each month’s Cookbook Club selection for 2009. Every month, the magazine selects an extraordinary cookbook and features recipes, videos, and exclusive menus online. Past selections include The Art and Soul of Baking, A Platter of Figs and Other Recipes, and Vegetarian Cooking for Everyone. Sure, you can follow along online, but it’s even better if you get all the books sent to you for an entire year. Bid on prize UE16 if interested.

Here’s how to “play:”

  • Browse from the tempting list of prizes at Steamy Kitchen (prizes from the U.S. East Coast) and Chez Pim (worldwide).
  • Make a donation at First Giving.
  • Each $10 you donate will count towards one raffle ticket for a prize of your choice. Please specify which prize you’d like in the ‘Personal Message’ section in the donation form. You must write-in how many tickets per prize, and please use the prize code. For example, a donation of $50 can be 2 tickets for UE11 and 3 tickets for UE16. Please write, “2xUE11, 3xUE16.”
  • If your company matches your charity donation, please check the box and fill in the information so we can claim the corporate match.
  • Please allow us to see your e-mail address so that we can contact you if you win. Your e-mail address will not be shared with anyone.
  • Winners will be announced late Dec./early Jan. Good luck!

Comments (1)      Email Email      Print Print

Winter Spice Cookies

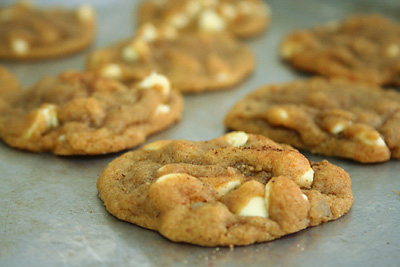
leckerli cookies

Happy Thanksgiving! After a three-month absense, I have returned. I must warn you, updates will be infrequent (if at all) until 2009 at least. I’m in an awkward housing situation with an even more awkward kitchen. Actually, I haven’t baked anything since my many moves, and I’m riding on recipes that I did long ago.

Any person who cooks with Nutella (spreadable chocolate) is a genius, and judging from Pierre Hermé’s Nutella tart, the man is a kitchen god. He is such a master of contrasting flavors and textures that his leckerli recipe called out to me, even though it contains no chocolate. The combination of citrus, cinnamon, pepper, cloves, ginger, and nutmeg is haunting—and novel. Unfortunately, the texture is what you’d expect from a no-fat-added cookie: chewy and borderline stale.

So I kept the flavors but contrasted them with creamy white chocolate in my chewy chocolate chip cookie recipe. If you’re craving warm, tingly spices this time of year but don’t want to resort to gingerbread, these cookies will turn heads.

Winter Spice Cookies

Makes 3 dozen cookies
Adapted from Pierre Hermé’s leckerli and my favorite chocolate chip cookie recipe

For an extra hit of flavor, these cookies are dusted with more spices when they’re hot out of the oven (a trick from Pure Dessert by Alice Medrich). I made these so long ago that I can’t quite remember the proportion of spices/honey. Apologies if something goes wrong. If you run into trouble, please leave a comment here, and I’ll see if I can backtrack.

1/4 tsp cinnamon
1/4 tsp freshly ground black pepper
pinch nutmeg
pinch ginger
pinch cloves
pinch freshly ground white pepper
3/4 c sugar
2 Tbsp honey
1 stick butter, at room temperature
1 egg
1 tsp vanilla extract
1 1/2 c unbleached all-purpose flour
1 tsp baking soda
1/2 tsp grated lemon zest
1/3 cup finely diced candied lemon and orange rind
1/4 c chopped toasted almonds, preferably blanched
1 c white chocolate chips (with real cocoa butter)

Preheat oven to 375° F.

In a small bowl, combine the cinnamon, white and black peppers, nutmeg, ginger, and cloves. Set aside.

In a large bowl, mix the sugar, honey, butter, egg, and vanilla.

In a separate medium bowl, stir together the flour, baking soda, and spice mixture, reserving a couple pinches for later. Add the flour mixture, lemon zest, candied citrus rind, almonds, and white chocolate to the wet ingredients. Drop by rounded teaspoons onto ungreased baking sheets.

Bake for 8-9 min, or JUST until the edges begin to brown.

While the cookies are still hot, sprinkle them with the reserved spice mixture.

Comments (6)      Email Email      Print Print

Still gone

In case you were wondering, I’m still between housing (and a kitchen and a personal computer). Sorry I haven’t been able to bake anything good!

Comments (3)      Email Email      Print Print

Out of the kitchen until further notice

It’s been a crazy couple weeks. Long story short, I’m searching for a new home. I’m bouncing around temporary housing and don’t have a personal computer or a well-stocked pantry. Until I find a place of my own, I’m taking a break. See you soon (I hope).

Comments (2)      Email Email      Print Print

You Say Tomato, I Say Cake

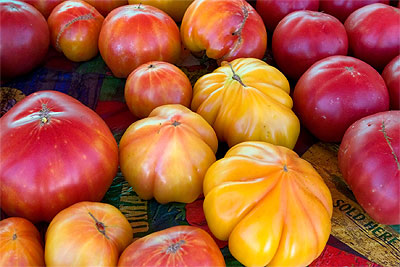
heirloom tomatoes
Photo: Clay Irving

The things people bake these days: cake with pork and beans and tomato soup! Scary ingredients, yes (why would you use canned soup when fresh tomatoes are falling off the vine?), but scary concept, no.

If you like carrot cake, fudgy brownies (with a secret ingredient), or zucchini bread, Carole Walter’s tomato cake isn’t far off. For the best results, use heirloom tomatoes. The uglier the better. You won’t taste the tomato, but instead you’ll get a moist “spice cake.” It is one of my favorite cakes, and it has relatively little butter. Sorry, no pictures. I made this a couple years ago.

Sugarsweet Tomato Nut Torte

From Great Cakes by Carole Walter

(Serves 8 to 10)

3/4 pound very ripe tomatoes
1 tablespoon cider vinegar
1 1/2 cups walnuts
1/3 cup (2/3 stick) unsalted butter
1/2 cup unbleached all-purpose flour, unsifted
1 cup sifted unbleached all-purpose flour
1 teaspoon baking soda
1/2 teaspoon salt
1 teaspoon ground cinnamon
1/2 teaspoon ground nutmeg
4 large eggs
1 1/4 cups dark brown sugar, lightly packed
2 teaspoons freshly grated navel orange rind (optional)
1 teaspoon vanilla extract

1. Cut an X in the skin on the bottom of each tomato. Remove the cores, place the tomatoes in a bowl and add boiling water to cover. Allow to stand for 1 minute, then rinse in cold water and peel off the skins. Cut each tomato in half across the core and squeeze gently to remove seeds and juice. Puree the pulp in a food processor. You should have about 1 cup of puree. Stir in the vinegar and set aside.

2. Position a rack in the lower third of the oven and preheat to 325 degrees. Butter a 9-inch springform pan and line the bottom with parchment paper.

3. Put walnuts and 1/2 cup unsifted flour in the container of the processor fitted with the steel blade and pulse 8 to 10 times, until nuts are chopped to medium size. Transfer to a bowl and set aside.

4. In a small pan, melt the butter over low heat. Set aside to cool to tepid. Sift together the 1 cup sifted flour, baking soda, salt, and spices in a triple sifter. Set aside.

5. Place the eggs in the large bowl of an electric mixer fitted with beaters or whip attachment. Beat on medium-high speed until thickened and light in color, about 1 1/2 to 2 minutes. Gradually add the brown sugar over 2 to 3 minutes and beat for 3 minutes longer. The mixture will be very thick.

6. Reduce mixer speed to medium-low. Blend in the orange rind and vanilla. Add the flour mixture alternately with the tomato puree, dividing the dry ingredients into 3 parts and the puree into 2 parts, starting and ending with the flour. Scrape sides of bowl as needed. The batter will be very loose.

7. Quickly pour in the butter, then add the nuts, beating just until blended.

8. IMMEDIATELY pour the batter into the prepared pan. Center the pan on the rack and bake in the preheated oven 55 to 60 minutes, until cake is golden brown, springy to the touch, and the sides, begin to come away from the pan. A toothpick inserted into the center should come out dry.

9. Remove from oven and set the pan on a cake rack to cool completely. Release the outer rim of pan, invert the cake onto the rack, and peel off the parchment paper. Place top side up on a serving platter. Just before serving, dust the top with confectioners’ sugar. If you like, split the cake into two layers with a long thin knife, then fill and frost with whipped cream made with 1 1/2 cups heavy sweet cream. Garnish with chopped walnuts.

Comments (6)      Email Email      Print Print